Animation Pipeline Tutorial
This tutorial covers building a simplified, yet typical, pipeline for animation or visual effects production. By following this tutorial you will build a pipeline that provides all of the pieces necessary to push Assets from modeling through look development, and then into and through a production scene.
Much of the workflows covered in this pipeline work out-of-the-box with ShotGrid’s built-in integrations. For the portions of the pipeline where studios are more often building custom solutions the tutorial will walk you through the process of customizing the artists workflow using the Toolkit platform.
Here is a high level view of the pipeline you will build in this tutorial:
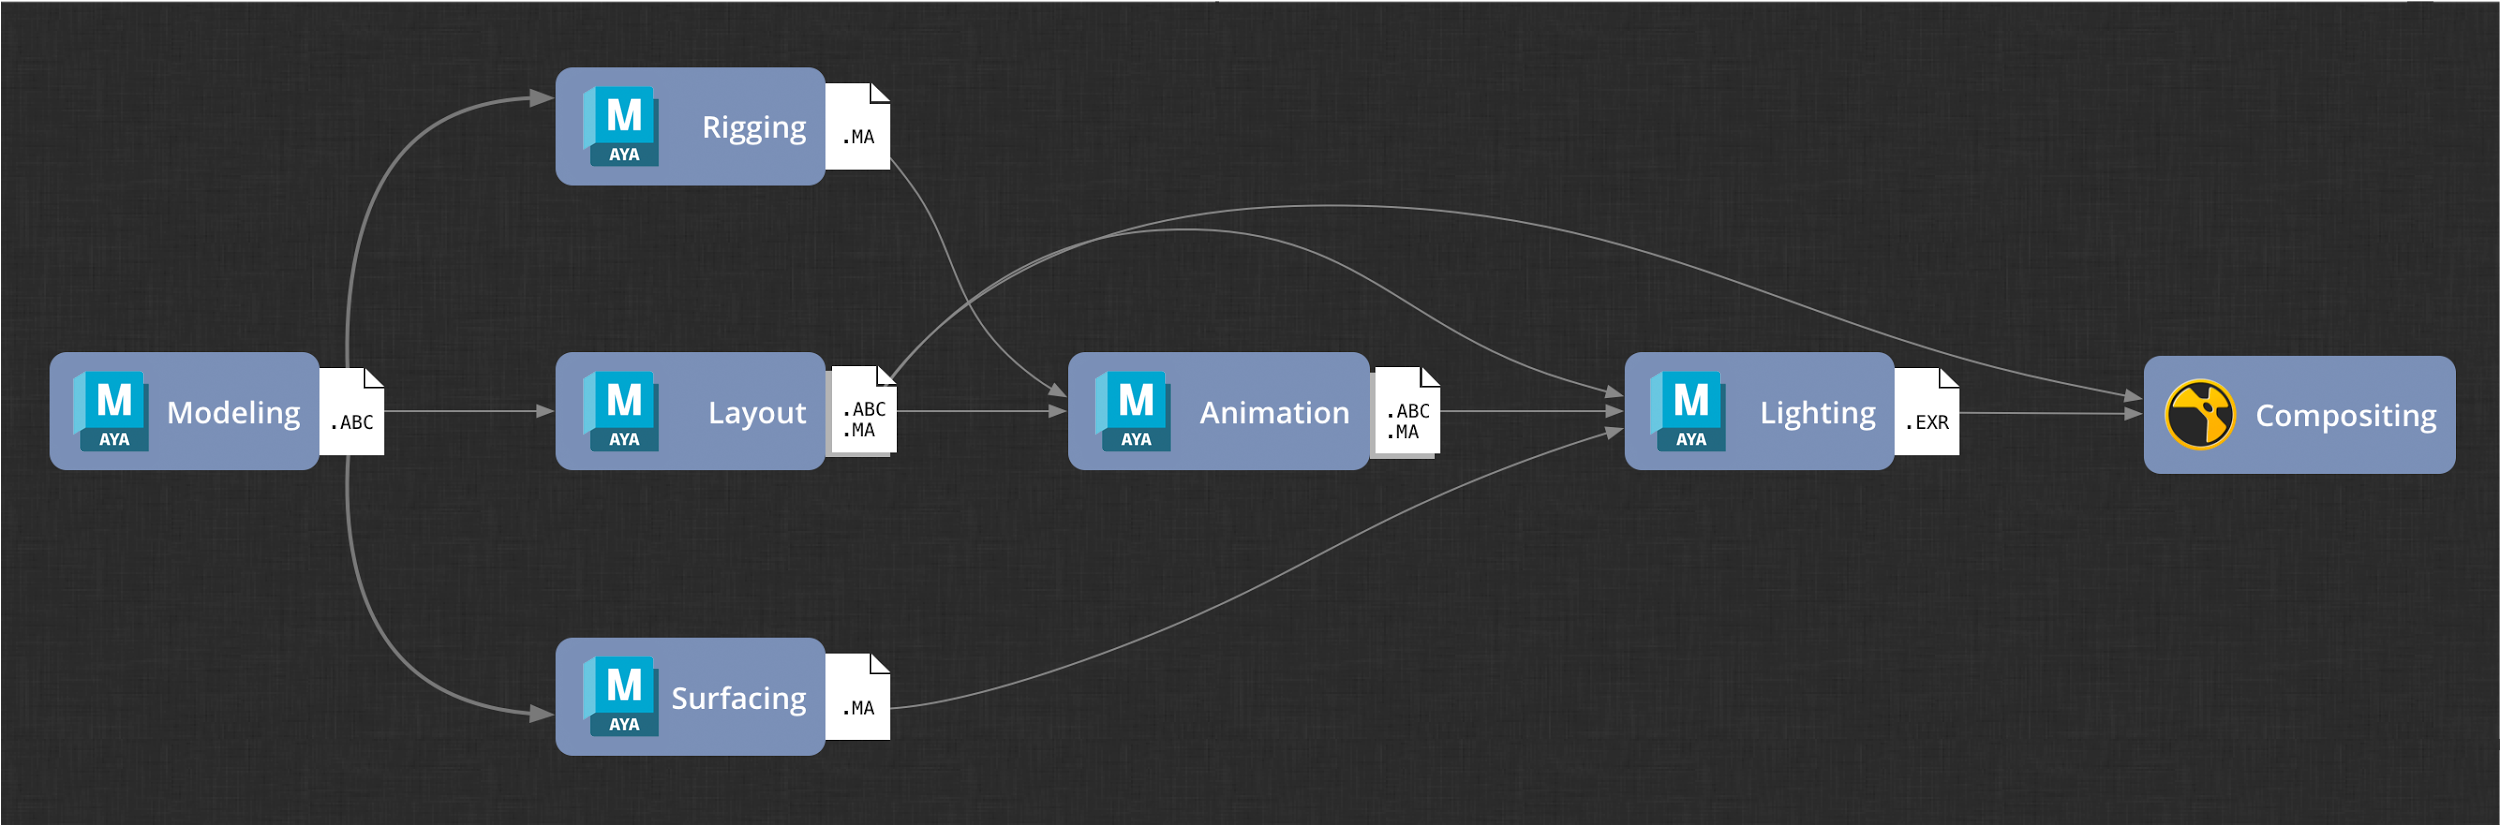
Pipeline Overview
For simplicity, the digital content creation (DCC) software used will be kept to a minimum and limited to Maya and Nuke. Also for the sake of simplicity, data passed between pipeline steps will be limited to Maya ascii files, Alembic caches, and rendered image sequences.
Note : The simple pipeline outlined in this tutorial has not been tested on production and should only be used as an example of how a ShotGrid-based pipeline could be built.
Prerequisites
-
A working ShotGrid Project - This tutorial assumes you have experience using ShotGrid for tracking and managing production data.
-
Understanding of ShotGrid Integrations - ShotGrid ships with integrations that provide some simple production workflows without requiring any manual configuration. You should understand the features and scope of these workflows before diving into the manual configuration and customizations outlined in this tutorial. More information about ShotGrid Integrations can be found here.
-
Maya & Nuke Experience - This tutorial is designed to build a simple pipeline using Maya and Nuke. You should have a basic understanding of these packages in order to customize the integrations provided by ShotGrid.
-
Working knowledge of Python - The tutorial requires modifying the functionality of ShotGrid integrations via “hooks” that are written in Python.
-
Familiarity with YAML - Much of the configuration of the pipeline you will be building is handled by modifying YAML files.
Additional Resources
Project Creation & Setup
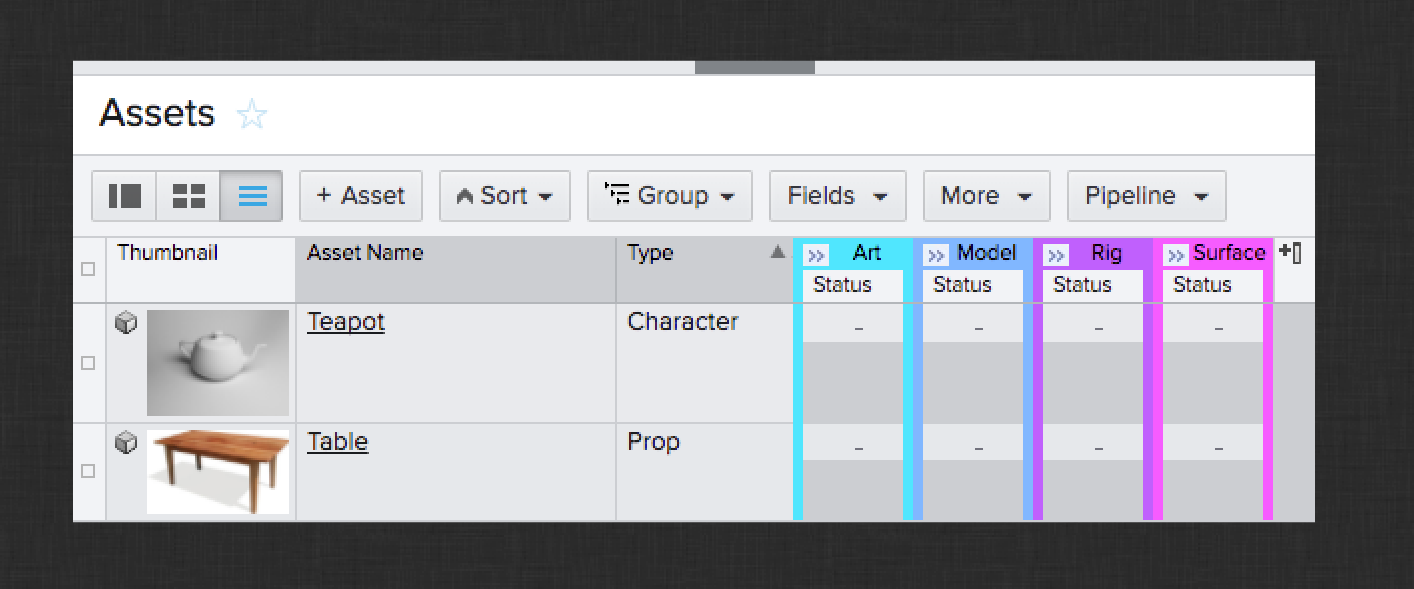
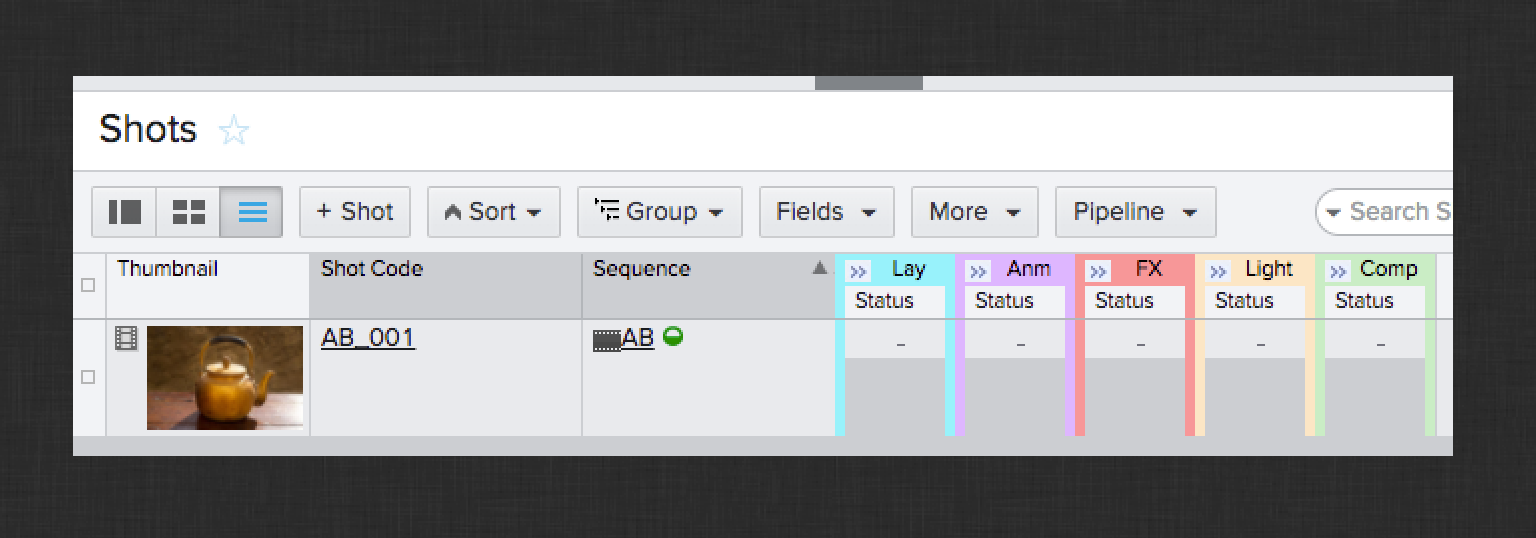
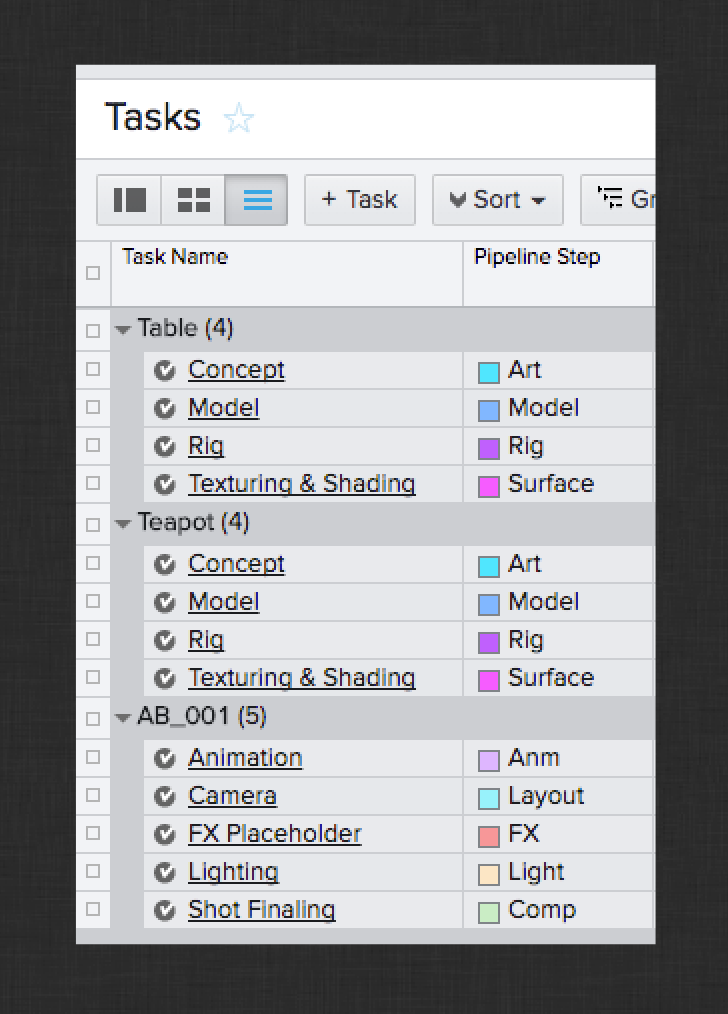
For this Tutorial, you will need to create a new project in ShotGrid and configure it as if you were preparing for production to begin. This includes ensuring all of the necessary ShotGrid entities are in place and linked up properly. For this tutorial, the Asset, Sequence, Shot, and Task entities are required and should be available by default in a new project. You will create:
-
Two Assets:
-
Teapot character
-
Table prop
-
-
One Sequence
-
One Shot linked to the Sequence you created
-
A Task per pipeline step
Here are some screenshots of what your configured project entities should look like in ShotGrid:
Software Launchers
Next, you’ll need to ensure that Maya and Nuke are available to launch in ShotGrid Desktop. In Desktop, make sure that each of these packages can be launched by clicking on their icon. Be sure that the proper version of each package is launched.
If either application does not show up in Desktop or the expected version does not launch, you may need to manually configure the launch in ShotGrid via the Software entity.
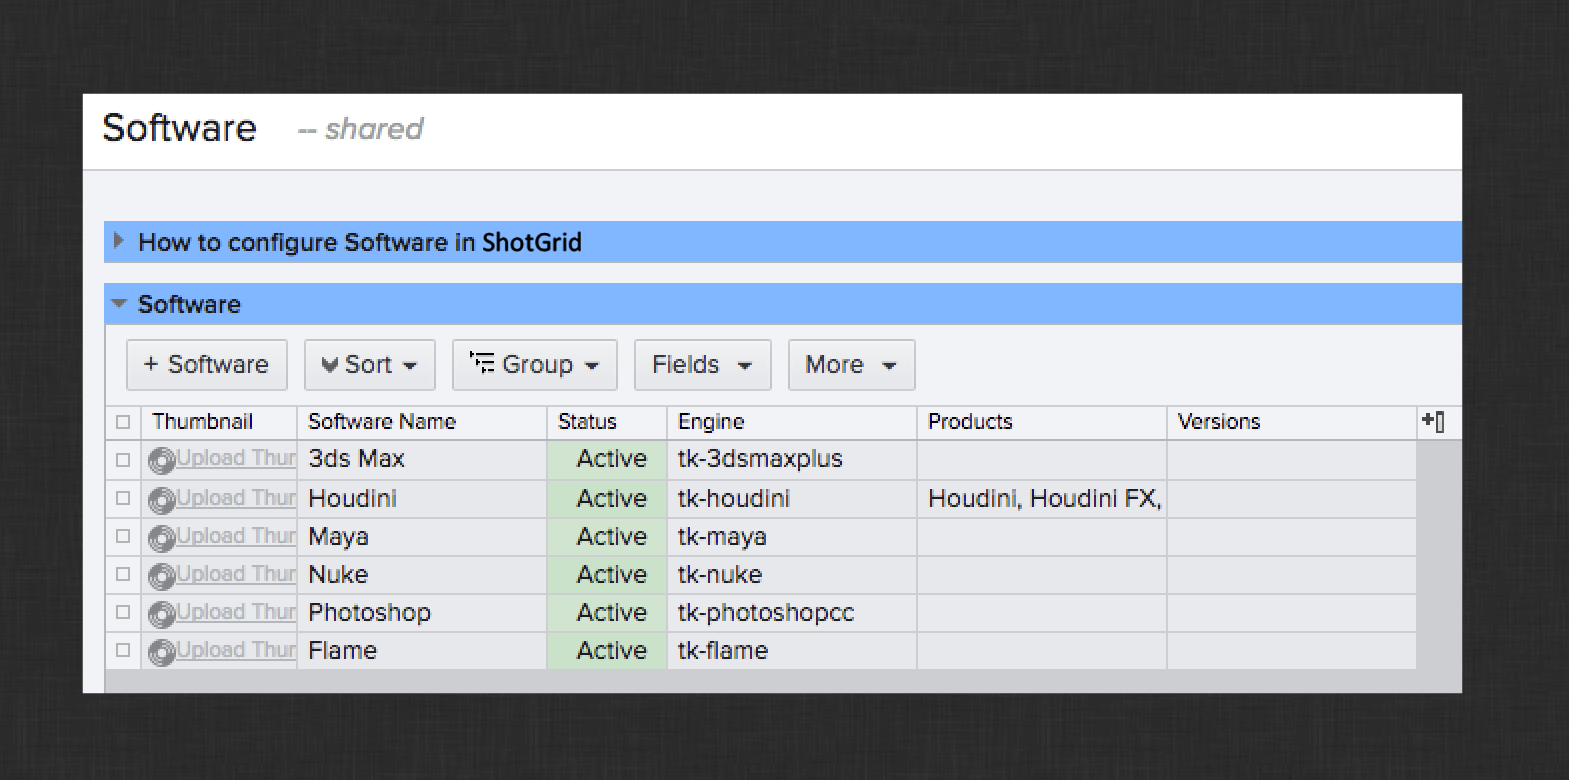
The Software entity is used to drive which DCC packages to use on your production. By default, the integrations will search for these packages in standard installation locations and make them launchable via Desktop. If you have more than one version installed or you have them installed in a non-standard location, it is possible you need to update the corresponding Software entity entry in ShotGrid to curate the launch experience for your artists.
For complete details on the Software entity and how to properly configure it, please see the Integrations Admin Guide. Once you have your DCCs launching the way you expect, you can continue to the next section.
Configuration
The configuration (config) defines the artist workflow for your project. This includes specifying which ShotGrid integrations to include within the DCCs your artists are launching, how your project’s folder structure is defined, and the naming conventions for files and folders created as artists share data.
By default, all new projects are configured to use the basic ShotGrid Integrations which provide a basic workflow for sharing files between artists using many off-the-shelf software packages. The following sections outline how to take over your project’s pipeline configuration (config) and customize it for your studio.
Taking Over the Project Config
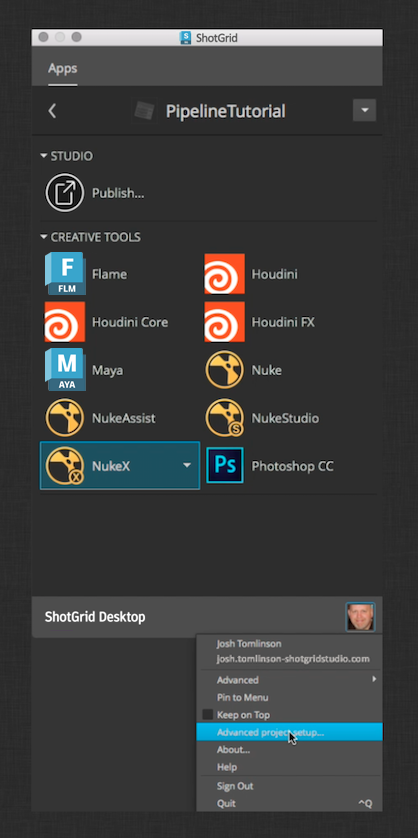
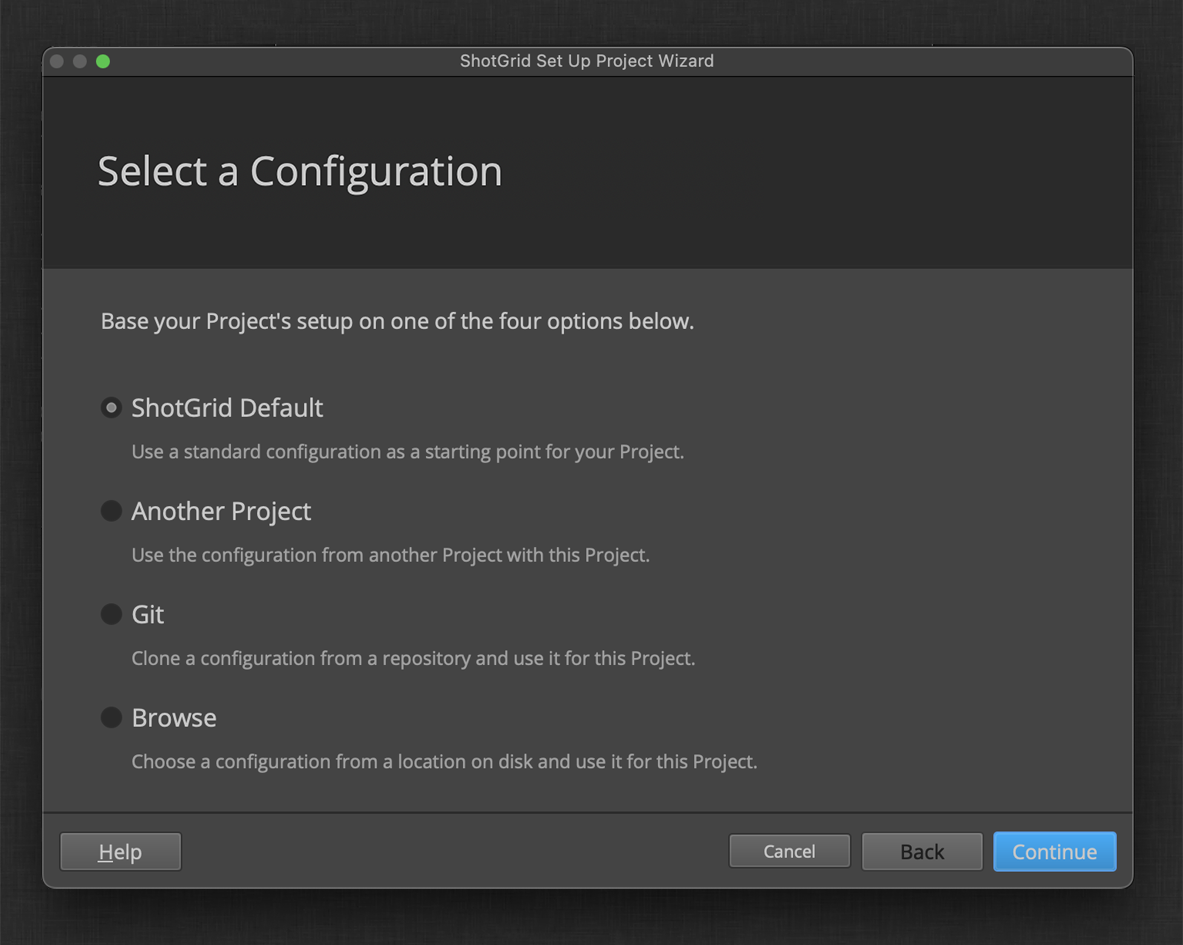
Use ShotGrid Desktop (Desktop) to take over your project’s configuration. RMB click within Desktop or click the user icon in the bottom right to show the popup menu. Select the Advanced project setup… option and follow the wizard to locally install your project configuration. The images below show the required steps. You can also follow the steps outlined in the Integrations Admin Guide for Taking over a Pipeline Configuration.
If this is your first time setting up a ShotGrid project, you’ll also be prompted to define a storage location for your project data. Otherwise, you can select an existing storage location.
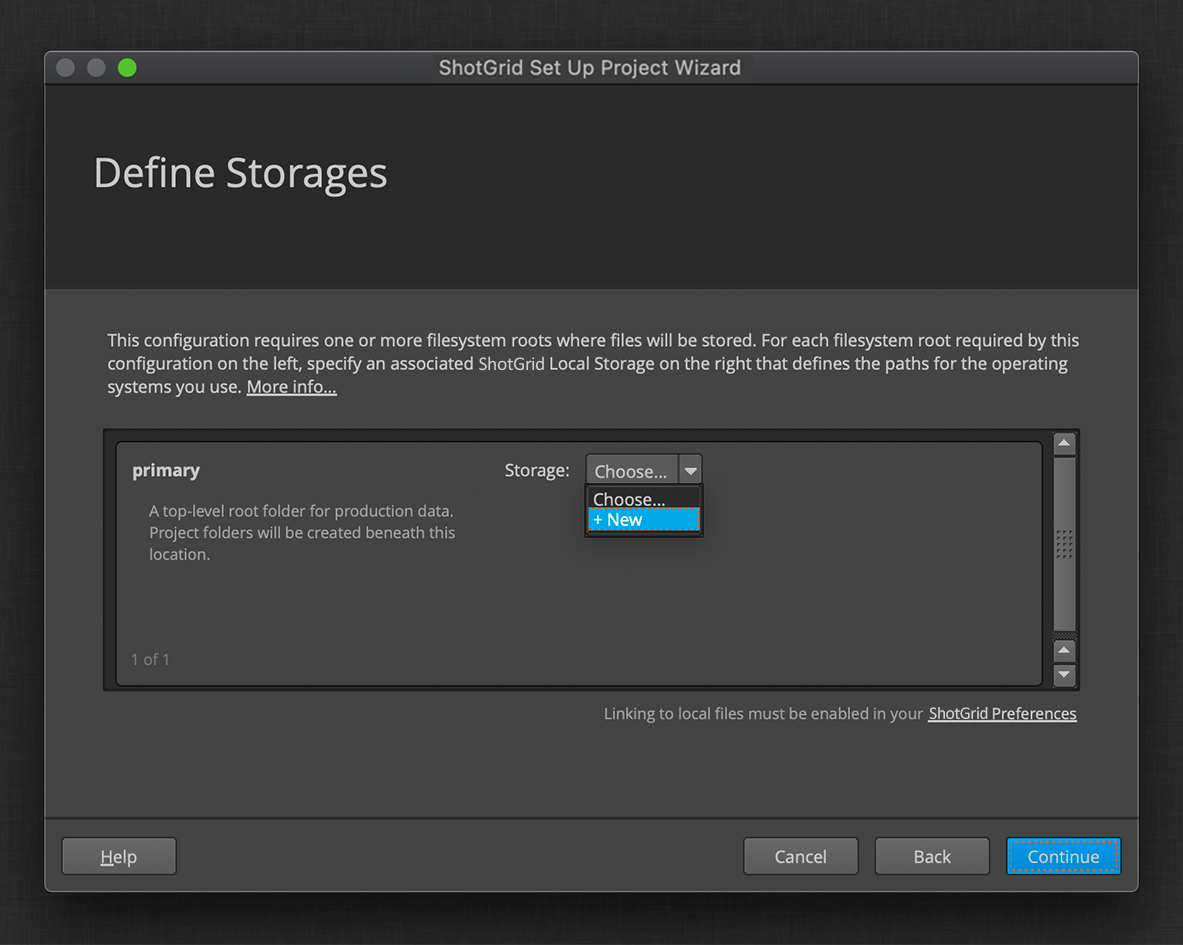
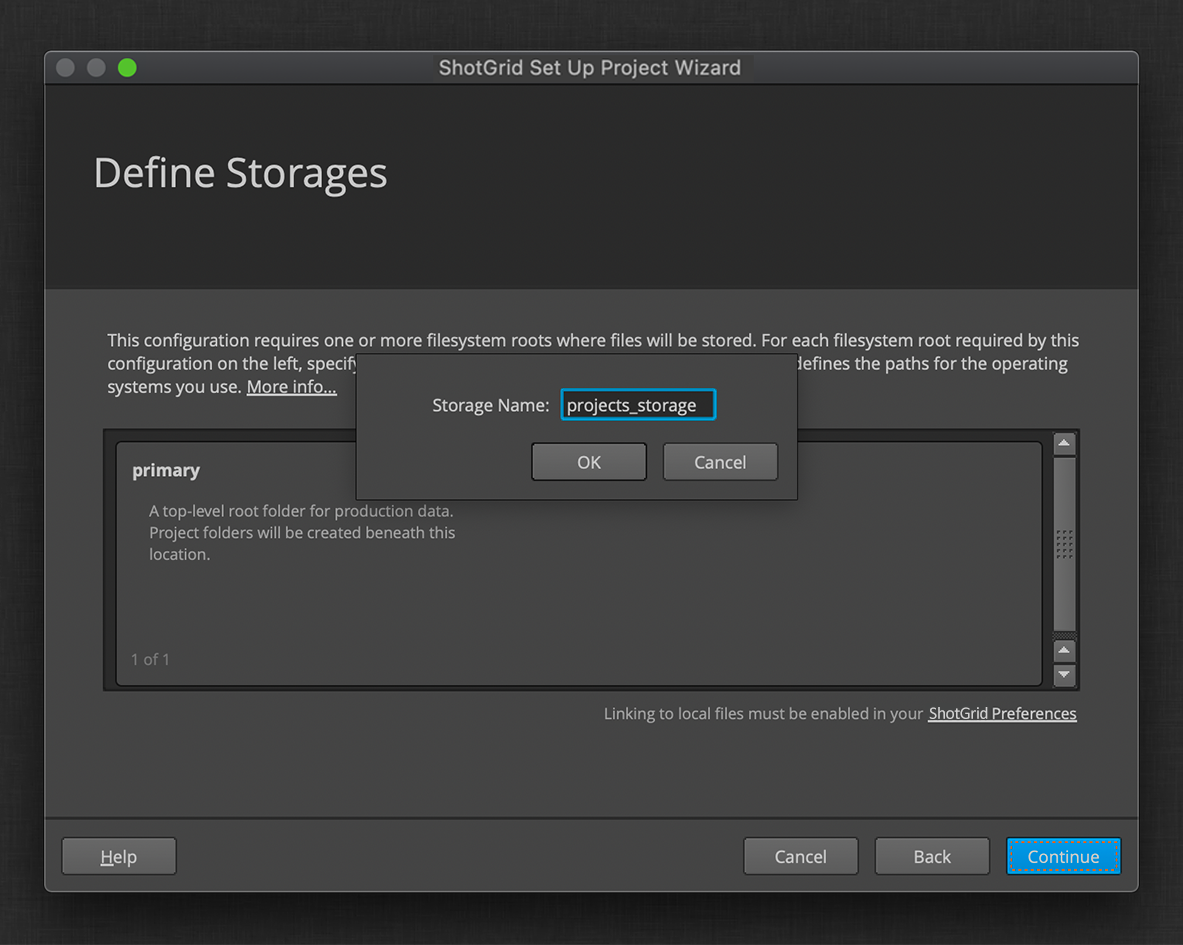
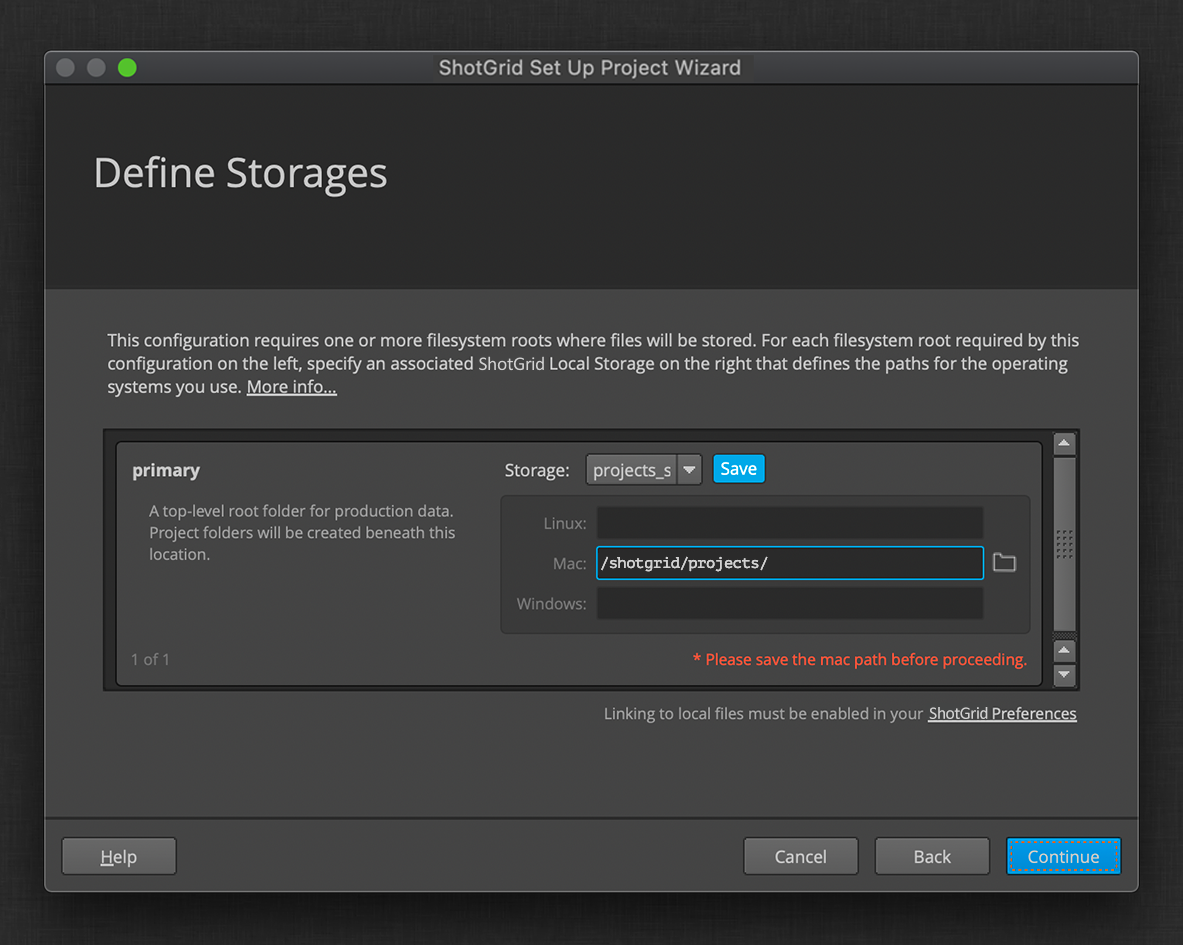
You can view and edit the storages for your ShotGrid site in your Site Preferences, under the File Management section. You can learn more about these settings here.
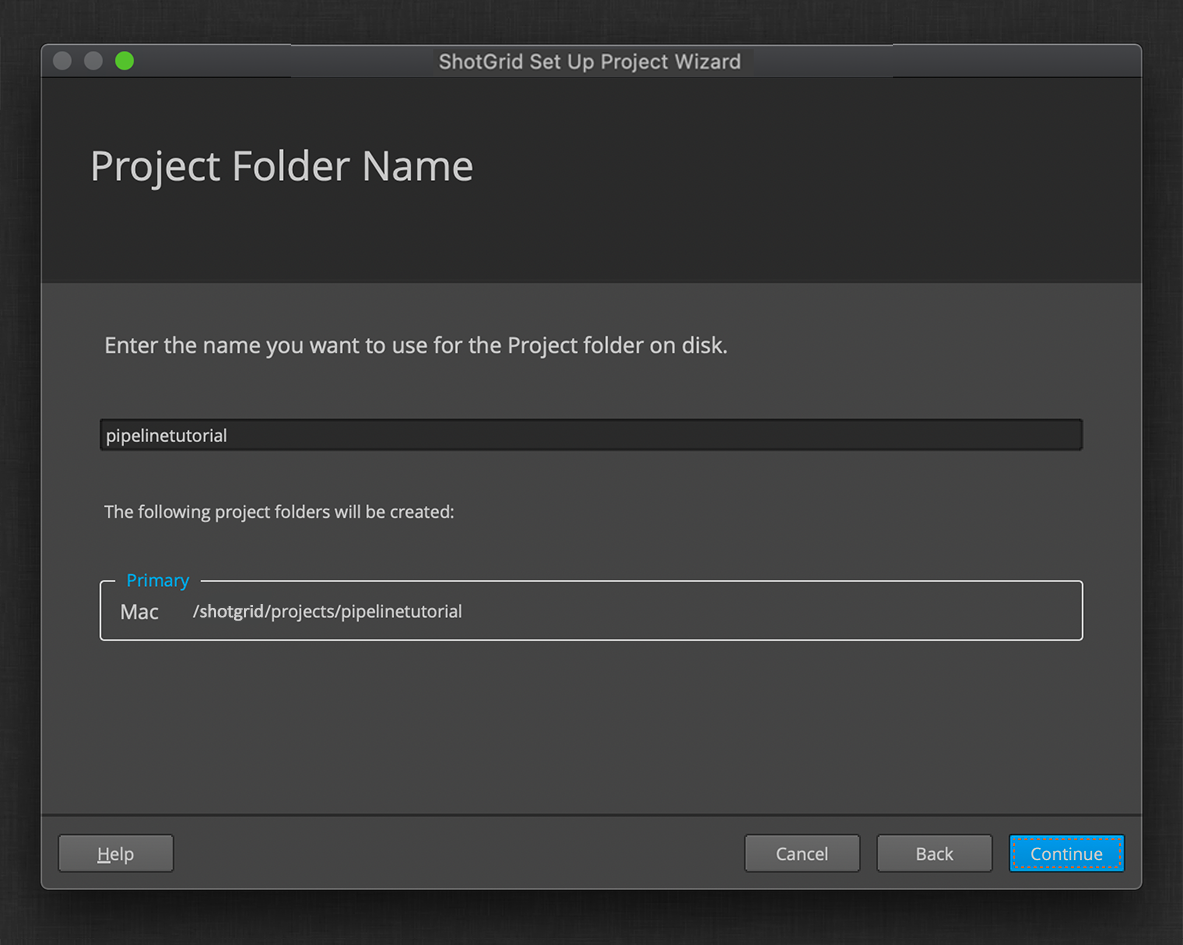
Now that you have a storage location selected, you’ll choose the name of the directory in that location for your new project.
For this tutorial, we’ll be using a centralized configuration. The Distributed Setup option provides an alternate option that can provide a different set of benefits, and may be the preferred option for studios without fast shared storage. You can learn more about the pro and cons of different configuration setups in the Toolkit Administration presentation.
Unlike the storages, which are site-wide, the configuration will be project specific, and so the directory you choose here will be used directly to store your configuration.
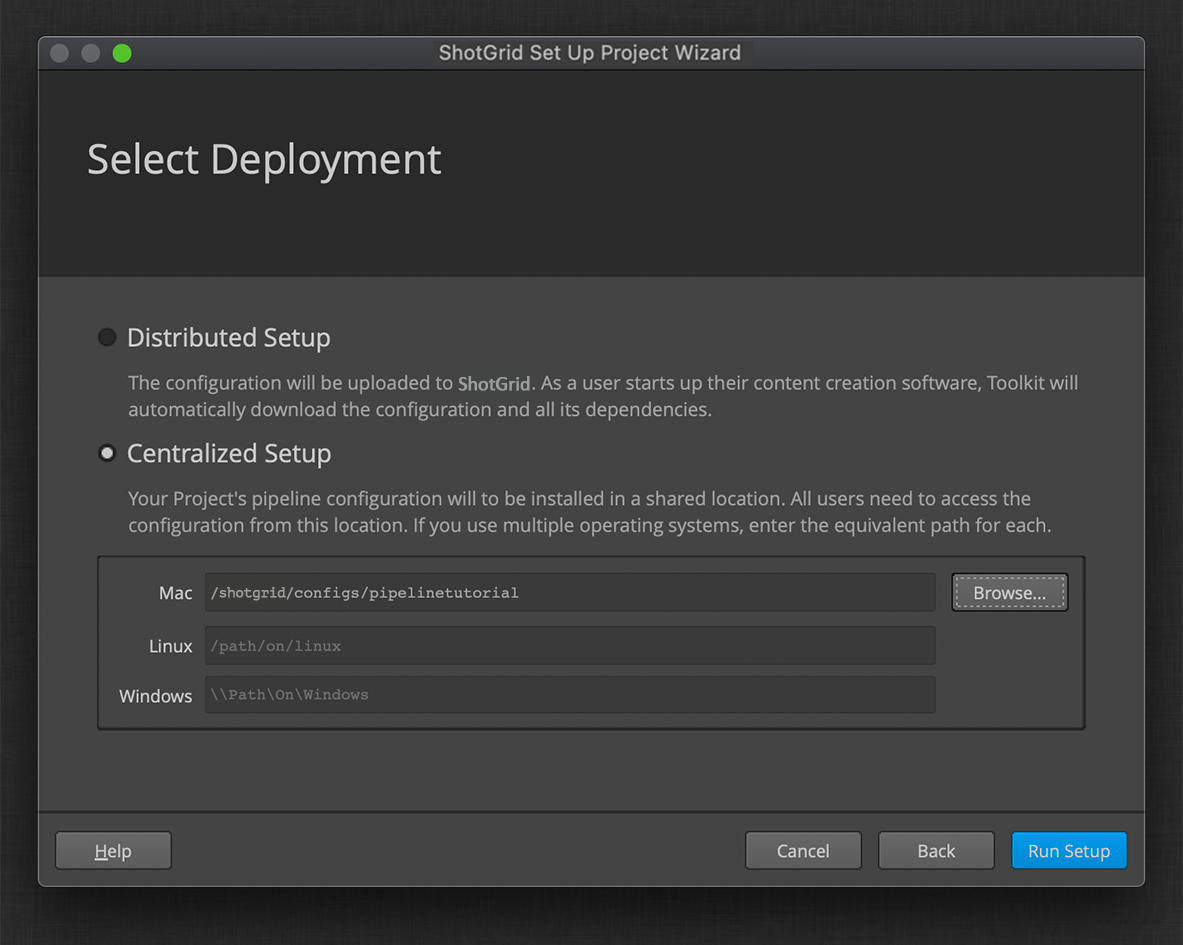
The folder you select on the screen above is where your configuration will be installed. You will explore and modify the contents of the configuration in this folder throughout this tutorial.
When you click Run Setup on the above screen, Desktop will begin to download and install all of the required components of your configuration. The installation process could take several minutes to complete. Once complete, you will have a local copy of the entire project configuration that you will modify in the following steps.
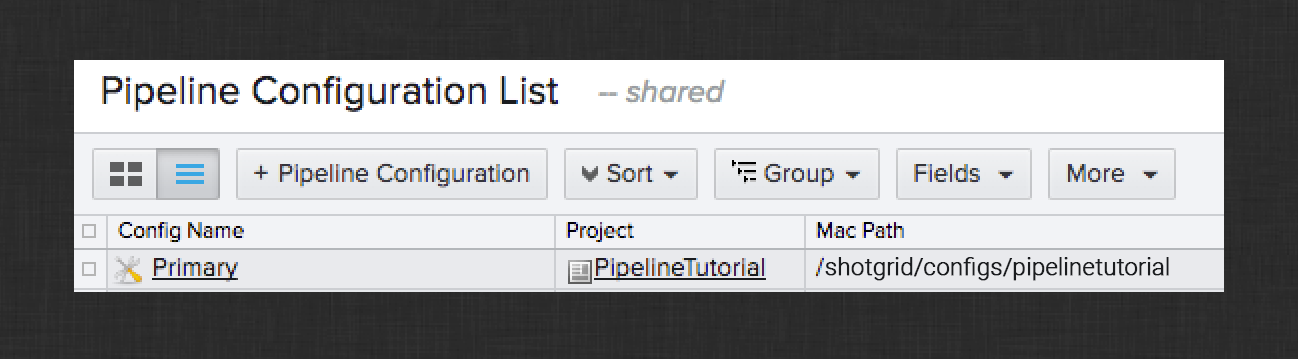
The configuration location you specified during the Desktop installation tutorial is recorded in ShotGrid in the Pipeline Configurations page for your project.
Familiarize yourself with the contents of this folder in preparation for the next section.
Config Organization
Before beginning the process of building your simple pipeline, you need to understand how the pipeline configurations are organized and how they work. The following graphic highlights the major components of the configuration and their purposes. For additional information about configurations and their administration, see the Administering Toolkit article.
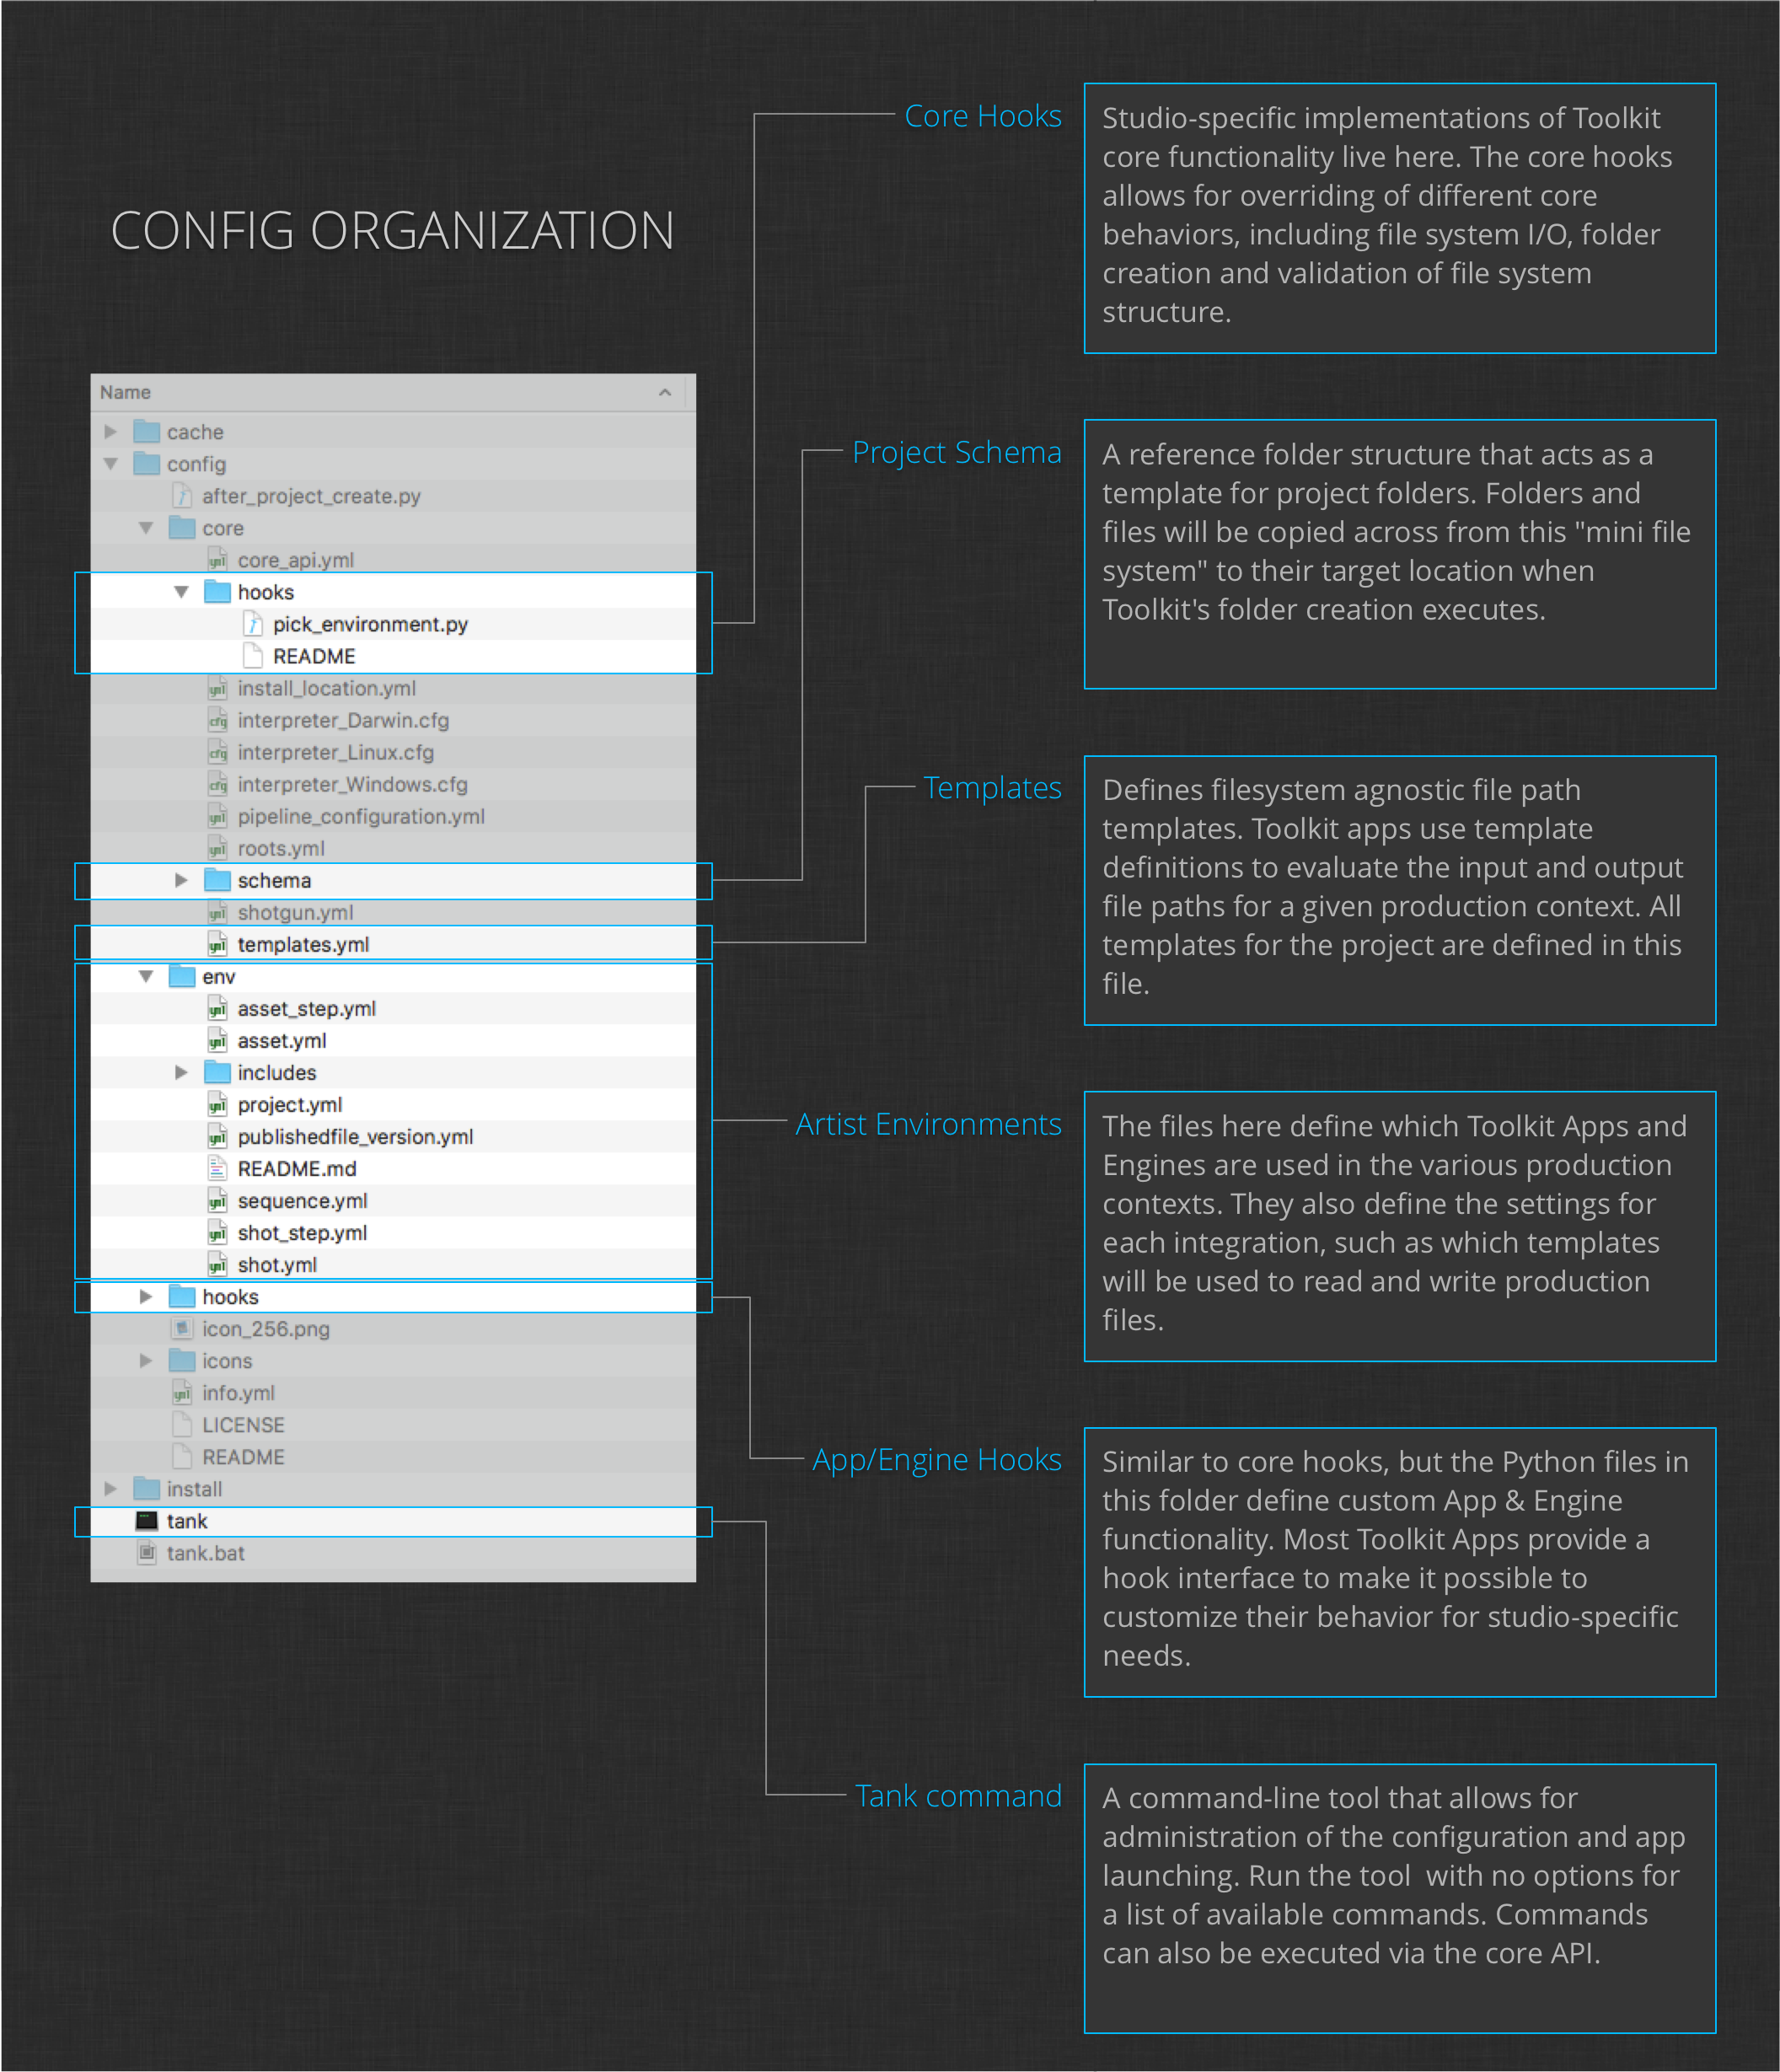
Project Schema
The simple pipeline you will build in this tutorial uses the project schema provided by the Default configuration. You can browse the config/core/schema folder to get a feel for the structure that will be created as Toolkit Apps write files to disk. For additional information about configuring the project directory structure, see the File System Configuration Reference documentation.
Templates
This tutorial also uses the templates defined in the Default pipeline configuration. You can open the config/core/templates.yml file to get a peek at the templates that are used by the apps to map input and output files to paths on disk. For more information about the templating system, see the File System Configuration Reference documentation.
Hooks
Much of this tutorial will involve modifying App hooks in order to customize the artist workflows. Before diving into that customization, you should have a basic understanding of what hooks are, how they work, and where they live. Read through the Hooks section of the Administration documentation.
As you progress through the tutorial, you will be asked to “take over” a hook defined by one of the Toolkit Apps. The process of taking over an app hook is straightforward. Each time you’re asked to do so, simply follow these steps:
-
Locate the app containing the hook you want to override in your configuration’s install folder. Find the
hookssubdirectory for that app and locate the hook file you want to override. -
Copy the hook (renaming it if necessary) into your configuration’s top-level
hooksdirectory.

Once the file is in your configuration’s hooks folder, you will be ready to make changes and customize the code. An additional step is required to point the corresponding App to this new location. You will see how to do this later in the tutorial.
Building the Pipeline
At this point you should be ready to begin building a pipeline. You have a project set up in ShotGrid, you can launch Maya & Nuke via Desktop, and you’ve taken control of the project’s configuration. You also have a basic understanding of the structure of the config and are ready to begin fleshing out the artist workflow.
The following sections will walk through each step of the pipeline, highlighting the features that are available out-of-the-box and walking you through the process of customizing the ShotGrid integrations. By the end of these sections, you will have a simple, fully functional, end-to-end production pipeline. You will also get a feel for the steps artists will take as they work on production.
Note
: All code and configuration for this tutorial can be found on the pipeline_tutorial branch of the tk-config-default2 repository. Feel free to use this branch if you need hints as to where files should live, where code should be added, etc.
Modeling Workflow
The first step in the simple pipeline is Modeling. In this section you will create the first iteration of the Teapot Asset in your project. You will save it to disk in your project’s folder structure and then publish it.
First, launch Maya from ShotGrid Desktop.
Once Maya has full loaded, you will see the File Open Dialog appear. This dialog allows you to browse existing Maya files within the project. It also allows you to create new files that the ShotGrid integrations will be aware of.
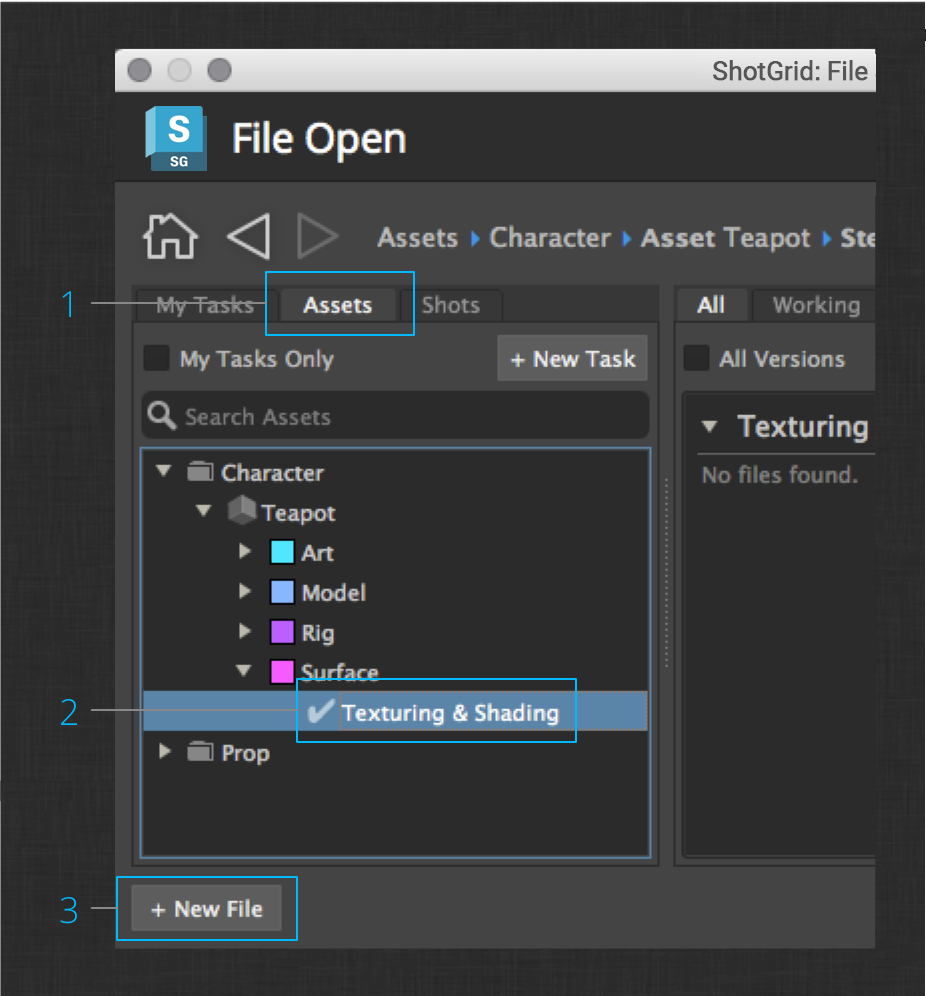
Select the Assets tab and drill down into the Teapot’s modeling task. Since there are no artist work files for this task yet, click the + New File button.
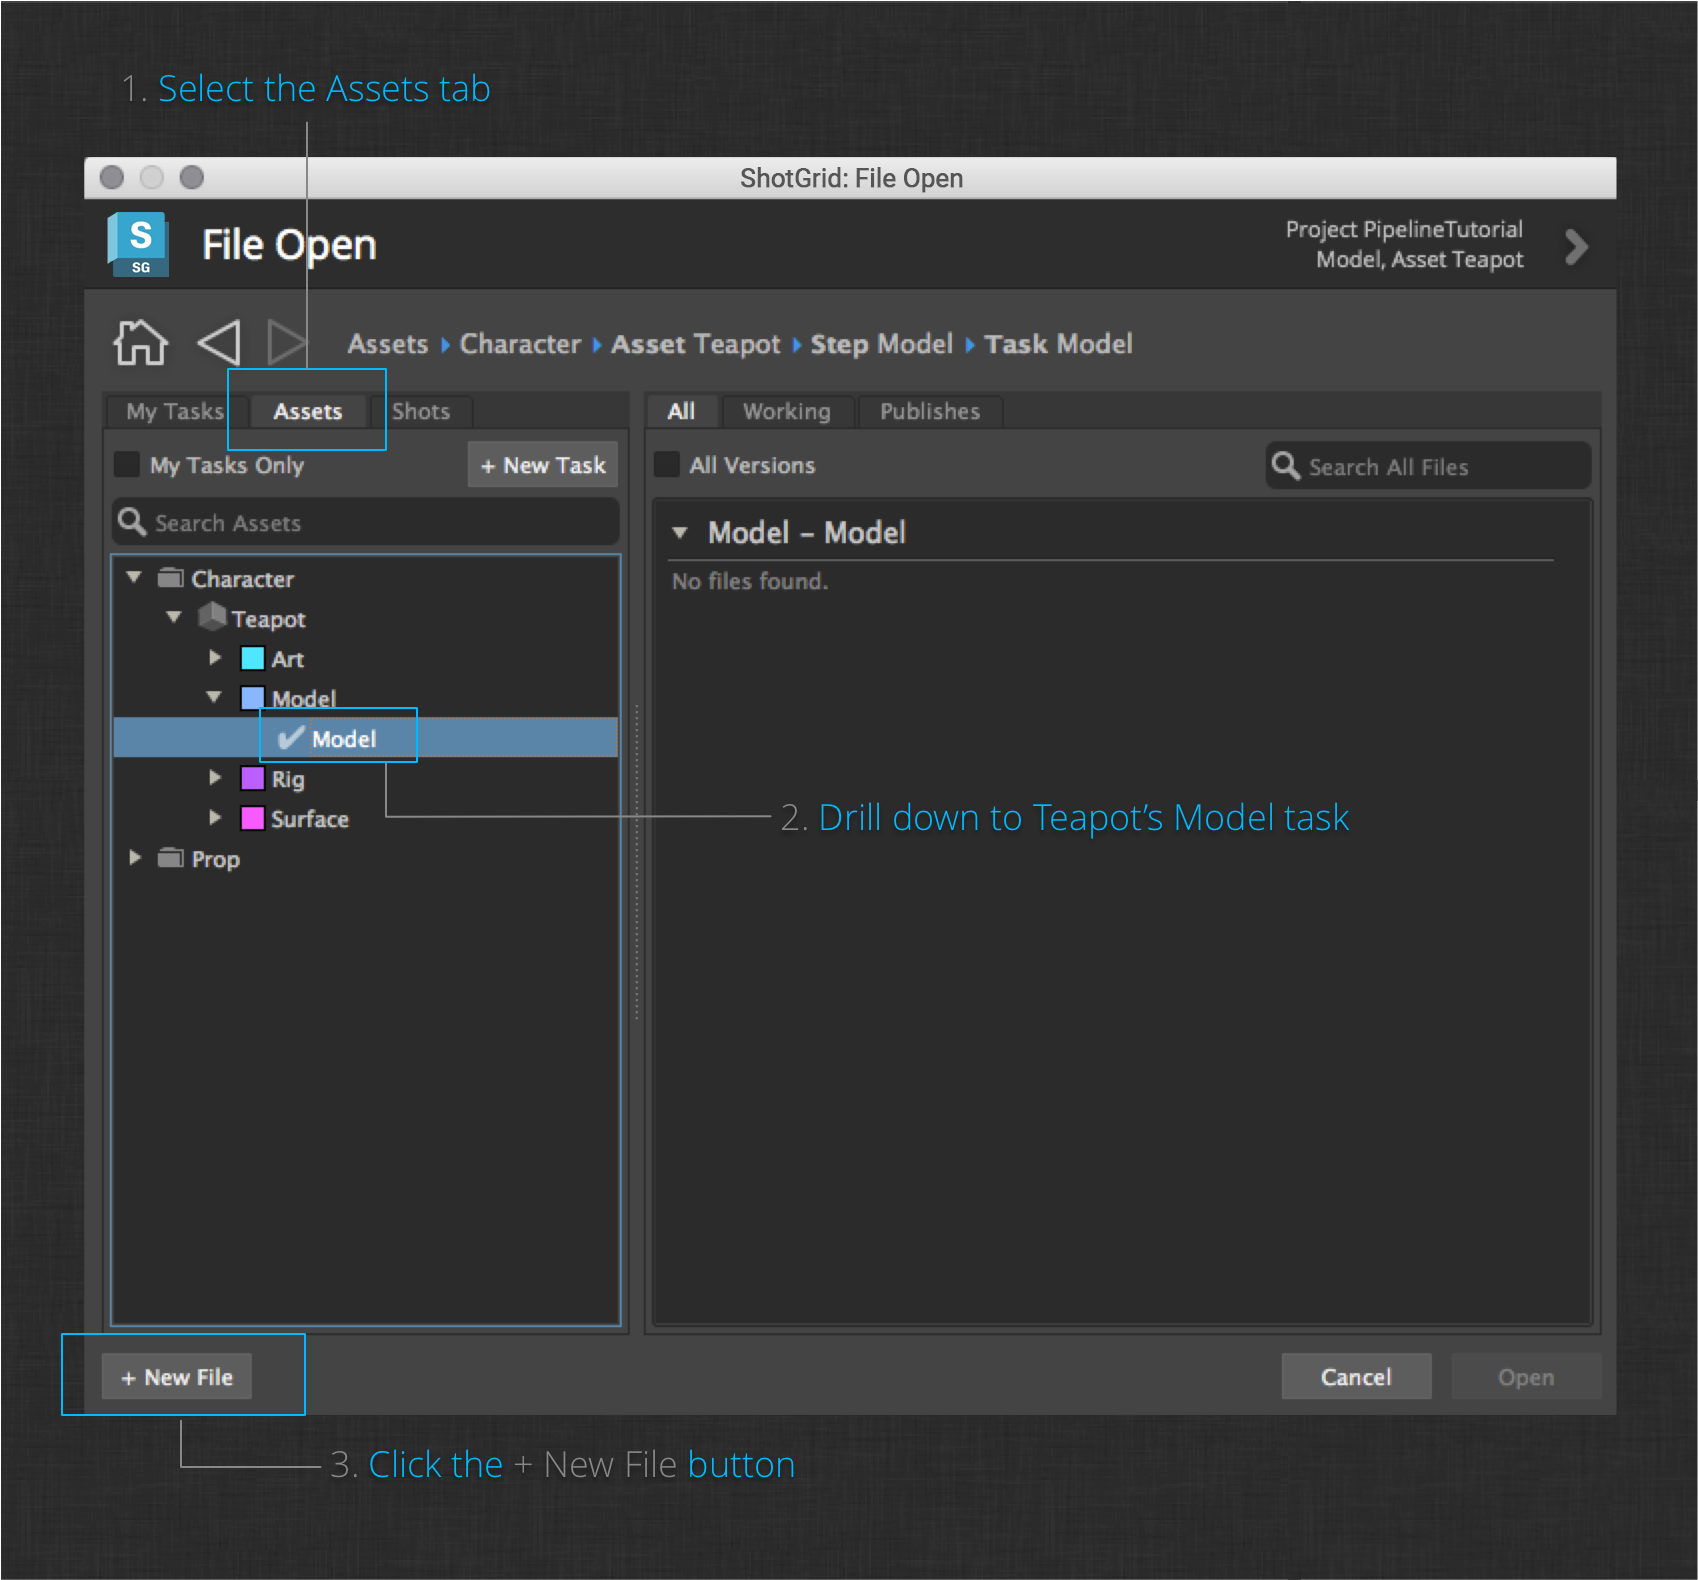
Clicking this button will create a new, empty Maya session and set your current working context to the Teapot Asset’s Model task.
Note : At any time during this tutorial you can launch the ShotGrid Panel via the ShotGrid menu in Maya or Nuke. This panel provides a view into your project data without leaving your DCC. It will show you your current working context and any recent activity within that context. You can also add notes for feedback directly into the panel. See the ShotGrid Panel documentation for more info.
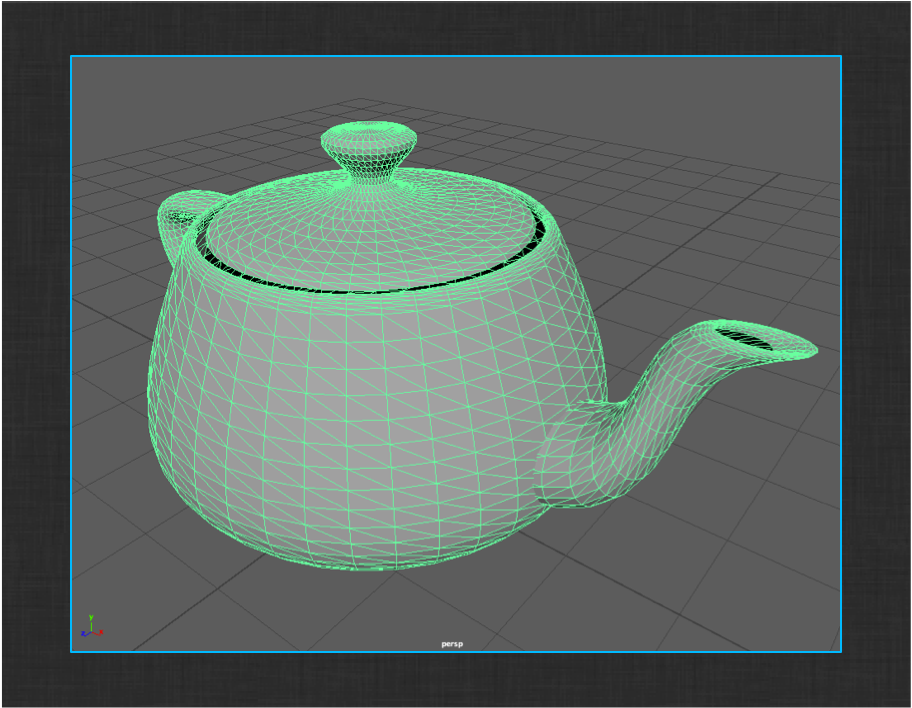
Next, model a Teapot, or download and import the provided Teapot.
When you’re happy with your Teapot model, select the ShotGrid > File Save… menu action. This dialog will prompt you to save the file to a given name, version, and type.
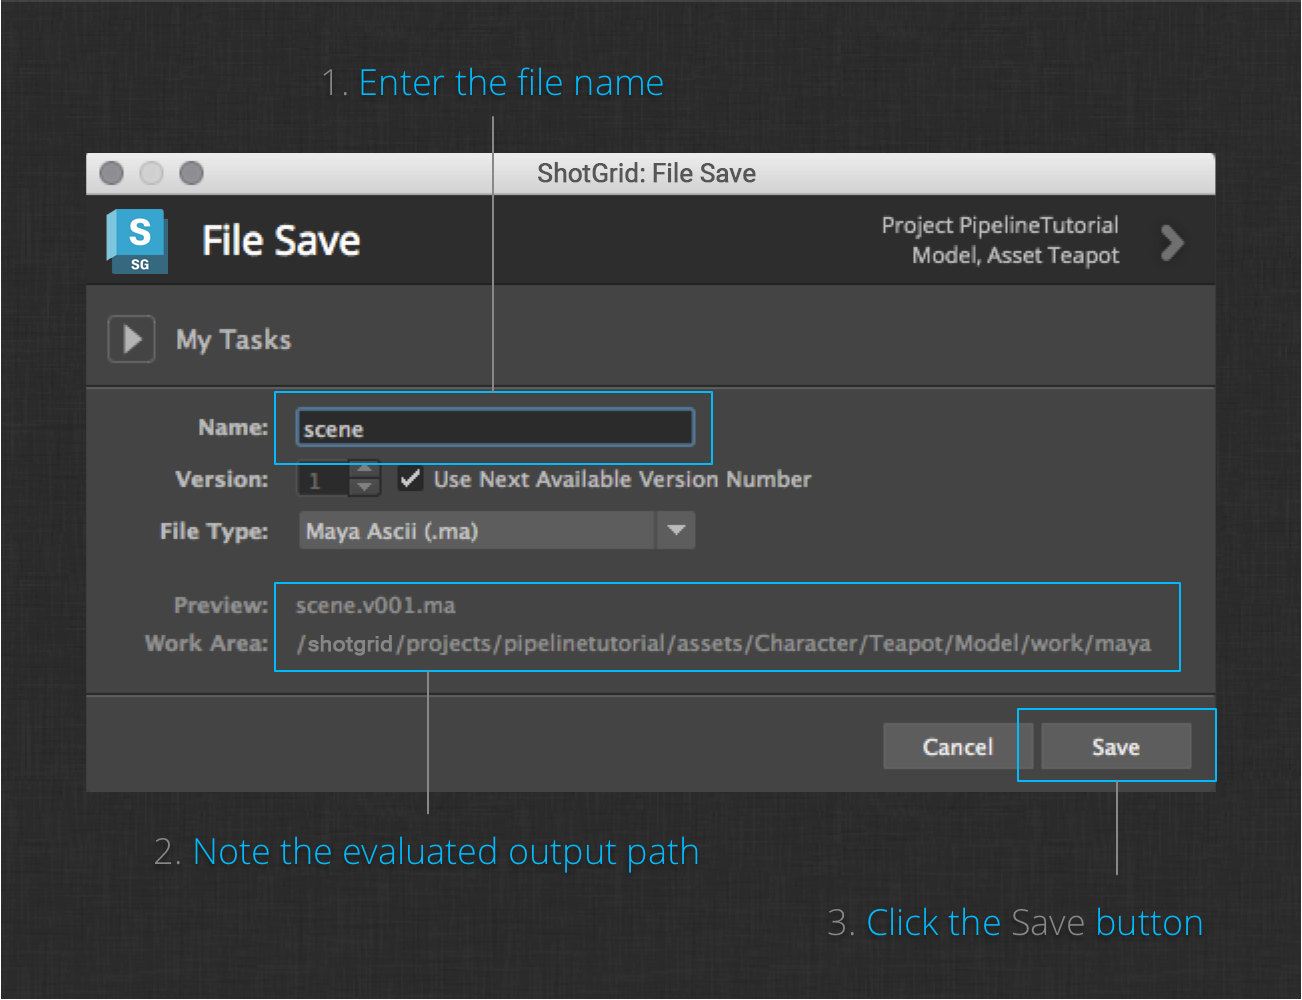
Notice how the dialog does not ask you to specify the full save path. This is because the App has been configured to save to the maya_asset_work template. This template is defined like this by default:
@asset_root/work/maya/{name}.v{version}.{maya_extension}
The tokenized fields, {name}, {version}, and {maya_extension} are all the app needs to populate the full path. The @asset_root portion of the template is defined as:
assets/{sg_asset_type}/{Asset}/{Step}
The tokenized fields here can be automatically inferred by the Toolkit platform, given the current working context that you set when you created the new file above.
Also notice the preview of the file name and path to be written at the bottom of the dialog. Note the primary storage and project folder you defined while taking over the project configuration make up the root of the template path.
Click the Save button to save the teapot model.
An important thing to note at this point is that the steps you just completed will be the same steps artists take when opening and saving workfiles throughout the pipeline. The File Open and File Save dialogs are part of Workfiles App. This “multi” app runs in all of the DCCs supported by the ShotGrid integrations and provides a consistent workflow for all artists.
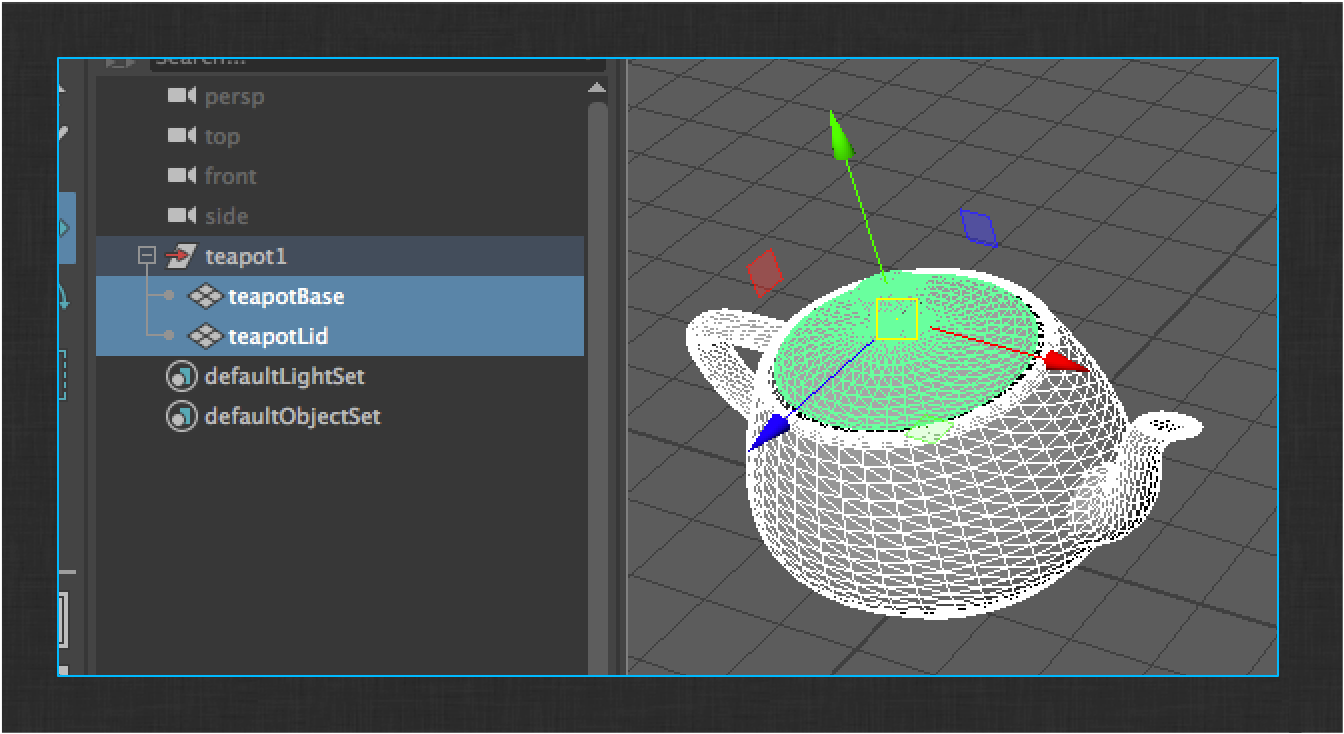
The next step is to make some changes to your teapot. Make sure the lid geometry is separate from the rest of the model so that it can be rigged later on.
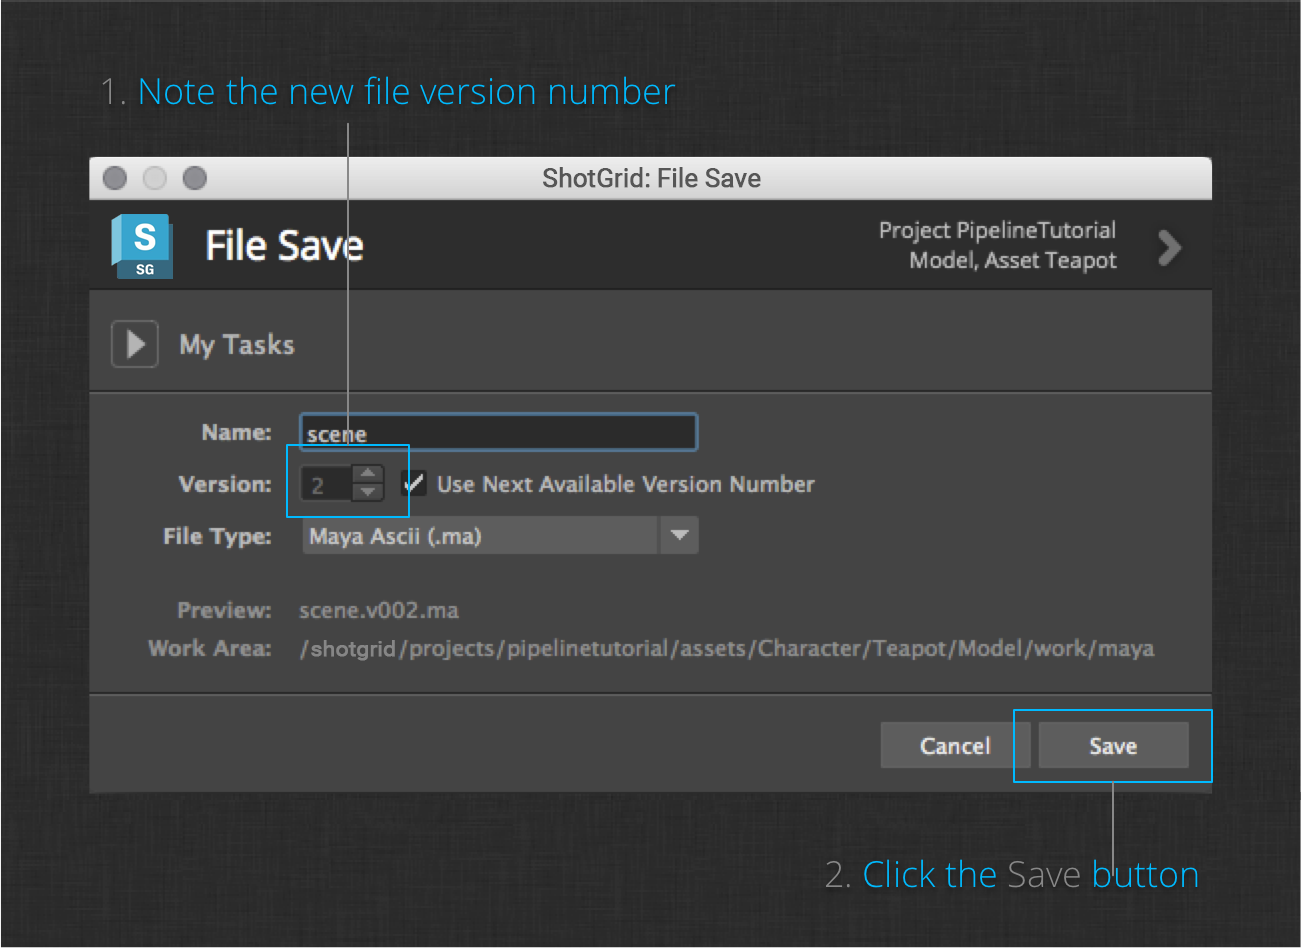
Once you’re satisfied with your work, run the ShotGrid > File Save… menu action again. This time the dialog will default your version number to 2. The automatic incrementing of the file version allows artists to maintain a complete history of the work they’ve done. Click the Save button.
Once you have saved the Teapot model to version 2, you are ready for the last step in this section of the tutorial.
Now that your Teapot model is ready, you need to publish it so that it can be surfaced and rigged. To publish, click the ShotGrid > Publish… menu action. You will be presented with the Publish App dialog.
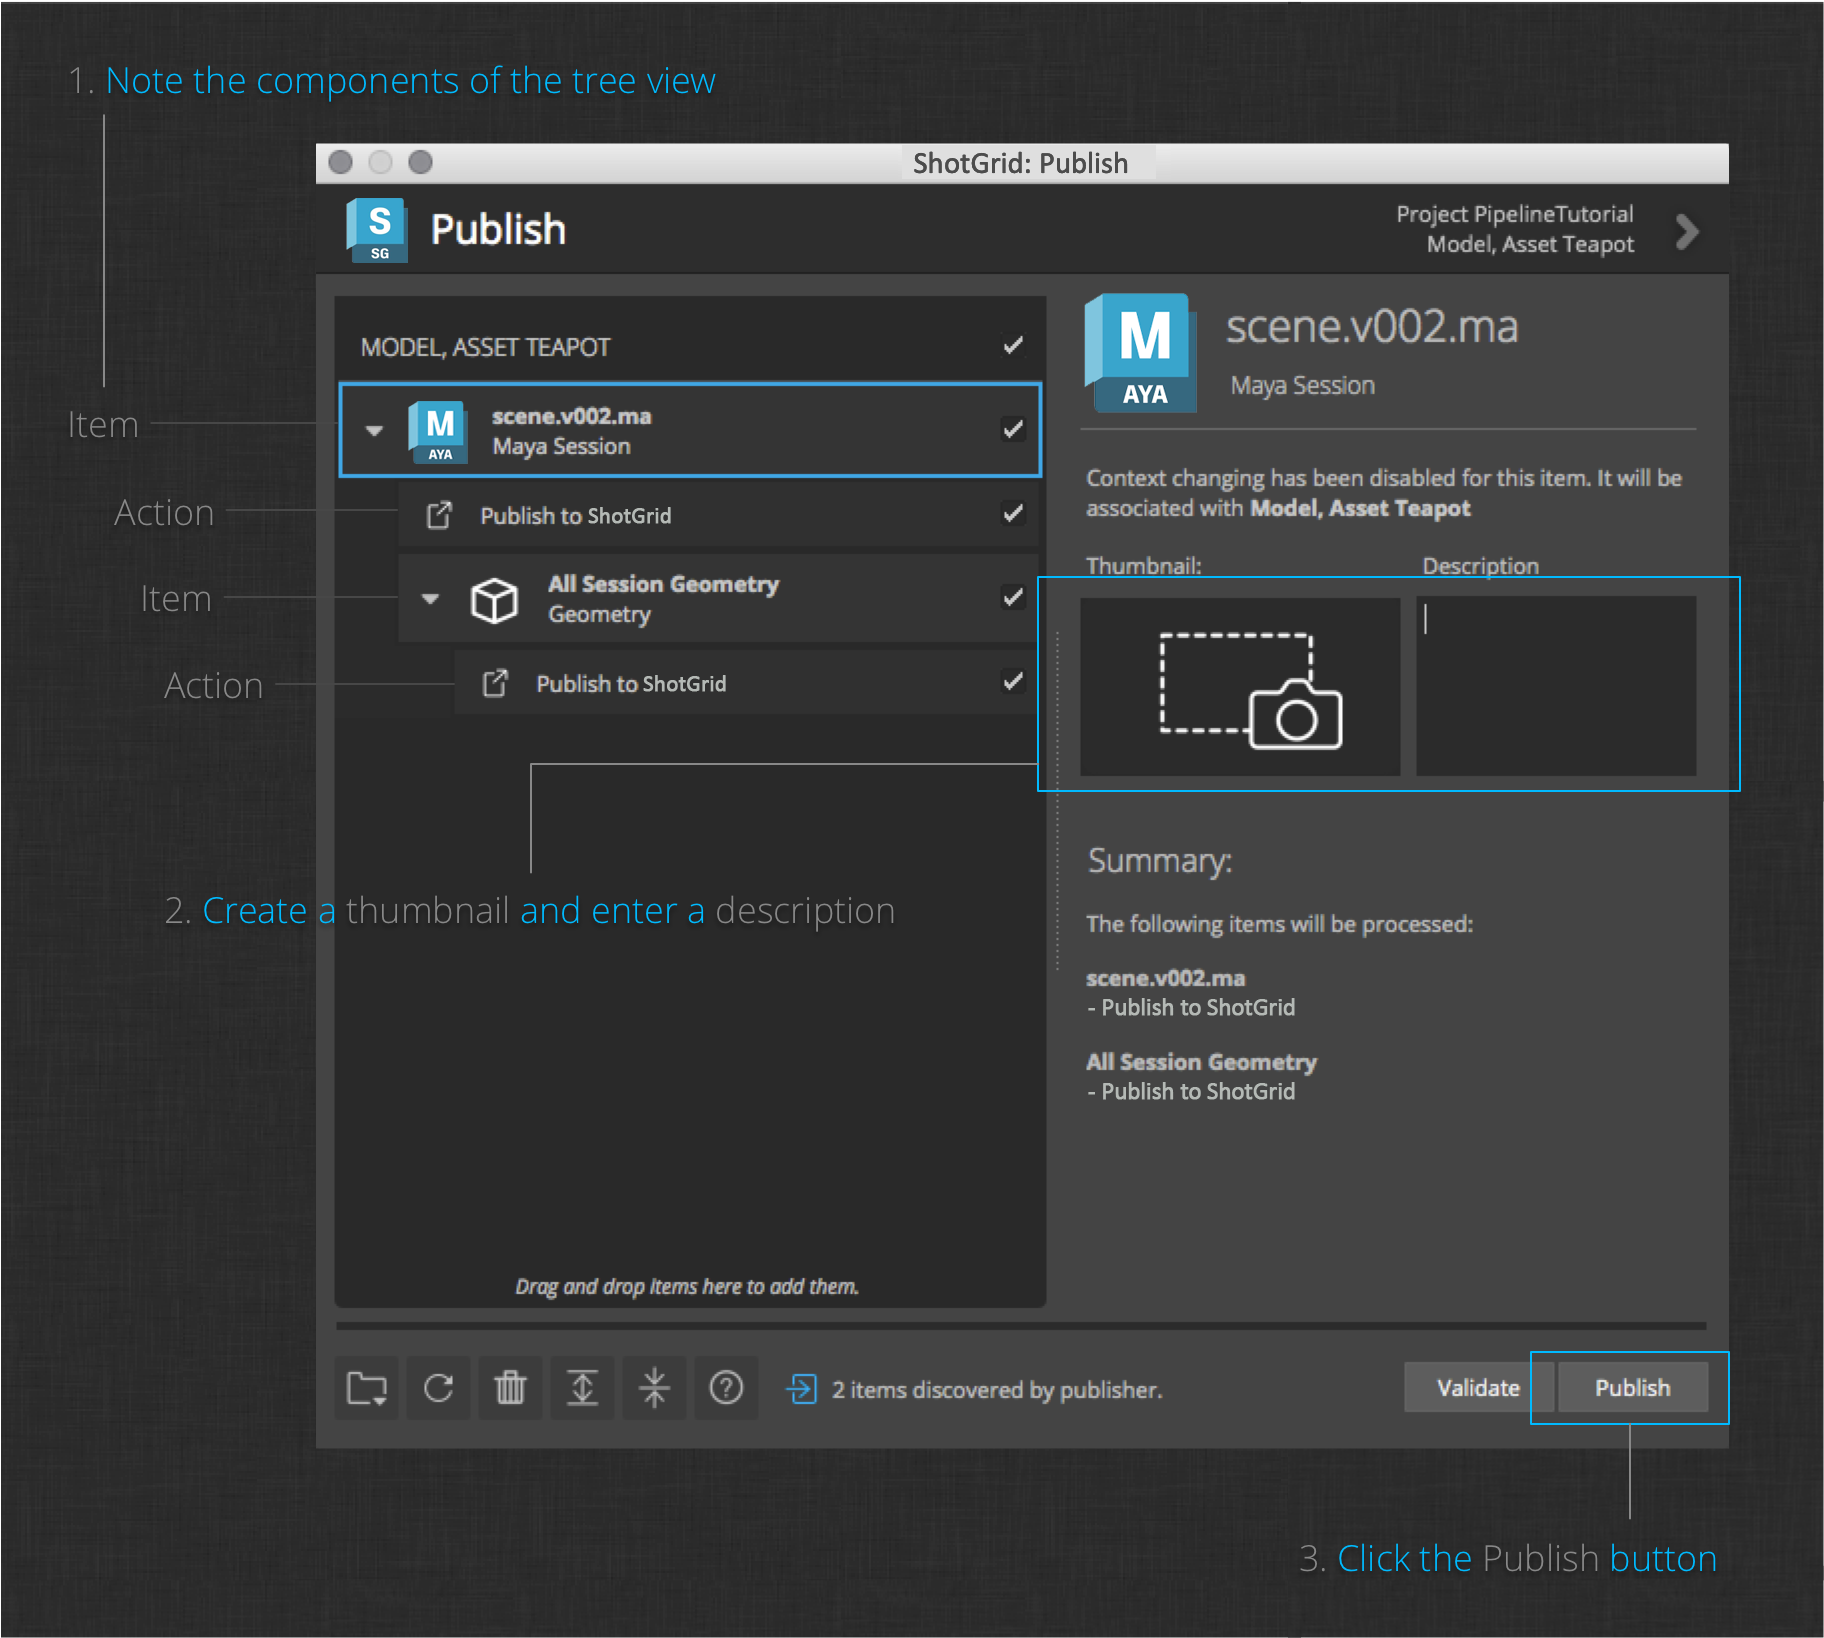
The dialog shows a tree of items representing what will be published. The tree includes some entries that represent the items to be published and some entries represent the actions that will be performed during the publish operation.
On the left side of the dialog you will see an item representing the current Maya session. Underneath it, you will see a Publish to ShotGrid child action. An additional item representing All Session Geometry is shown as a child item of the current session. It also has a Publish to ShotGrid child action.
Note : If the All Session Geometry item doesn’t show up, ensure that the Alembic export plugin is enabled in Maya.
Explore the Publish App by clicking on the items on the left side of the tree. You’ll notice that the items to be acted upon, when selected, allow you to enter a description of what is being published. You can also take a screenshot to be associated with the item by clicking the camera icon on the right.
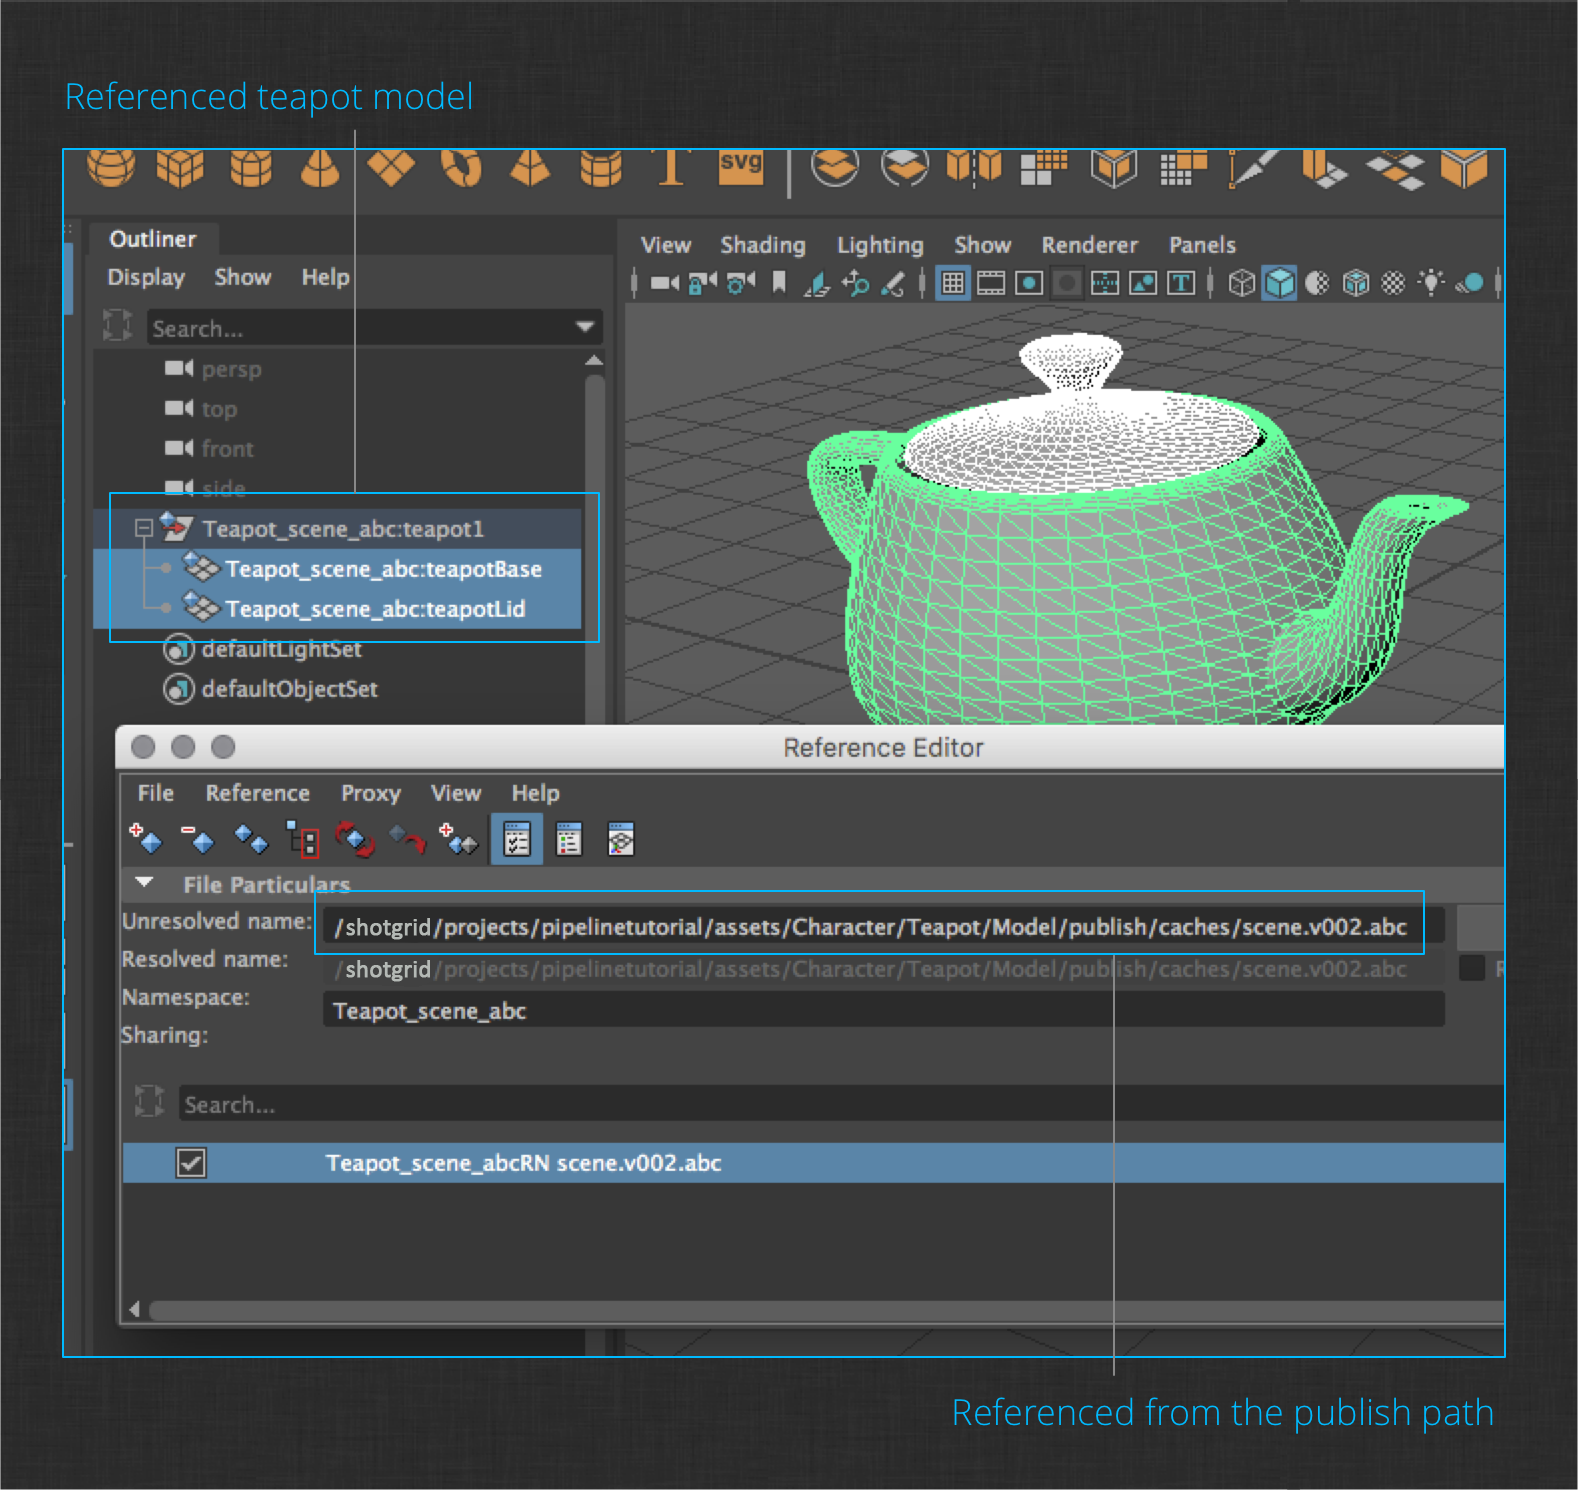
When you are ready, click the Publish button in the bottom right corner to publish the current work file and the teapot geometry. Once complete, you can browse to the Teapot Asset in ShotGrid to verify that the publish completed successfully.
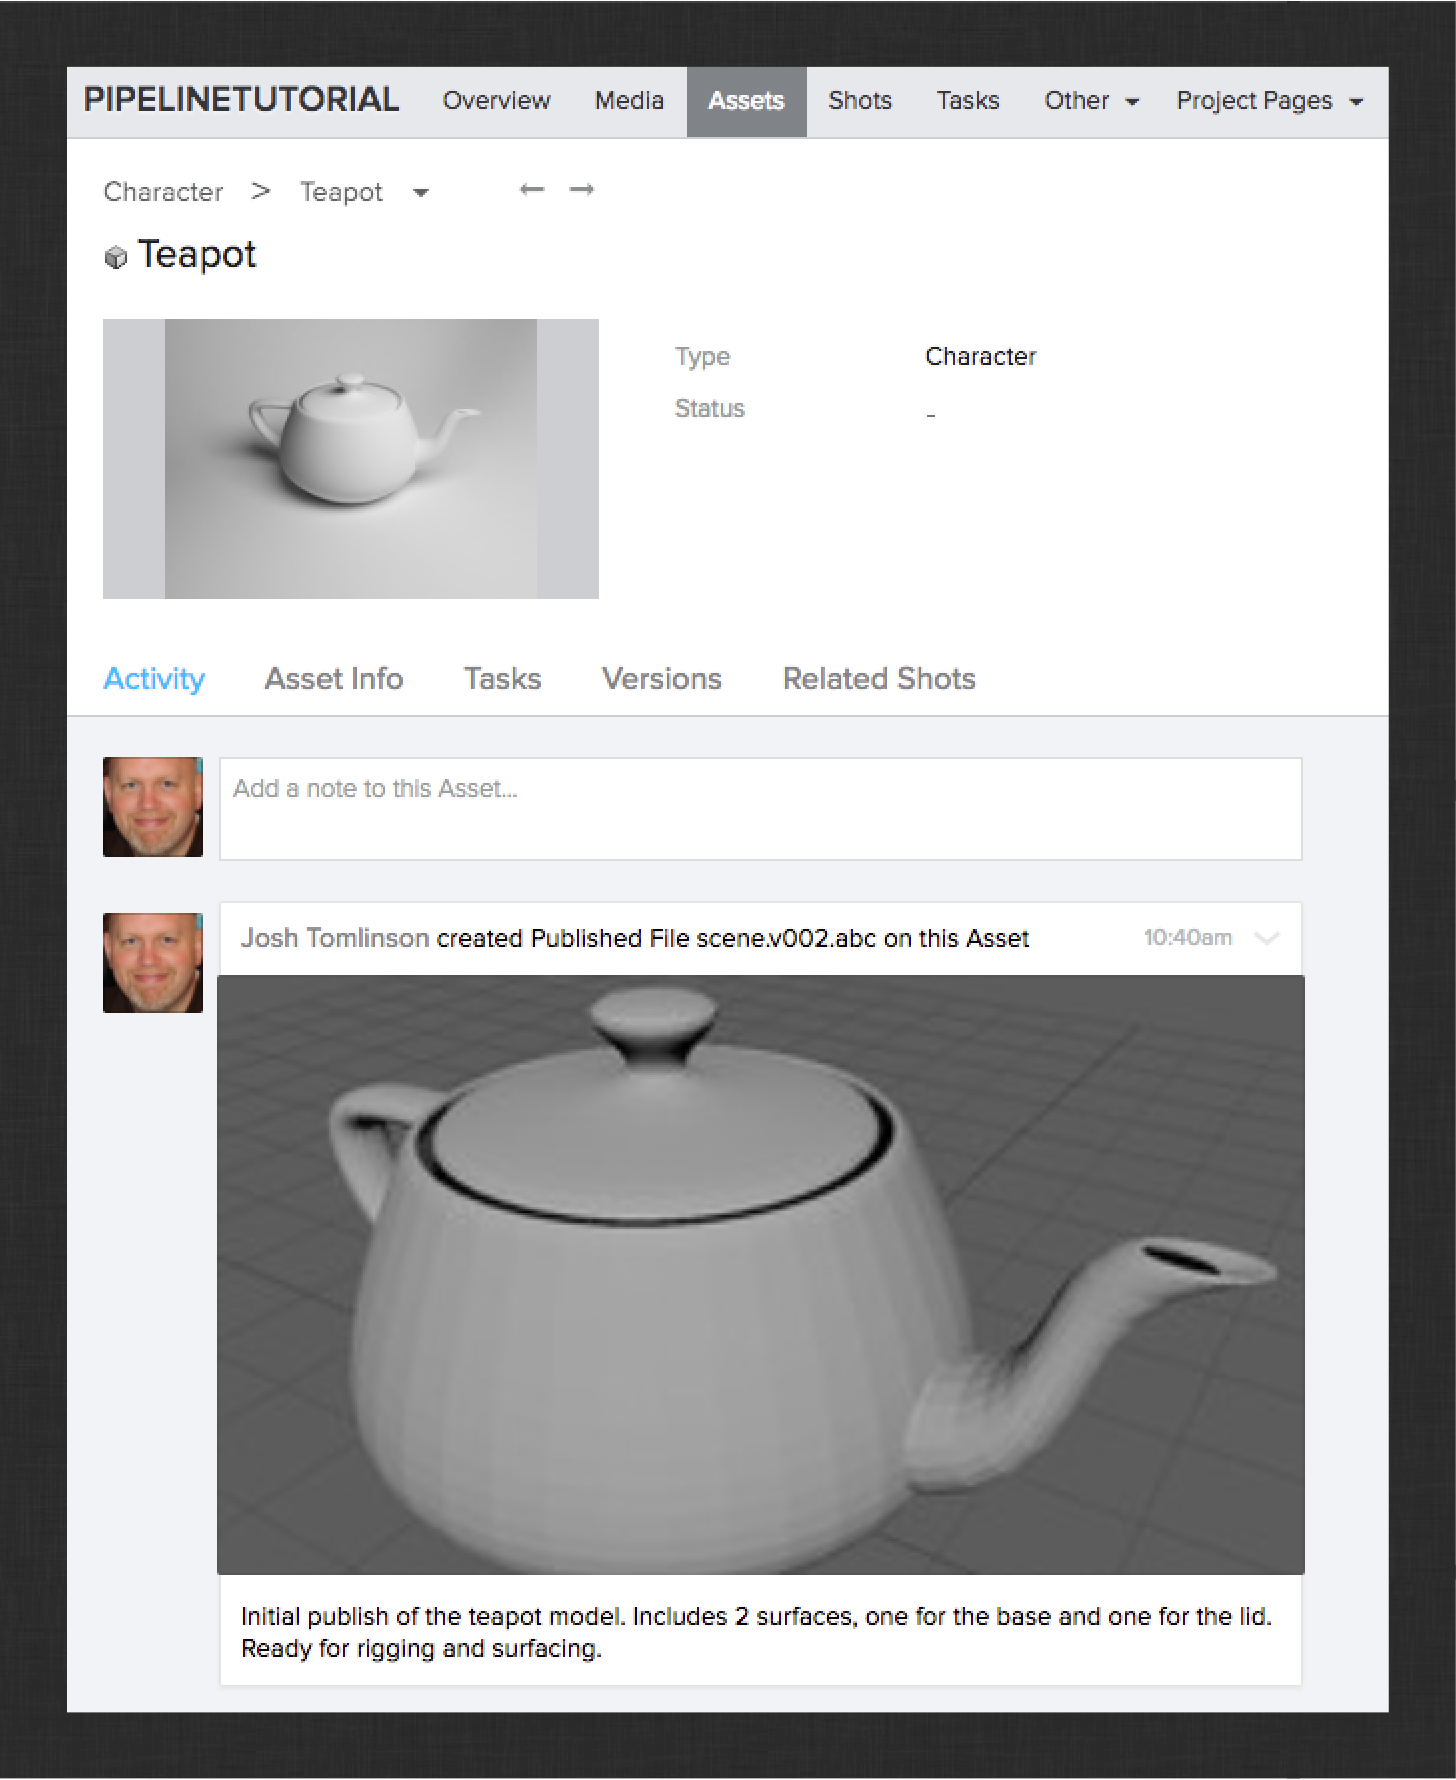
In the image above, you can see the published alembic file that contains the teapot model. You should also see a publish for the maya session file. These publishes correspond to the items in the Publish app’s tree view.
Like the work file created when using the File Save dialog, the output paths of these two publishes are driven by templates. Here’s what they look like (you’ll find out where these templates are configured for the app later):
Maya session publish:
@asset_root/publish/maya/{name}.v{version}.{maya_extension}
This template is very similar to the work file template by default, the only difference being the publish folder.
Asset publish:
@asset_root/publish/caches/{name}.v{version}.abc
This template is similar to the maya session publish template, but the file is written to a caches folder.
Unlike the File Save dialog, when publishing, you don’t have to supply the name, version, or file extension values. This is because by default the publisher pulls these values from the work file path. Under the hood it is extracting these values through the work template and then applying them to the publish templates. This is an important concept with regard to the Toolkit platform and how templates are used to connect the output of one pipeline step to the input of another. You will look at this in more depth in subsequent sections.
Browse to the files on disk to ensure they’ve been created in the correct location.
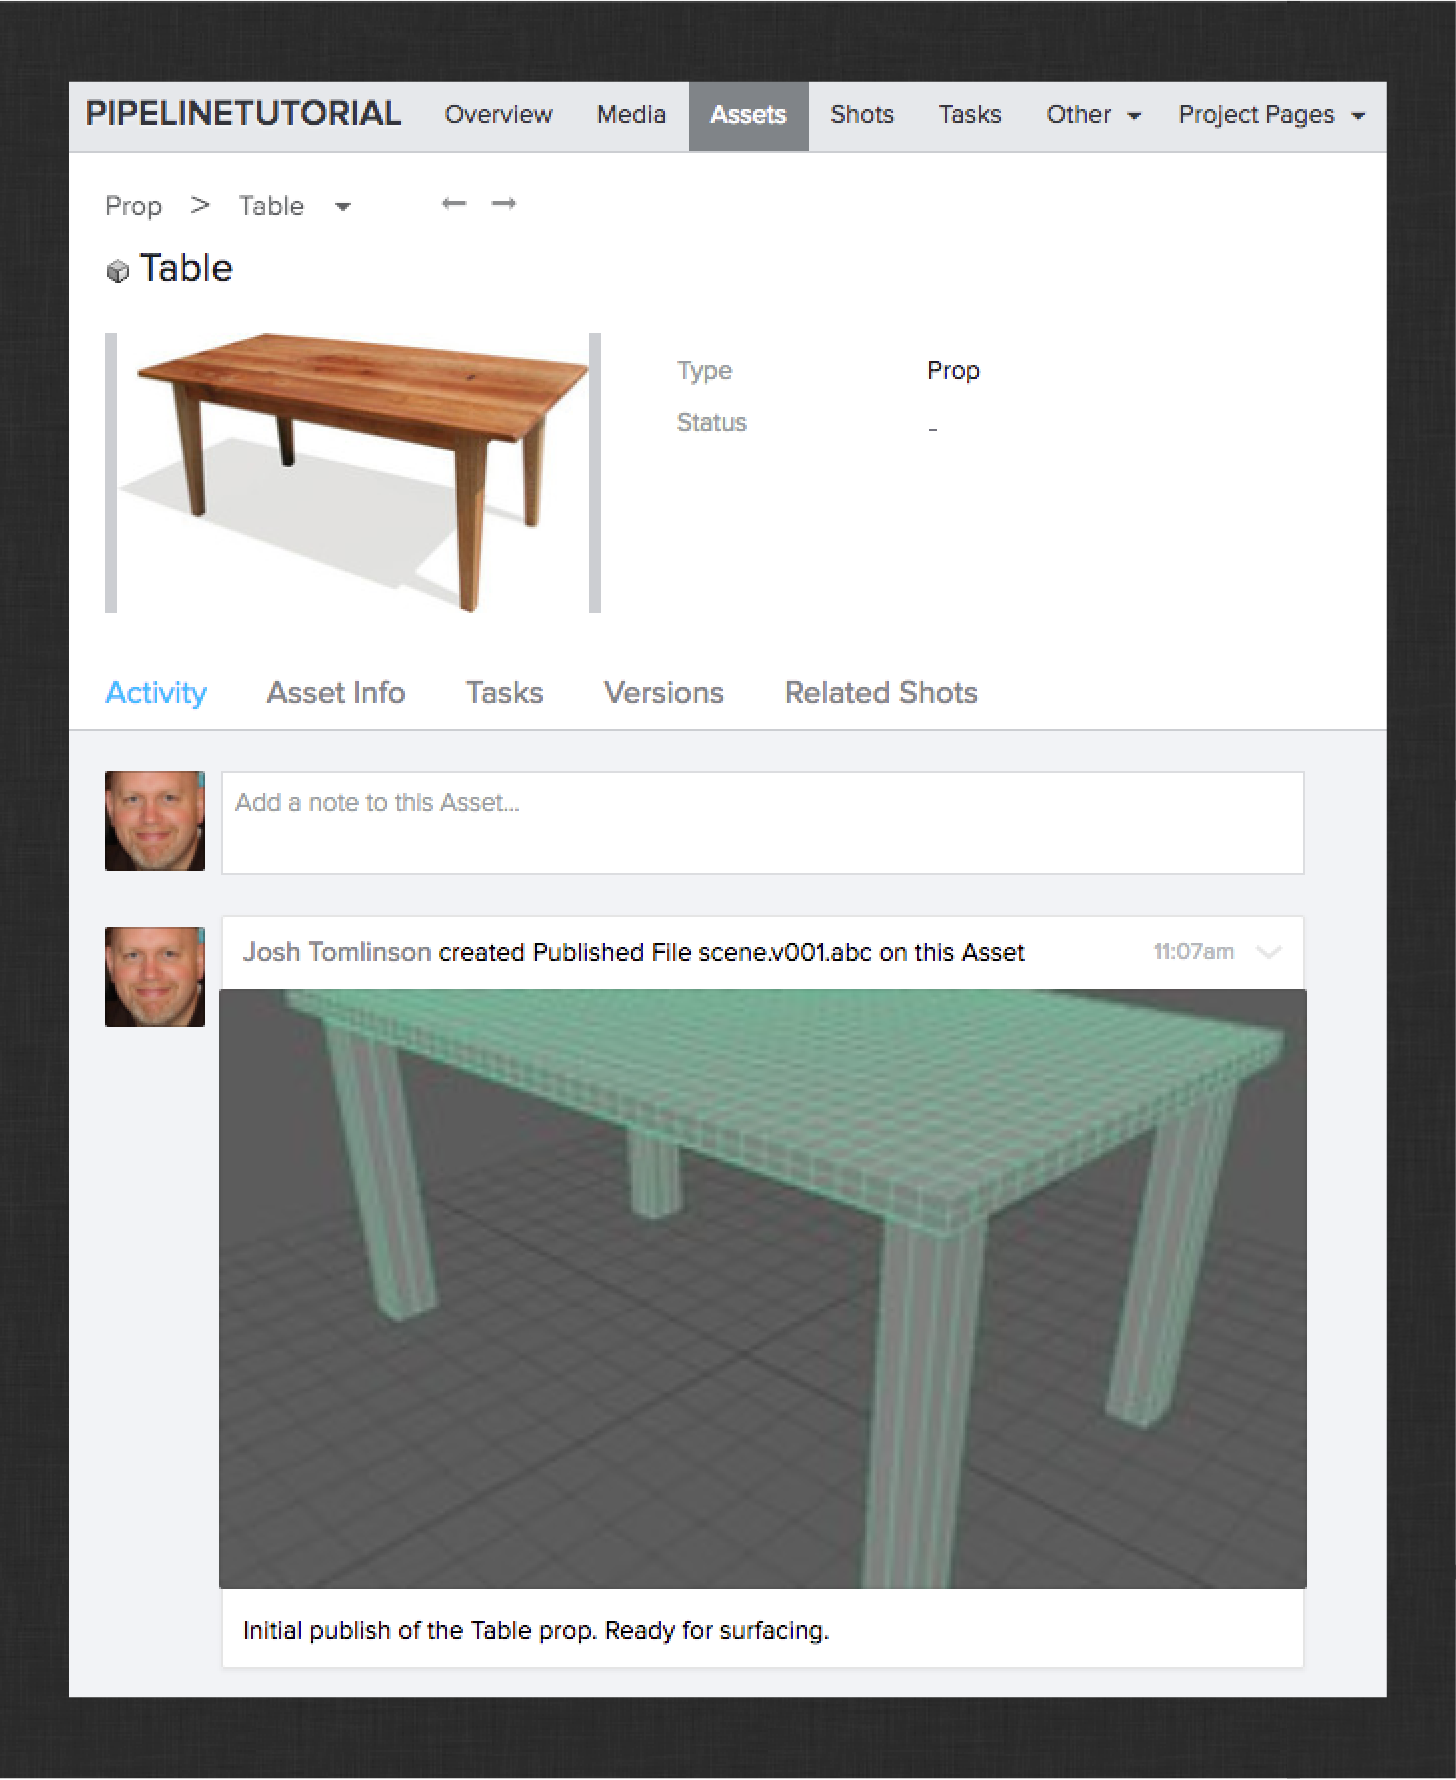
Congratulations! You have successfully created the first published iteration of the Teapot. See if you can use what you’ve learned to publish a model of a table from the Table prop’s modeling task. The result should look something like this:
Next up, the surfacing workflow.
Surfacing Workflow
In this section you will build on what you learned in the modeling section. You will learn how to load the Teapot model you created in the previous section using the Loader app. You will also learn how to customize the Publish app to publish shaders for your Teapot.
Start by launching Maya from Desktop. If you still have Maya open after working through the previous section, you do not need to relaunch. Once Maya is open, use the ShotGrid > File Open… menu item to open the Workfiles app. Just like in the Modeling section, use the Assets tab to drill down into the Teapot asset’s tasks. This time, select the surfacing task and click + New File.
You are now working in the Teapot’s surfacing task. An easy way to verify that you are in the right production context is to check the first entry in the ShotGrid menu.

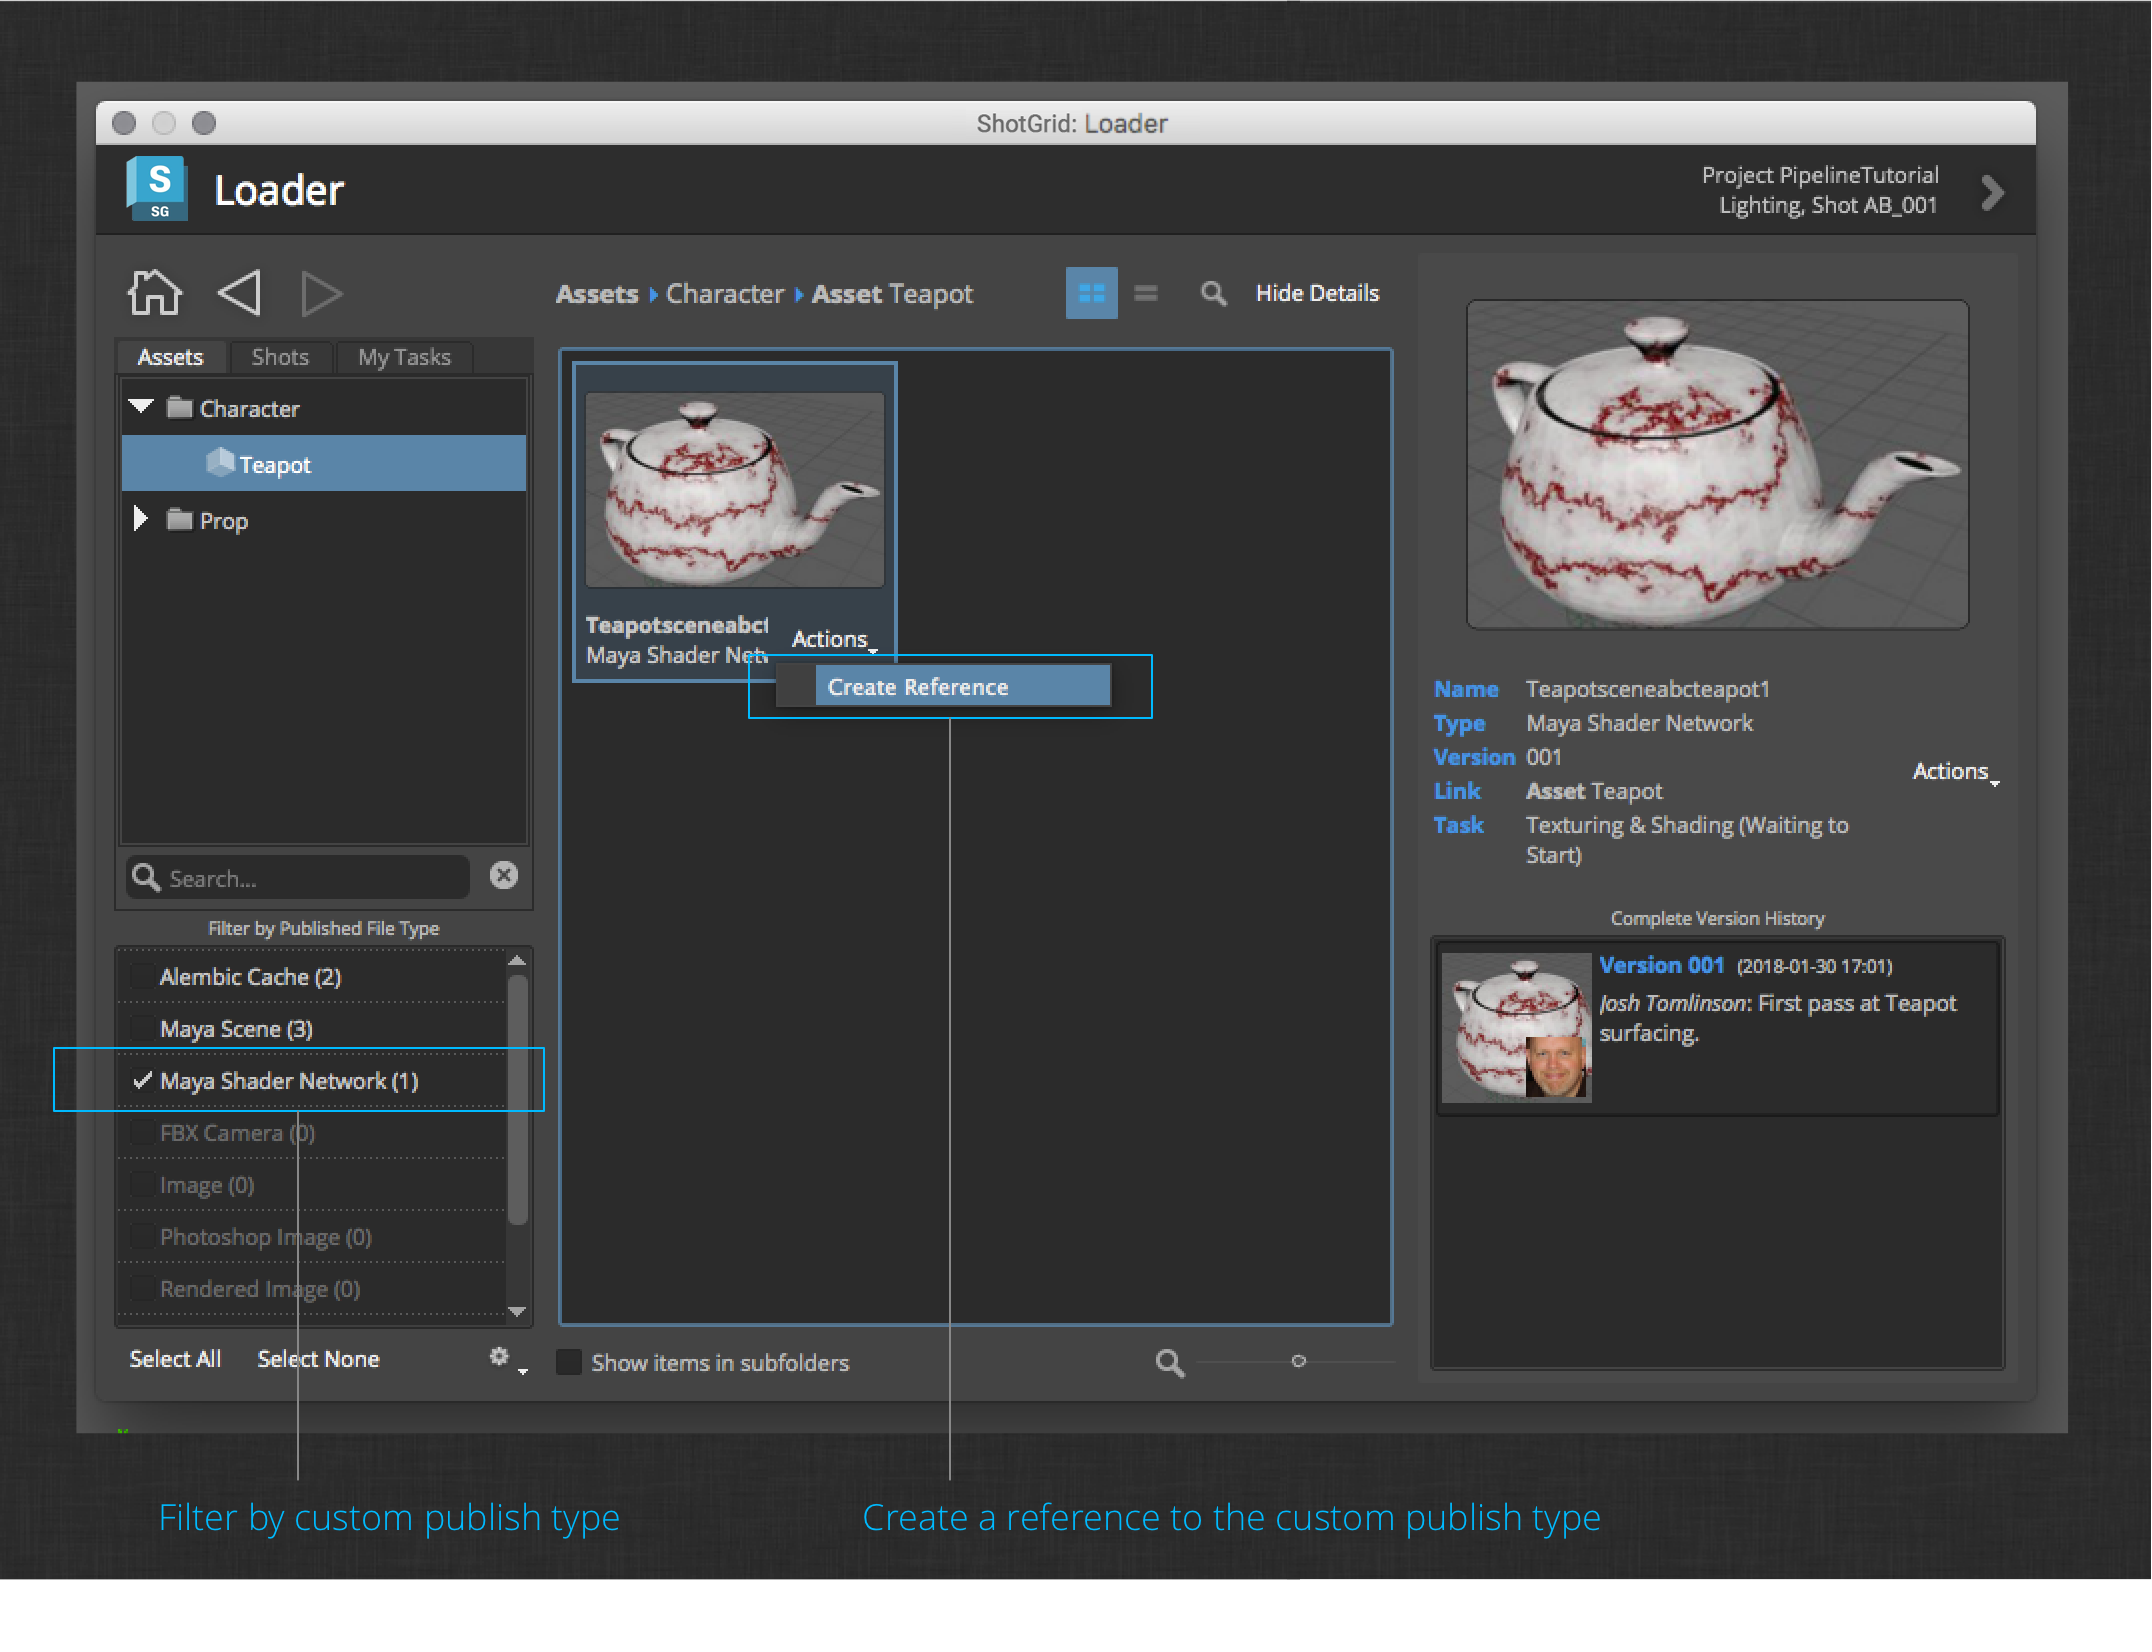
Next you need to load the teapot model into your new surfacing work file. To do this, launch the Loader app via the ShotGrid > Load… menu item in Maya.
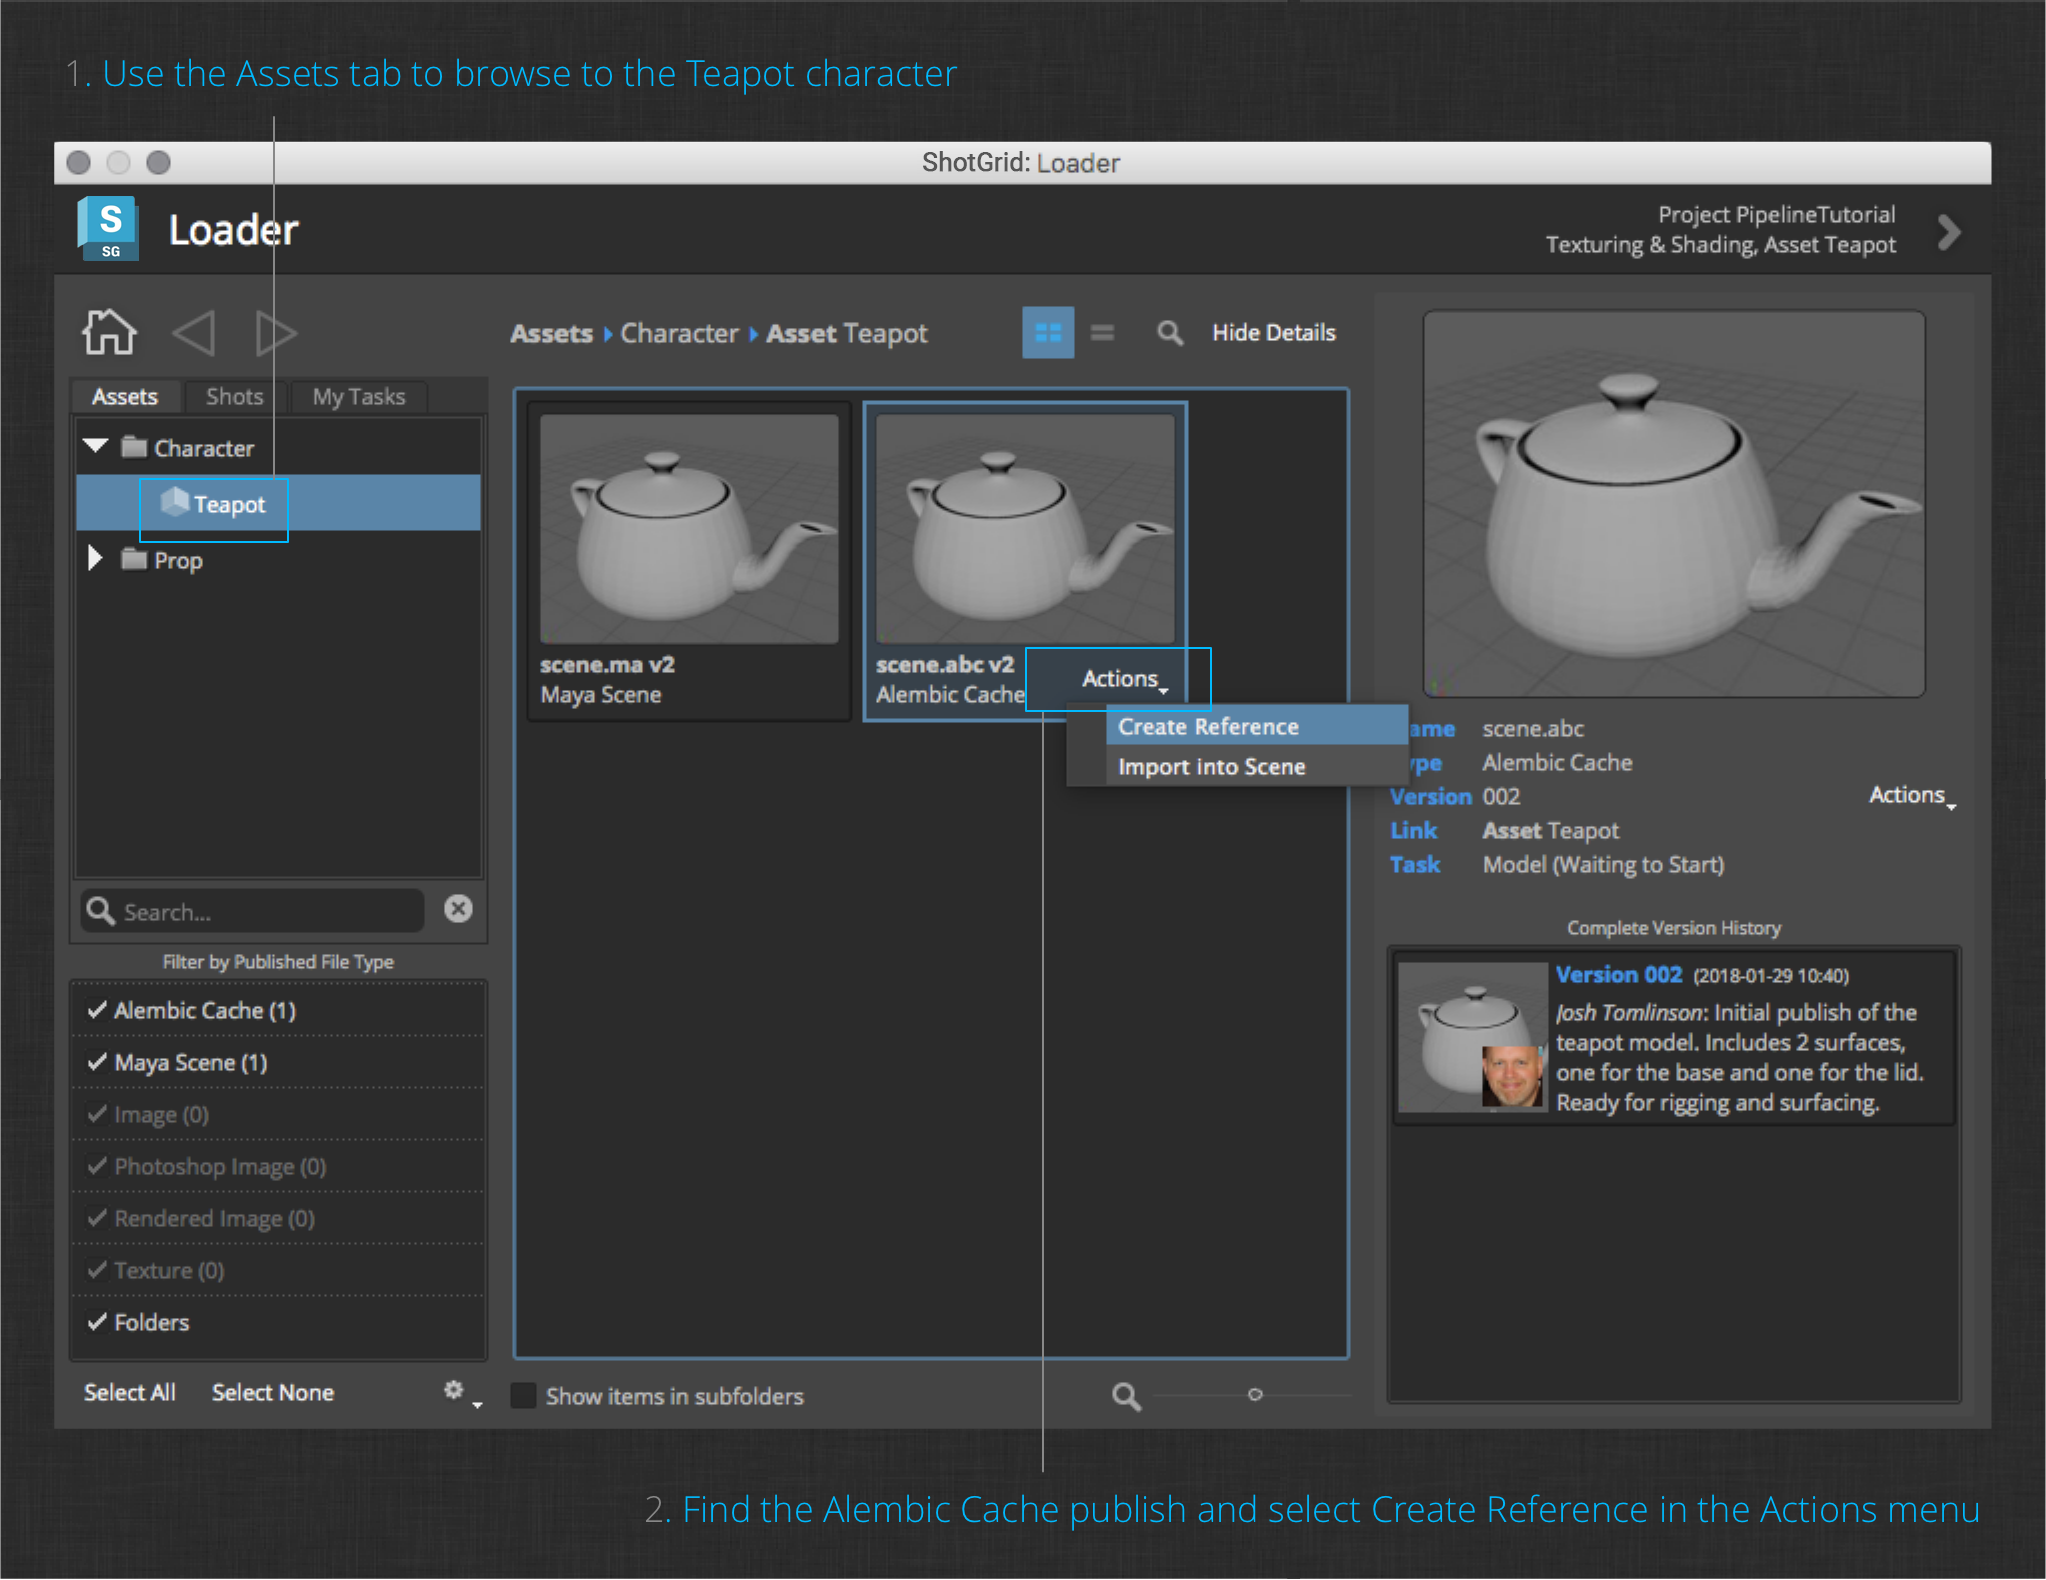
The layout of the Loader app is similar to the Workfiles app, but now you are browsing for published files to load rather than work files to open.
In the Assets tab, browse to the Teapot character to show the teapot publishes you created in the previous section. You should see a Maya Scene and an Alembic Cache publish. Select the Alembic Cache publish to show details about it on the right side of the dialog. Next, click the Create Reference item in the Actions menu of the Alembic Cache publish. The loader will remain open by default to allow additional actions to be performed, but you can close it to continue. You should see in Maya that a reference has been created pointing to the Teapot publish from the modeling task.
Next, add a simple procedural shader to the teapot.
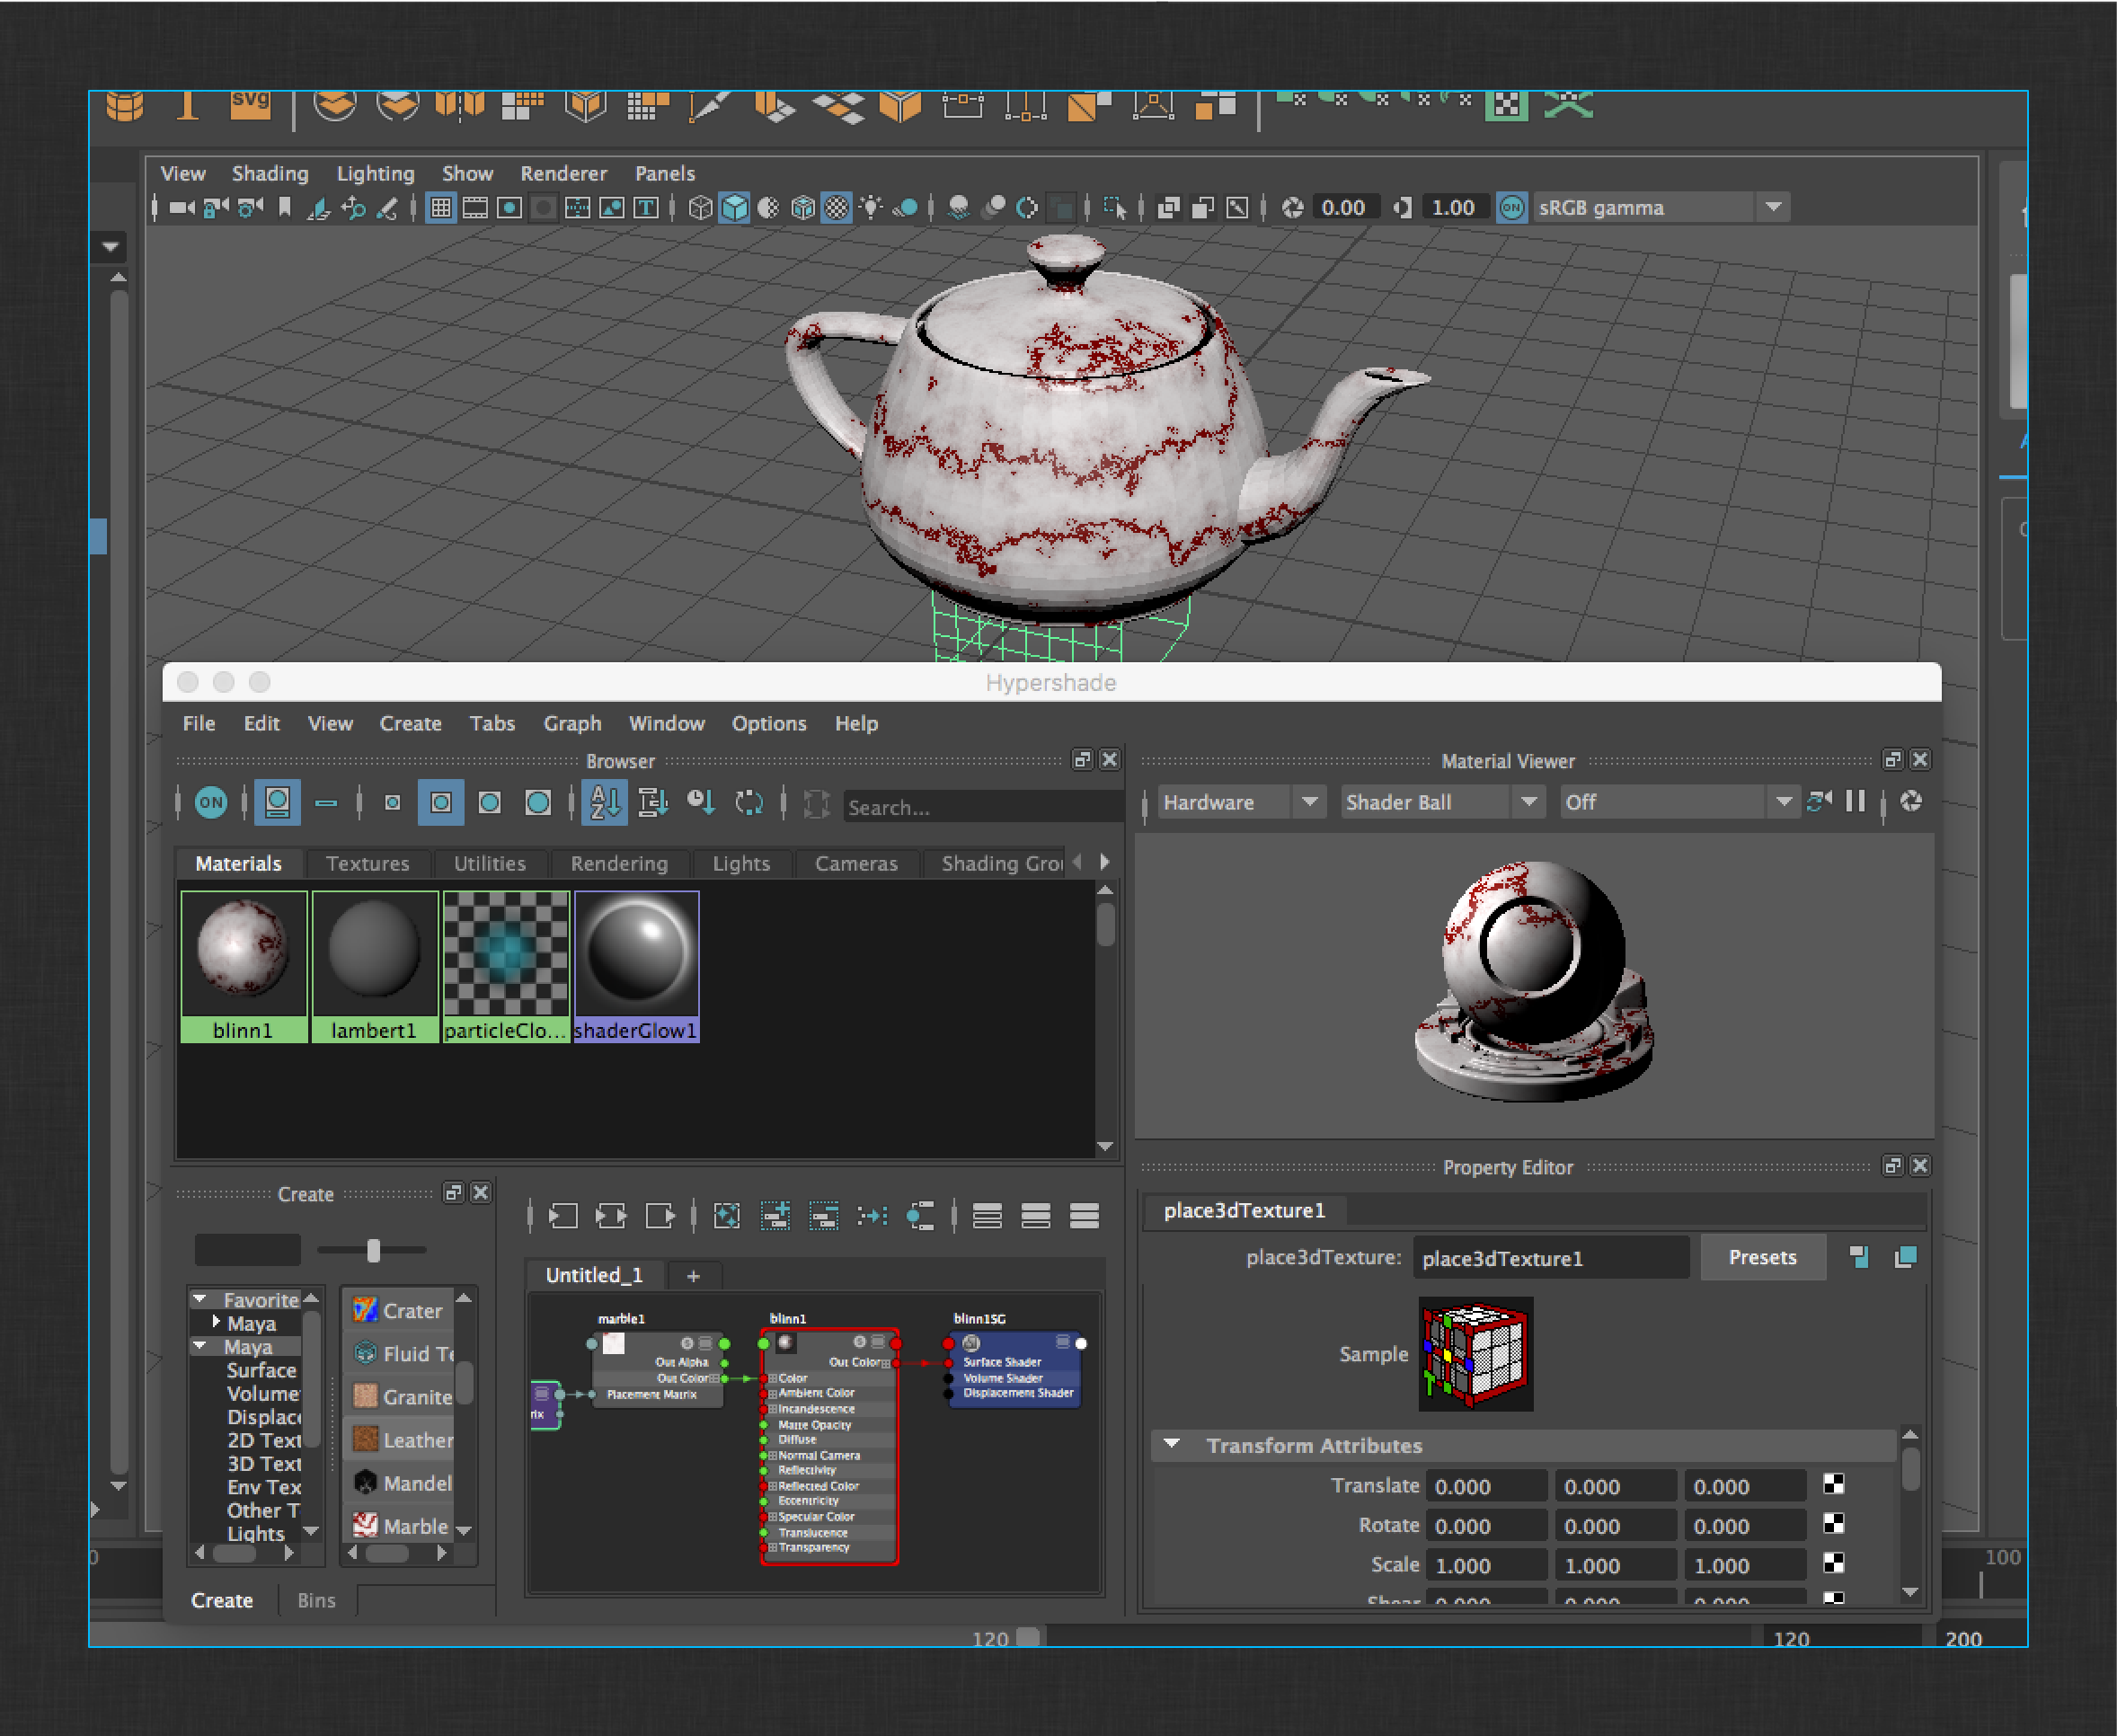
Shader management can be a time consuming and complex task when building a pipeline. It is often very specific to a studio. It is for these reasons that the shipped Maya integration does not handle shader or texture management out-of-the-box.
Use the ShotGrid > File Save… menu action to save the current session before continuing.
Custom Shader Publish
For the purposes of this simple pipeline, you will customize the Publisher app to export Maya shader networks as additional publish items from the surfacing step. Later in the tutorial, you will put together a quick and dirty solution that allows the shaders to be reconnected to the Alembic geometry caches when referenced downstream.
Note : The customization you’ll be adding is, admittedly, very simple and fragile. A more robust solution might take into account alternate representations of a surfaced character as well as the asset management side of using external images as texture maps. This example presents only a starting point for building a real-world solution.
Note : You can see the full details of how to write publisher plugins here.
Override the Maya collector
First, you will need to modify the Publish app’s collection logic. The publisher is configured with a collector hook that defines the logic for “collecting” items to publish and display in the app. You can find the configured app’s settings in this file within your project’s configuration:
env/includes/settings/tk-multi-publish2.yml
This file defines how the Publish app will be used within all of the artist environments. Open the file and search for the Maya section, specifically the configuration for the asset step. It will look like this:
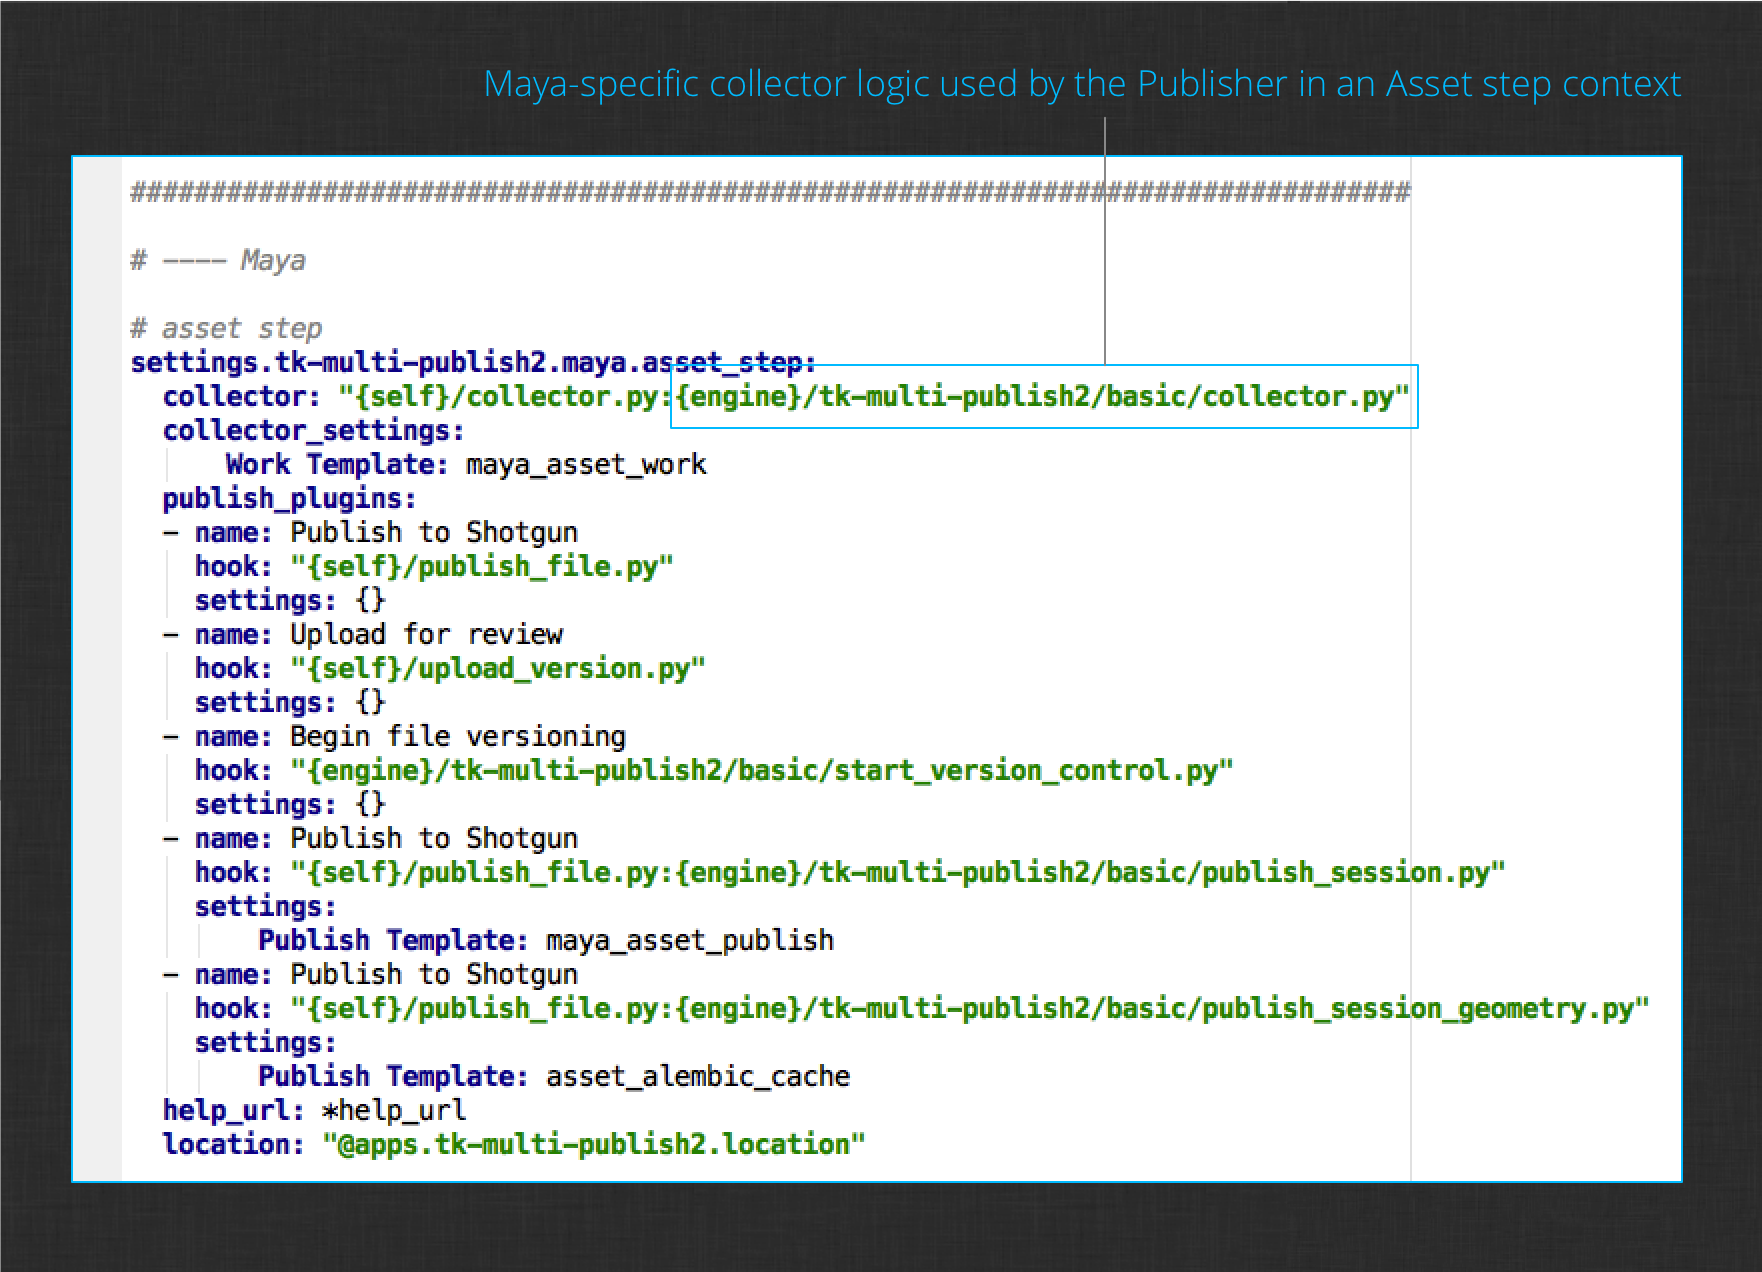
The collector setting defines the hook where the publisher’s collection logic lives. By default, the value is:
collector: "{self}/collector.py:{engine}/tk-multi-publish2/basic/collector.py"
This definition includes two files. When multiple files are listed in a hook setting, it implies inheritance. The first file contains the {self} token which will evaluate to the installed Publish app’s hooks folder. The second file contains the {engine} token which will evaluate to the current engine’s (in this case the installed Maya engine’s) hooks folder. To summarize, this value says the Maya-specific collector inherits the Publish app’s collector. This is a common pattern for Publisher configuration since the app’s collector hook has logic that is useful regardless of the DCC that is running. The DCC-specific logic inherits from that base logic and extends it to collect items that are specific to the current session.
Note : We’re only changing the collector setting for the Asset step environment, so our modifications won’t be seen by artists working in other contexts, like Shot steps. They will continue to use the shipped, default Maya collector.
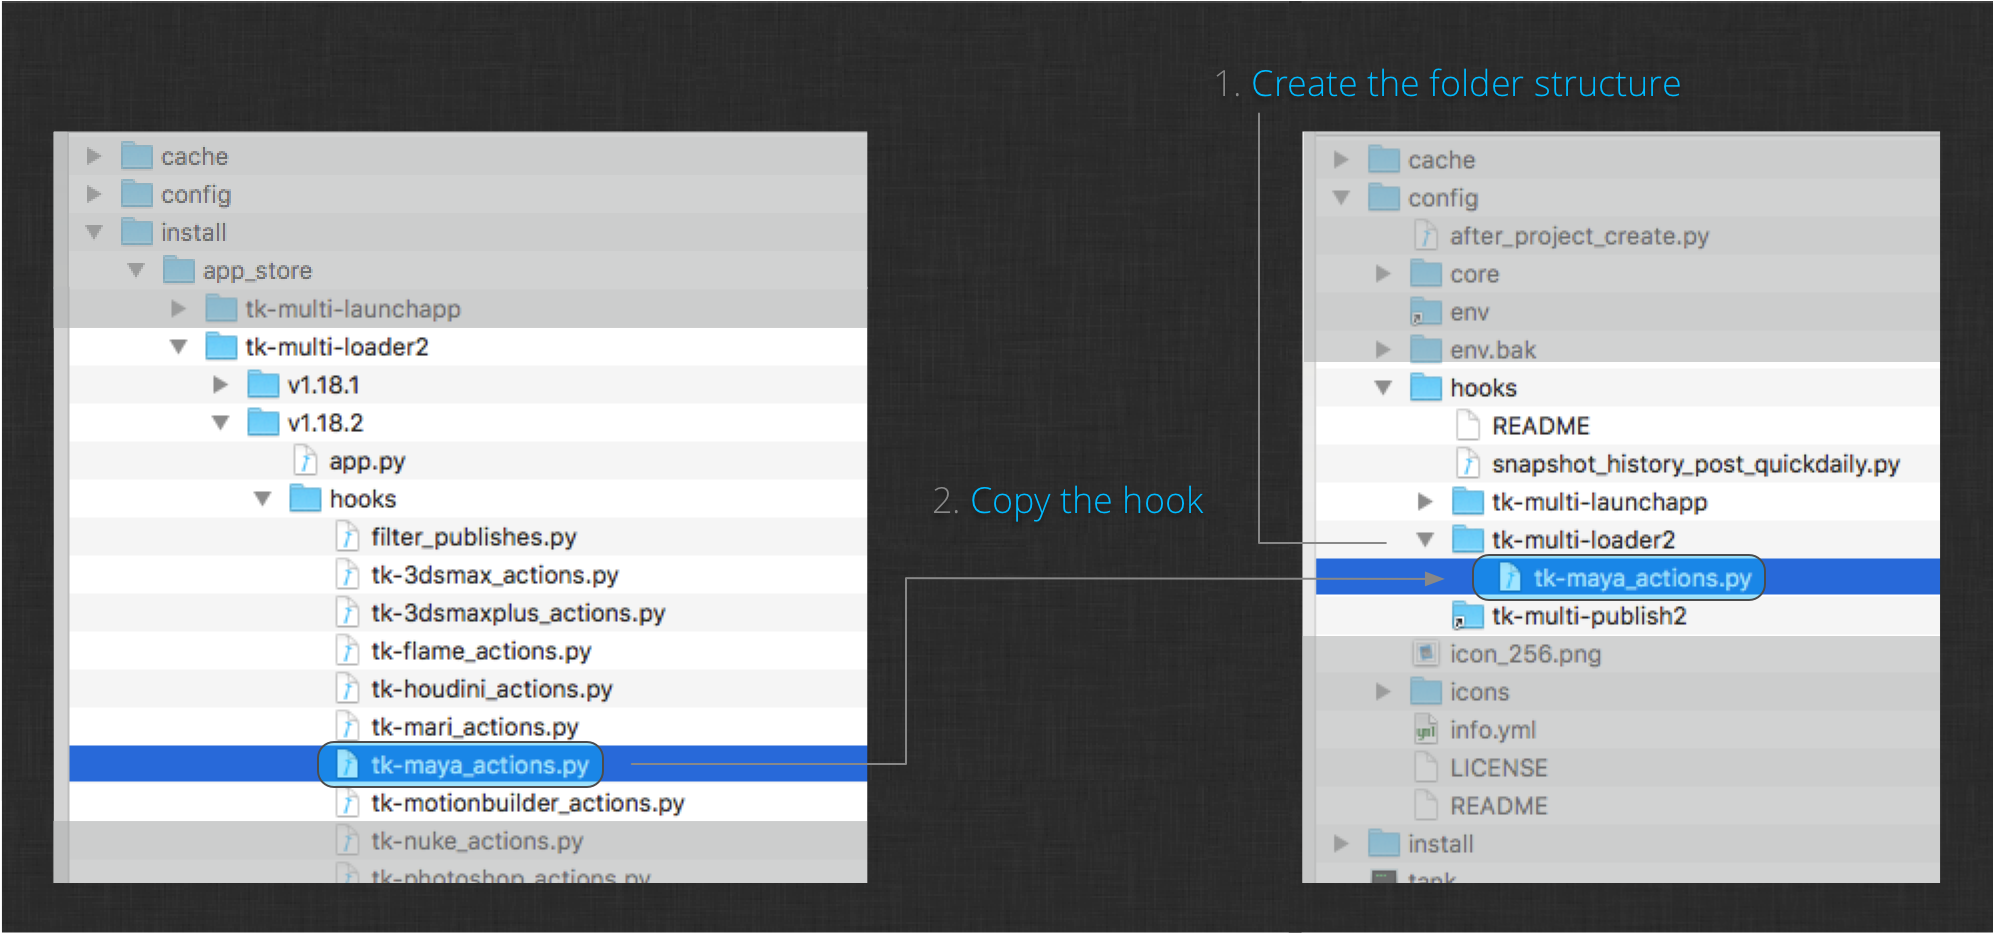
In the Configuration section you learned how to take over a hook. Begin the customization process by taking over the Maya engine’s collector hook in your configuration.
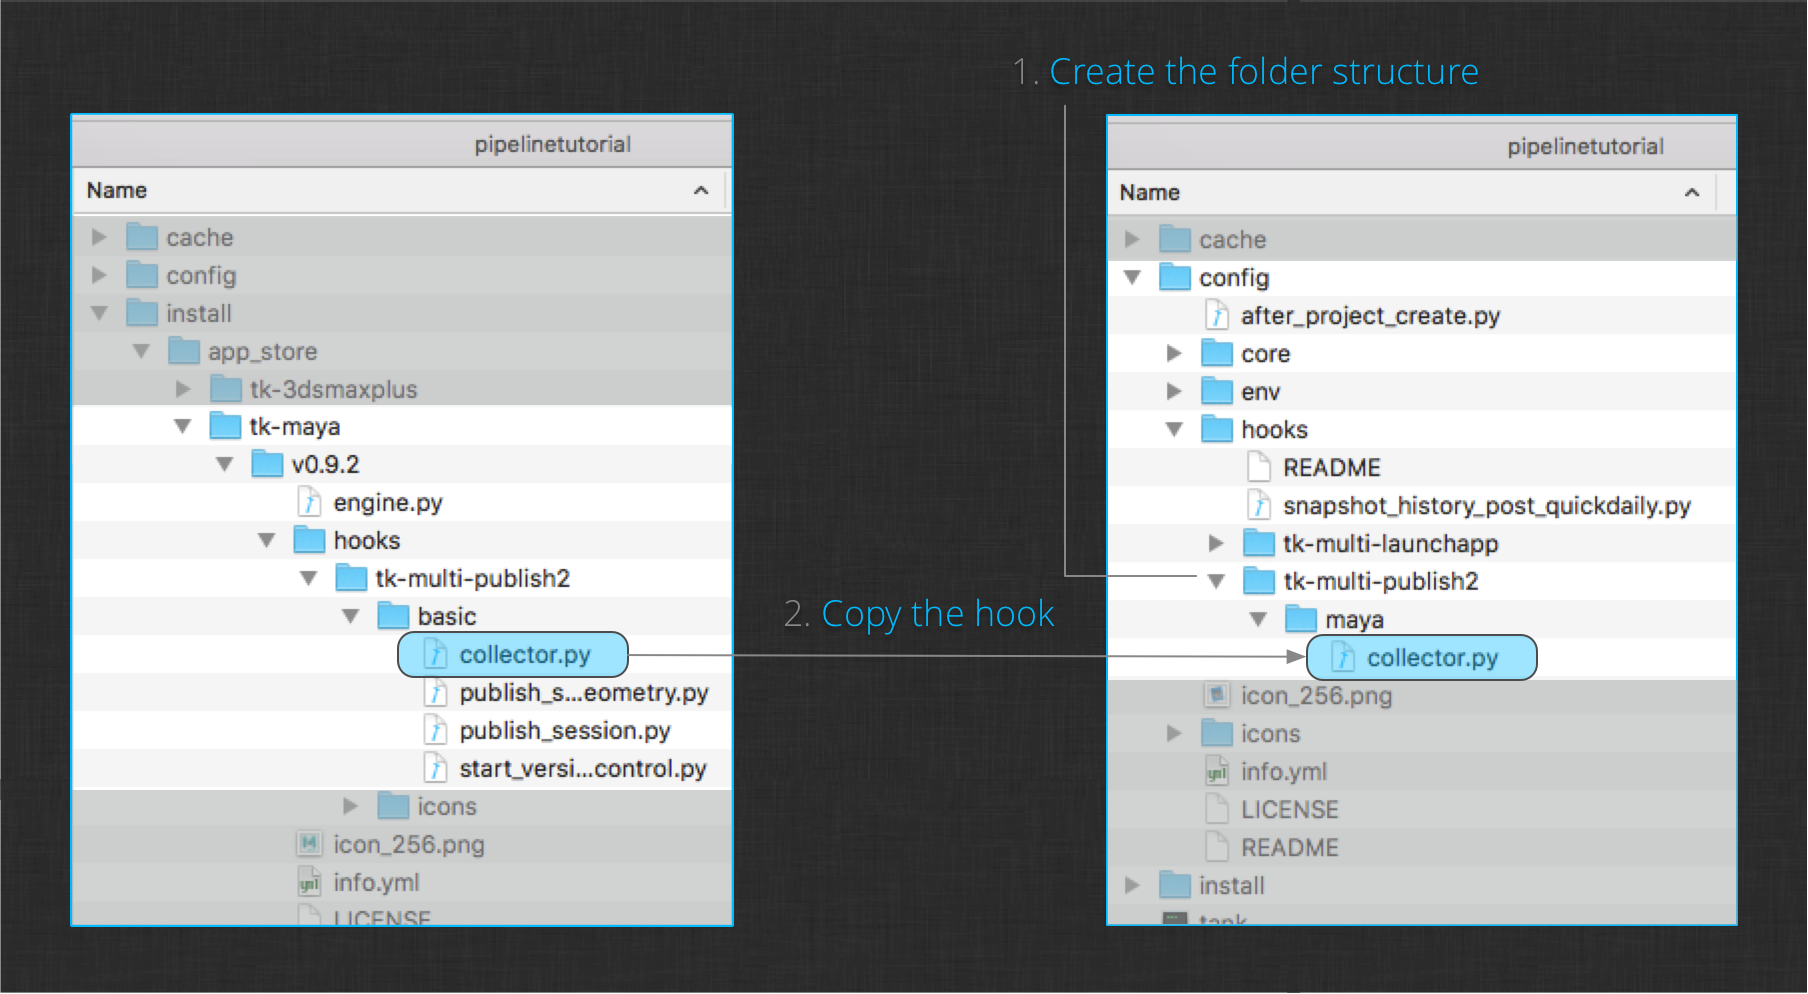
The image above shows how to do this. First, create a folder structure in your project configuration’s hooks folder. This will provide some namespacing to the collector plugin since you may override the same hook for other DCCs later on. Next, copy the Maya engine’s collector hook from the install folder into your new hook folder structure. You should now have a copy of the Maya collector in your configuration with the path:
config/hooks/tk-multi-publish2/maya/collector.py
Next, update the publish2 settings file to point to your new hook location. Your collector setting should now have this value:
collector: "{self}/collector.py:{config}/tk-multi-publish2/maya/collector.py"
Note the {config} token. The path will now resolve to the hooks folder in your project configuration. Your new copy of the collector will inherit from the collector defined by the app itself.
Note : If you were to publish at this point, the Publish logic would be exactly the same as the collector has simply been copied and referenced from a new location.
Now you need to open up your copy of the collector in your preferred IDE or text editor, then locate the process_current_session method. This method is responsible for collecting all publish items in the current DCC session. Because you will be collecting a new publish type, go to the bottom of this method and add the following line:
self._collect_meshes(item)
This is a new method that you will add to collect any meshes found in the current session. The method will create mesh items that a shader publish plugin (that you’ll create later) can act upon. The item being passed in is the session item that will be the parent for our mesh items.
Note : This is a very directed approach to modifying existing publish plugins. For a deeper dive into the structure of the publisher and all of its moving parts, please see the developer docs.
Now add the new method definition below to the bottom of the file:
    def _collect_meshes(self, parent_item):
       """
       Collect mesh definitions and create publish items for them.

       :param parent_item: The maya session parent item
       """

       # build a path for the icon to use for each item. the disk
       # location refers to the path of this hook file. this means that
       # the icon should live one level above the hook in an "icons"
       # folder.
       icon_path = os.path.join(
           self.disk_location,
           os.pardir,
           "icons",
           "mesh.png"
       )

       # iterate over all top-level transforms and create mesh items
       # for any mesh.
       for object in cmds.ls(assemblies=True):

           if not cmds.ls(object, dag=True, type="mesh"):
               # ignore non-meshes
               continue

           # create a new item parented to the supplied session item. We
           # define an item type (maya.session.mesh) that will be
           # used by an associated shader publish plugin as it searches for
           # items to act upon. We also give the item a display type and
           # display name (the group name). In the future, other publish
           # plugins might attach to these mesh items to publish other things
           mesh_item = parent_item.create_item(
               "maya.session.mesh",
               "Mesh",
               object
           )

           # set the icon for the item
           mesh_item.set_icon_from_path(icon_path)

           # finally, add information to the mesh item that can be used
           # by the publish plugin to identify and export it properly
           mesh_item.properties["object"] = object
The code is commented and should give you an idea of what is being done. The main point is that you’ve now added logic to collect mesh items for any top-level meshes in the current session. If you were to execute the publisher at this point however, you would not see any mesh items in the item tree. This is because there are no publish plugins defined to act on them. Next, you’ll write a new shader publish plugin that will attach to these mesh items and handle publishing them for use downstream.
Note : You probably saw the call to set an icon for the mesh item in the code above. For this to work, you will need to add an icon to your configuration at the specified path:
config/hooks/tk-multi-publish2/icons/mesh.png
Create a shader publish plugin
The next step is to connect the newly collected mesh items to a publish plugin that can export the mesh’s shaders to disk and publish them. You will need to create a new publish plugin to do this. Follow this link to the source code for this hook and save it in the hooks/tk-multi-publish2/maya folder and name it publish_shader_network.py.
Note : The plugin is a lot of code to take in if you are new to the Toolkit platform and the publish code. Don’t worry about that right now. You will have time to go through and understand what is happening as you progress through this tutorial and are exposed to the features of the publisher. For now, just create the file and know that its purpose is to handle writing the shader networks to disk.
The last step before being able to publish shaders is to add the template and configuration defined by the new shader publish plugin. You can see the setting defined by the plugin in the settings property:
    @property
    def settings(self):
       "”” … "””

       # inherit the settings from the base publish plugin
       plugin_settings = super(MayaShaderPublishPlugin, self).settings or {}

       # settings specific to this class
       shader_publish_settings = {
           "Publish Template": {
               "type": "template",
               "default": None,
               "description": "Template path for published shader networks. "
                              "Should correspond to a template defined in "
                              "templates.yml.",
           }
       }

       # update the base settings
       plugin_settings.update(shader_publish_settings)

       return plugin_settings
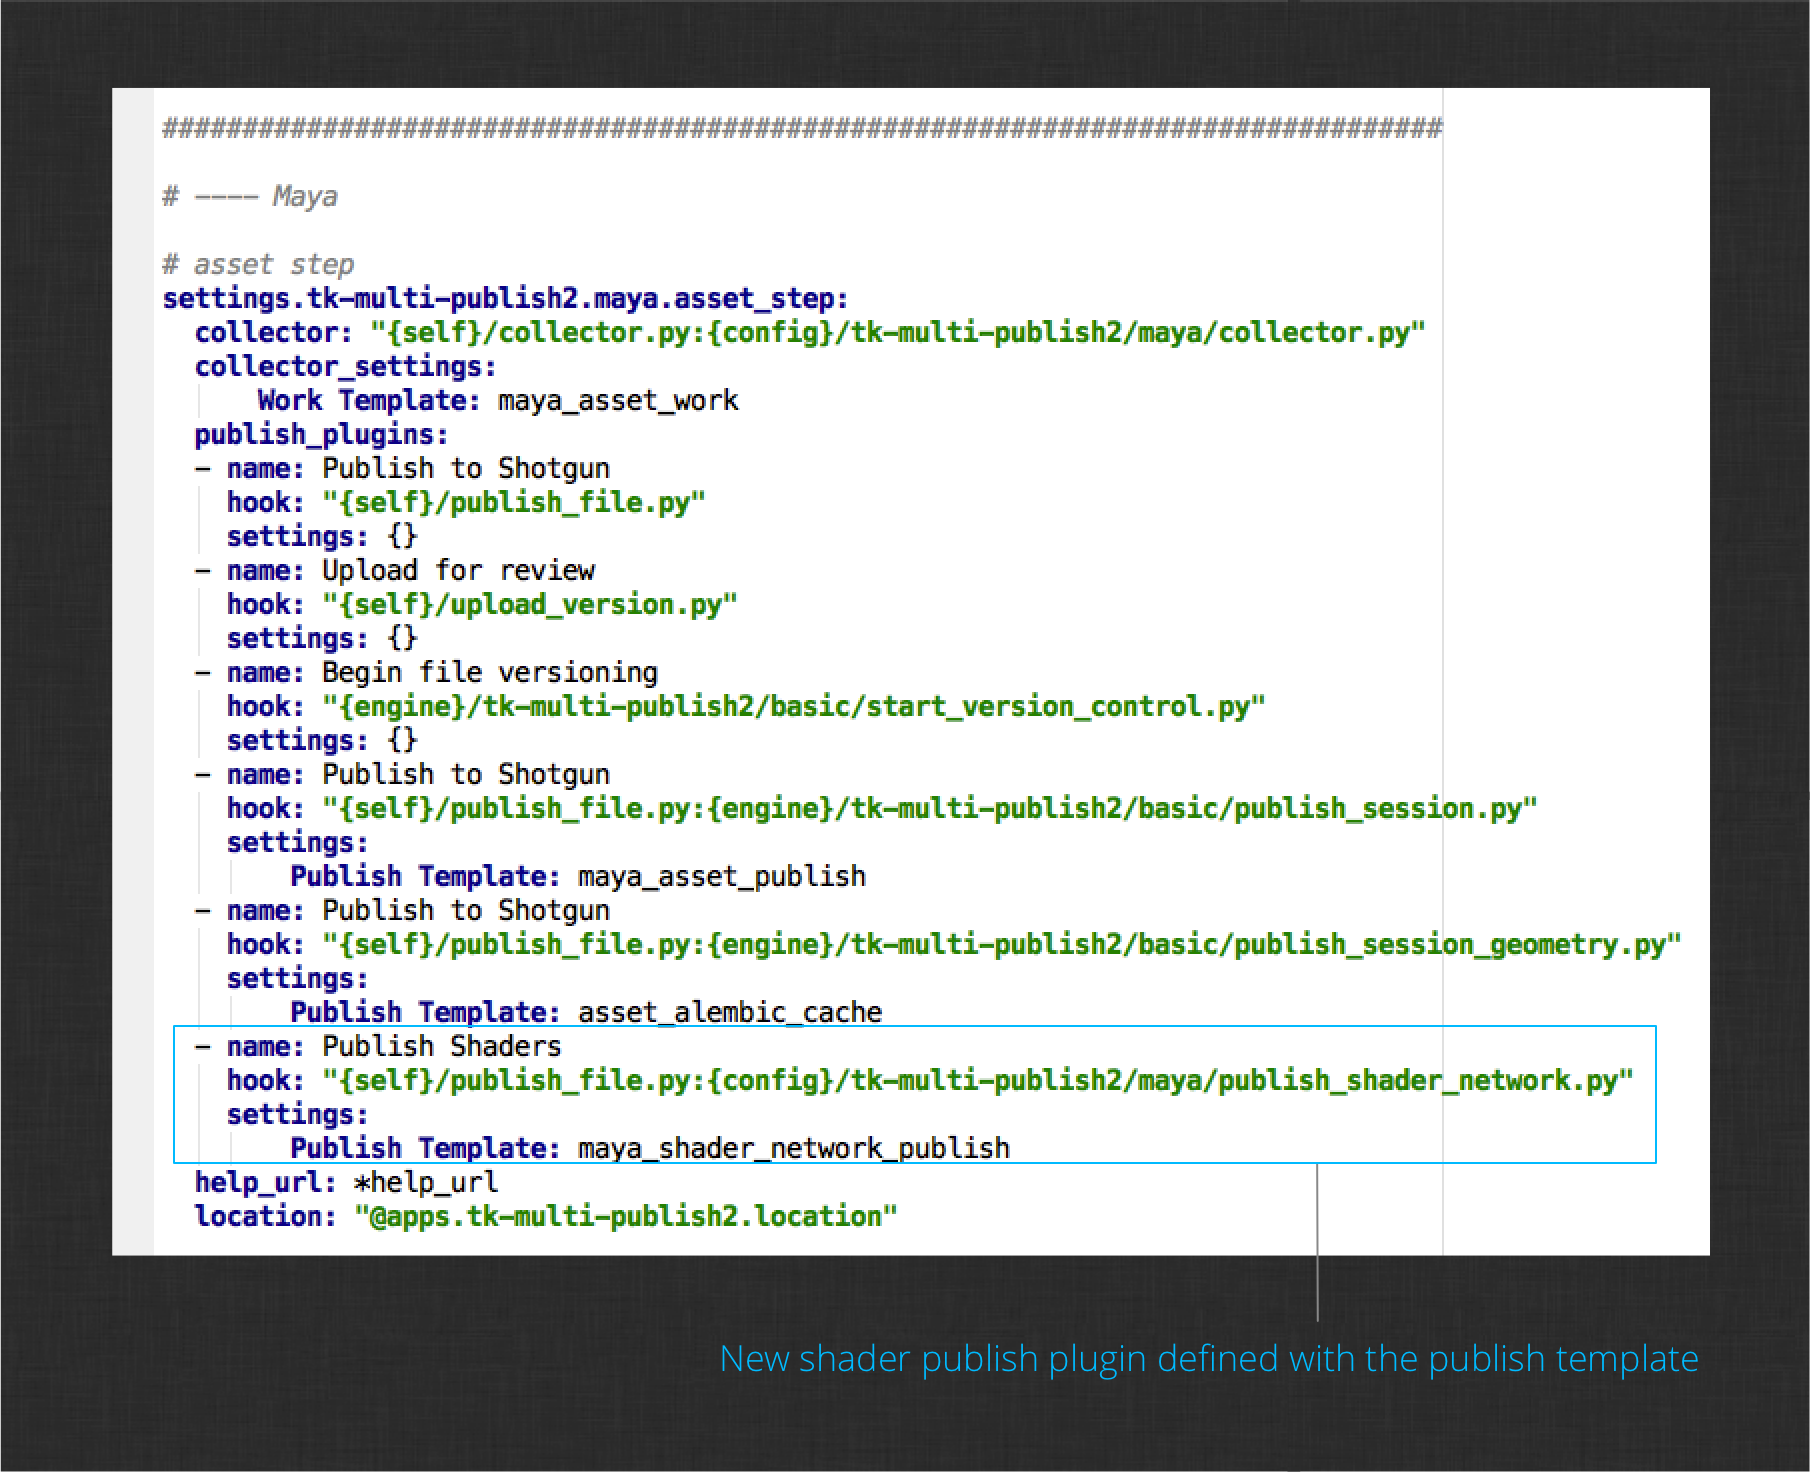
This method defines the configuration interface for the plugin. A “Publish Template” setting is required to tell the plugin where to write the shader networks to disk. Add the new publish plugin to the publisher configuration and include the template setting. This is the same configuration block you modified before when taking over the collector. It is defined in this file:
env/includes/settings/tk-multi-publish2.yml
Your configuration should look like this now:
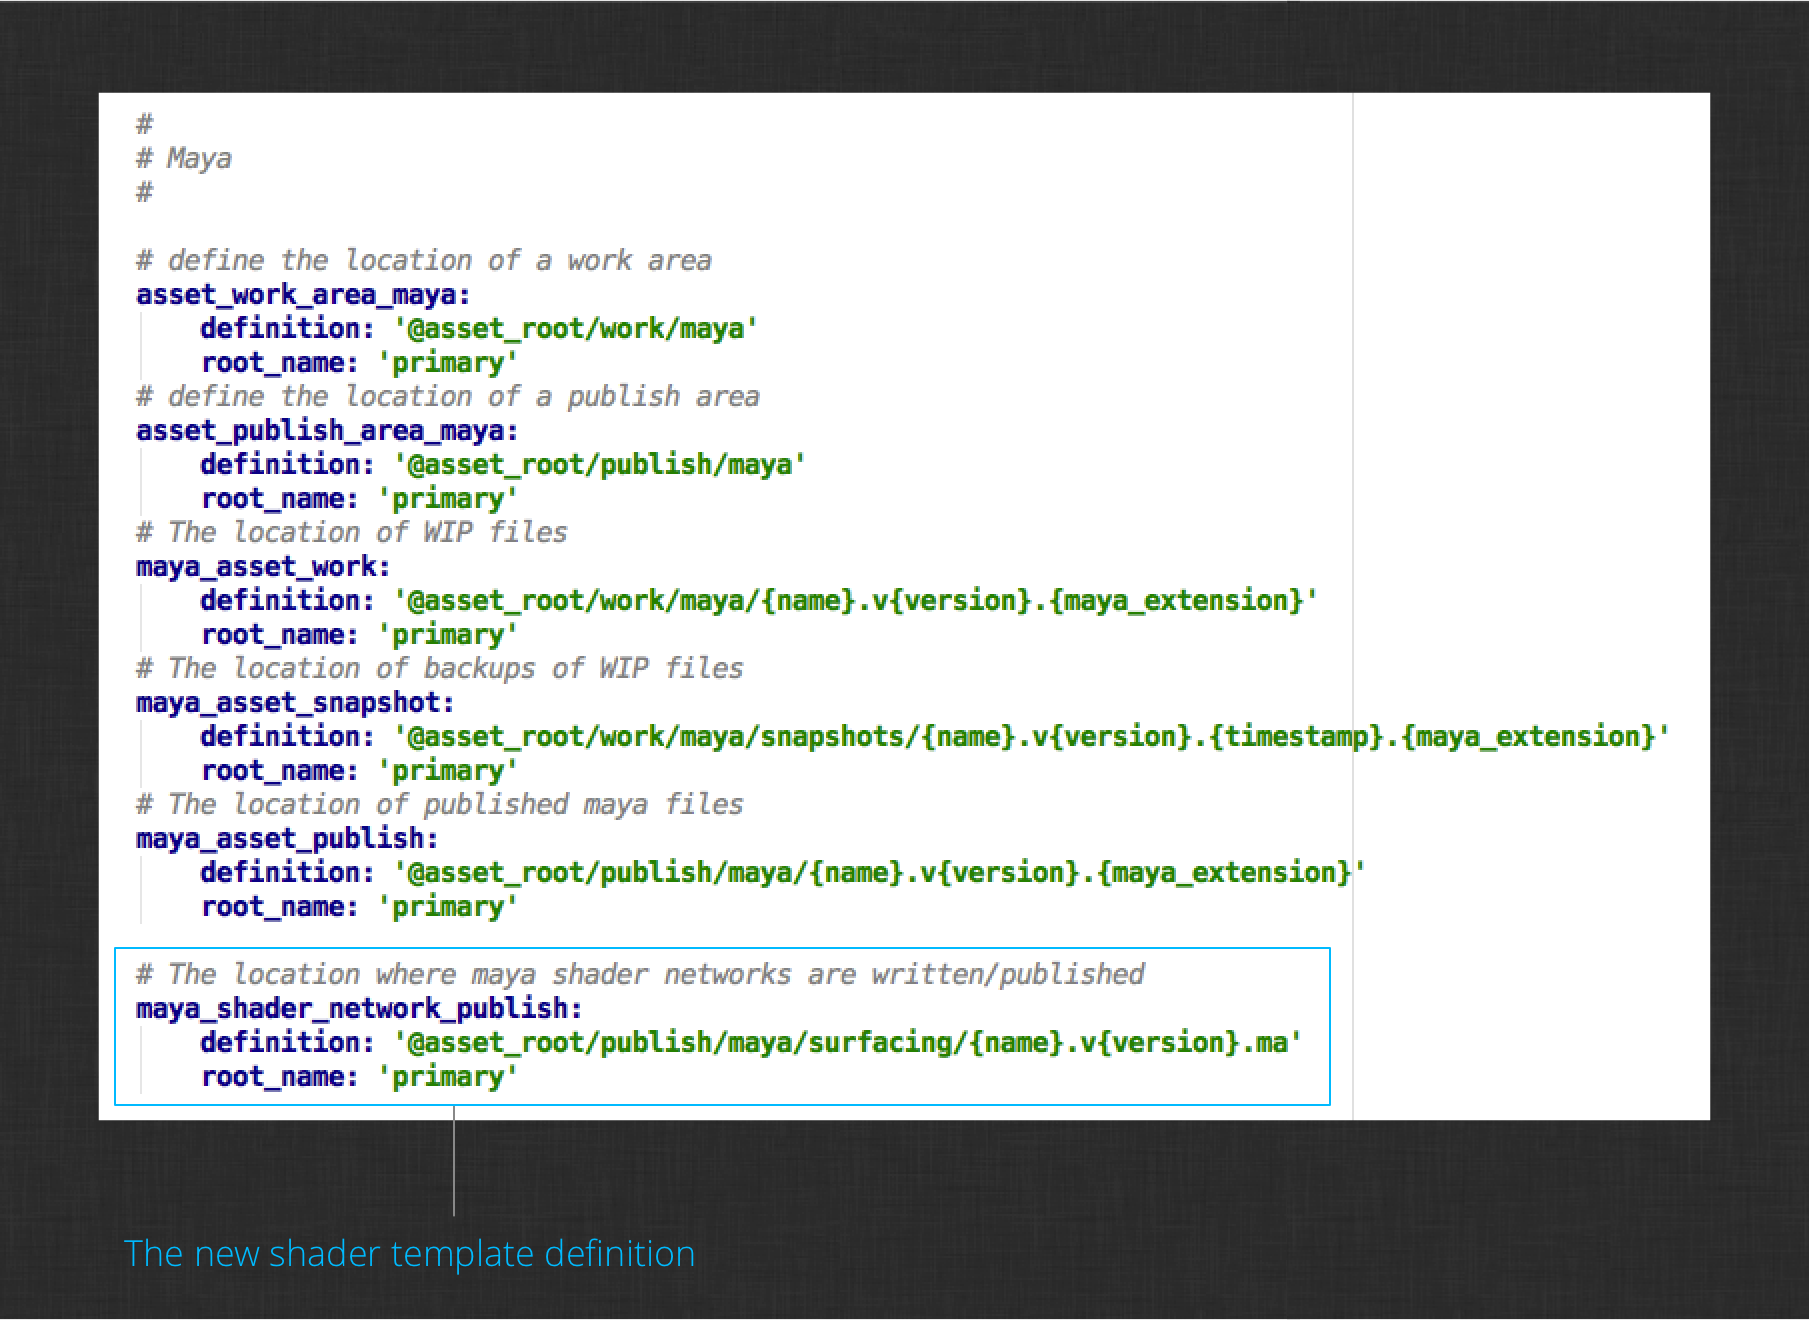
Finally, you need to define the new maya_shader_network_publish template in your configuration. Edit this file to add it:
config/core/templates.yml
Find the section where asset related Maya templates are defined and add the new template definition. Your definition will look like this:
That should be everything. You have overridden the Publish app’s collector hook to find meshes to publish shaders for. You have implemented a new publish plugin to attach to the collected shader items, and you have defined and configured a new publish template where the shader networks will be written to disk.
Note : If you closed Maya while making the customizations to your configuration, do not worry. You can simply launch Maya again and use the File Open dialog to open your surfacing work file. You can skip the reloading step below.
Reloading the ShotGrid Integrations
In order to try out your customizations, you’ll need to reload the integrations in your Maya session. To do this, click the ShotGrid > [Task Name] > Work Area Info… menu action.
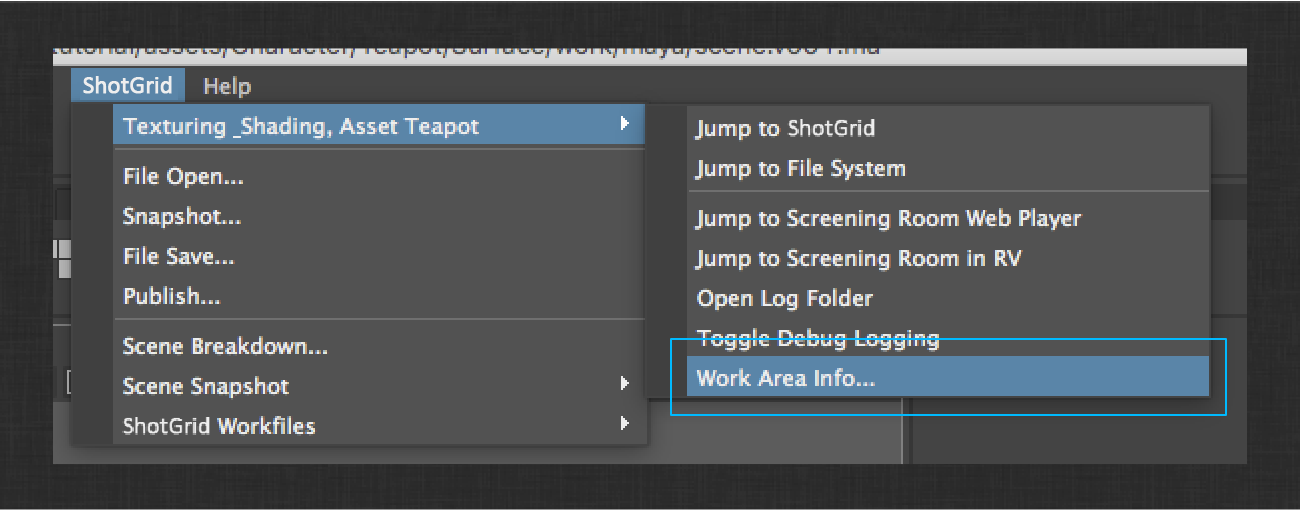
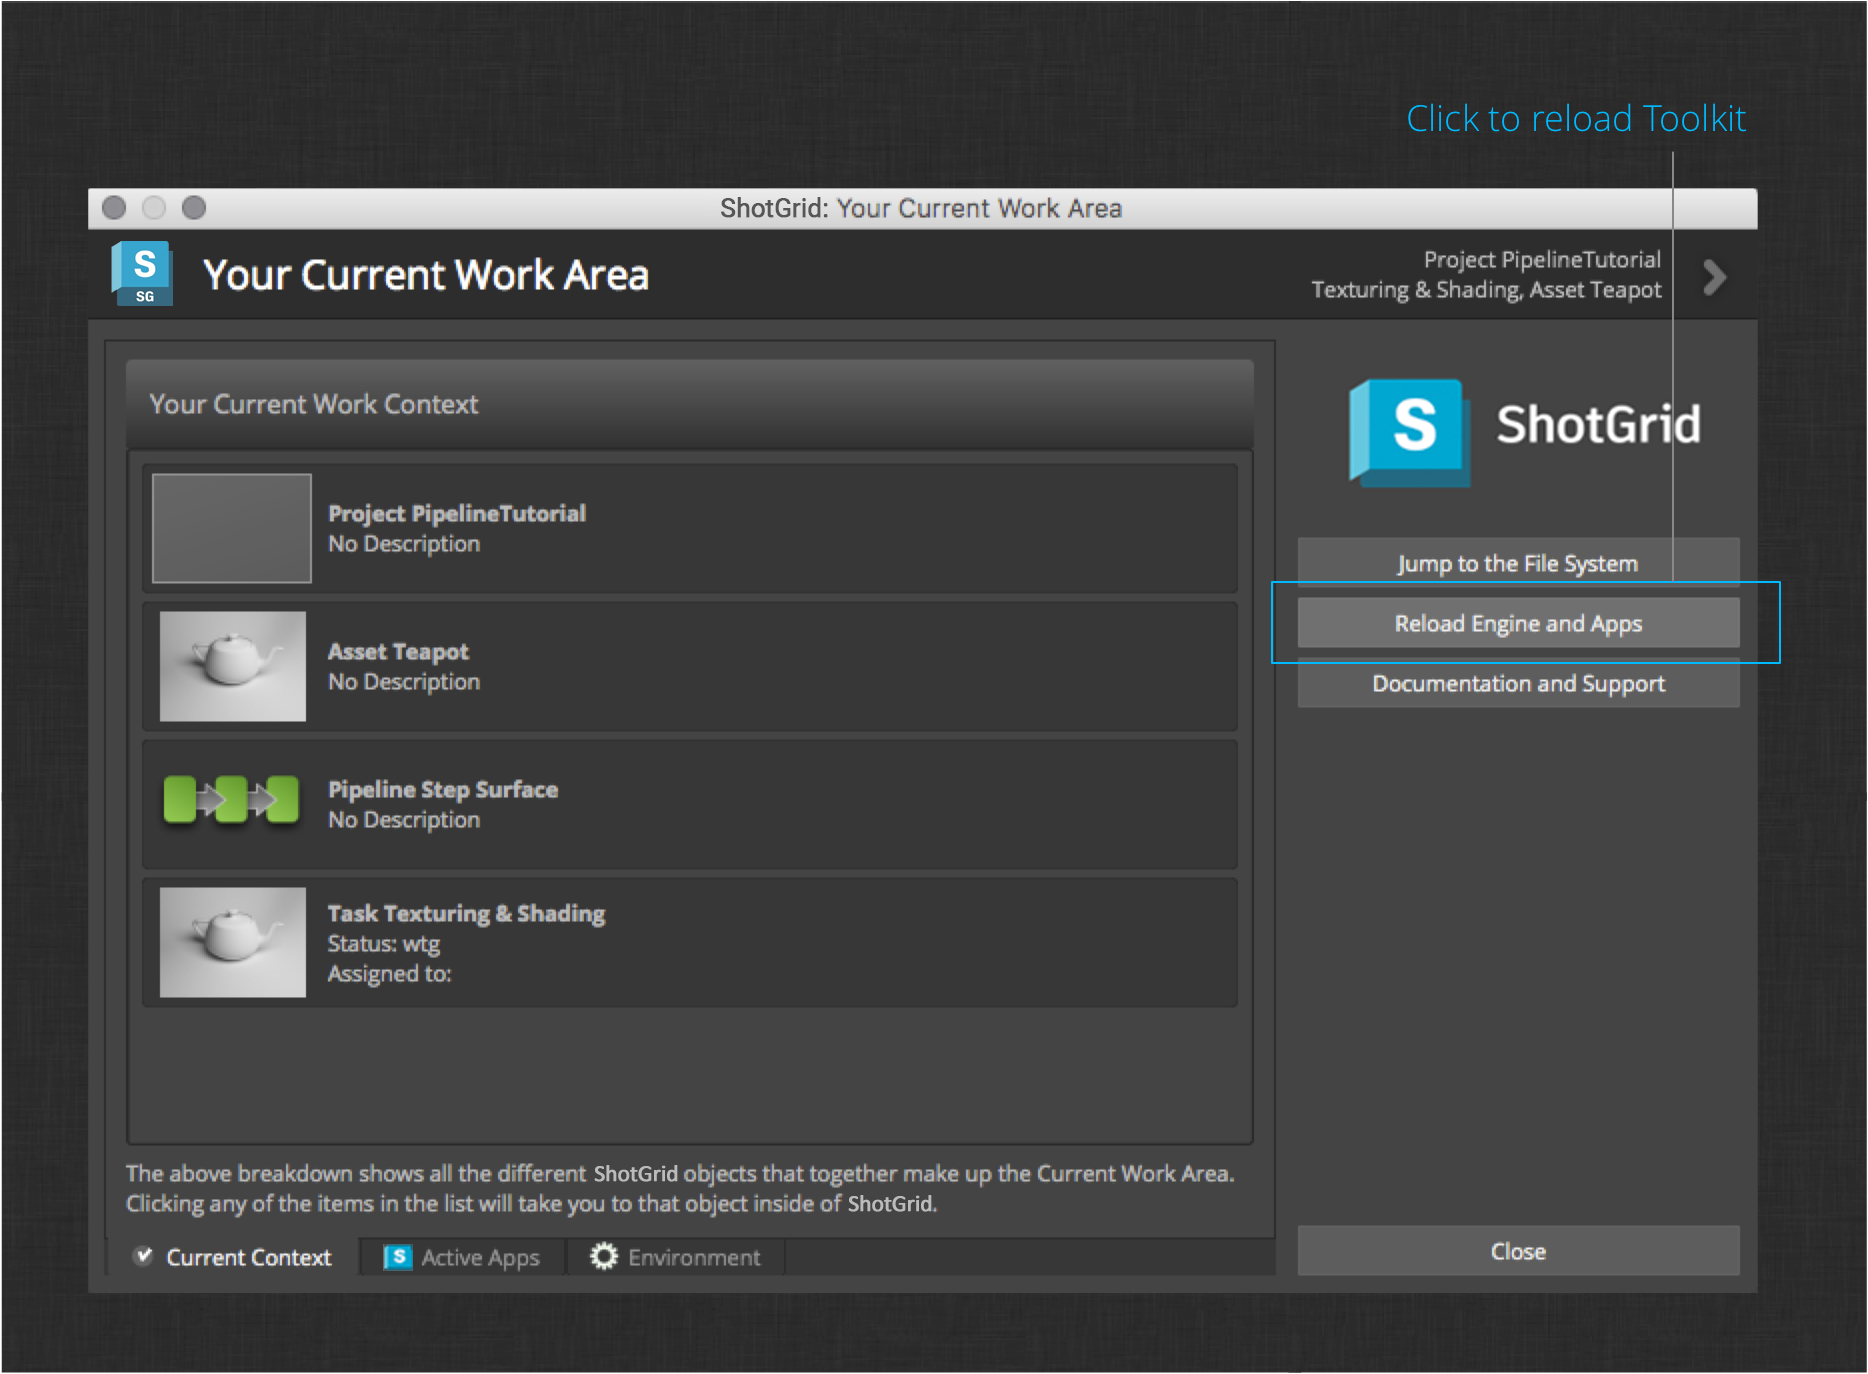
This will launch the Work Area Info app that provides information about your current context. It also has a handy button for reloading integrations while you’re making changes to your configuration. Click the button to reload the the apps and engines, and then close the dialog.
Publishing Shader Networks
Now it is time to see the results of your changes to the project configuration. Launch the publish app from the ShotGrid menu. You should see the collected teapot mesh item with a Publish Shaders plugin attached:
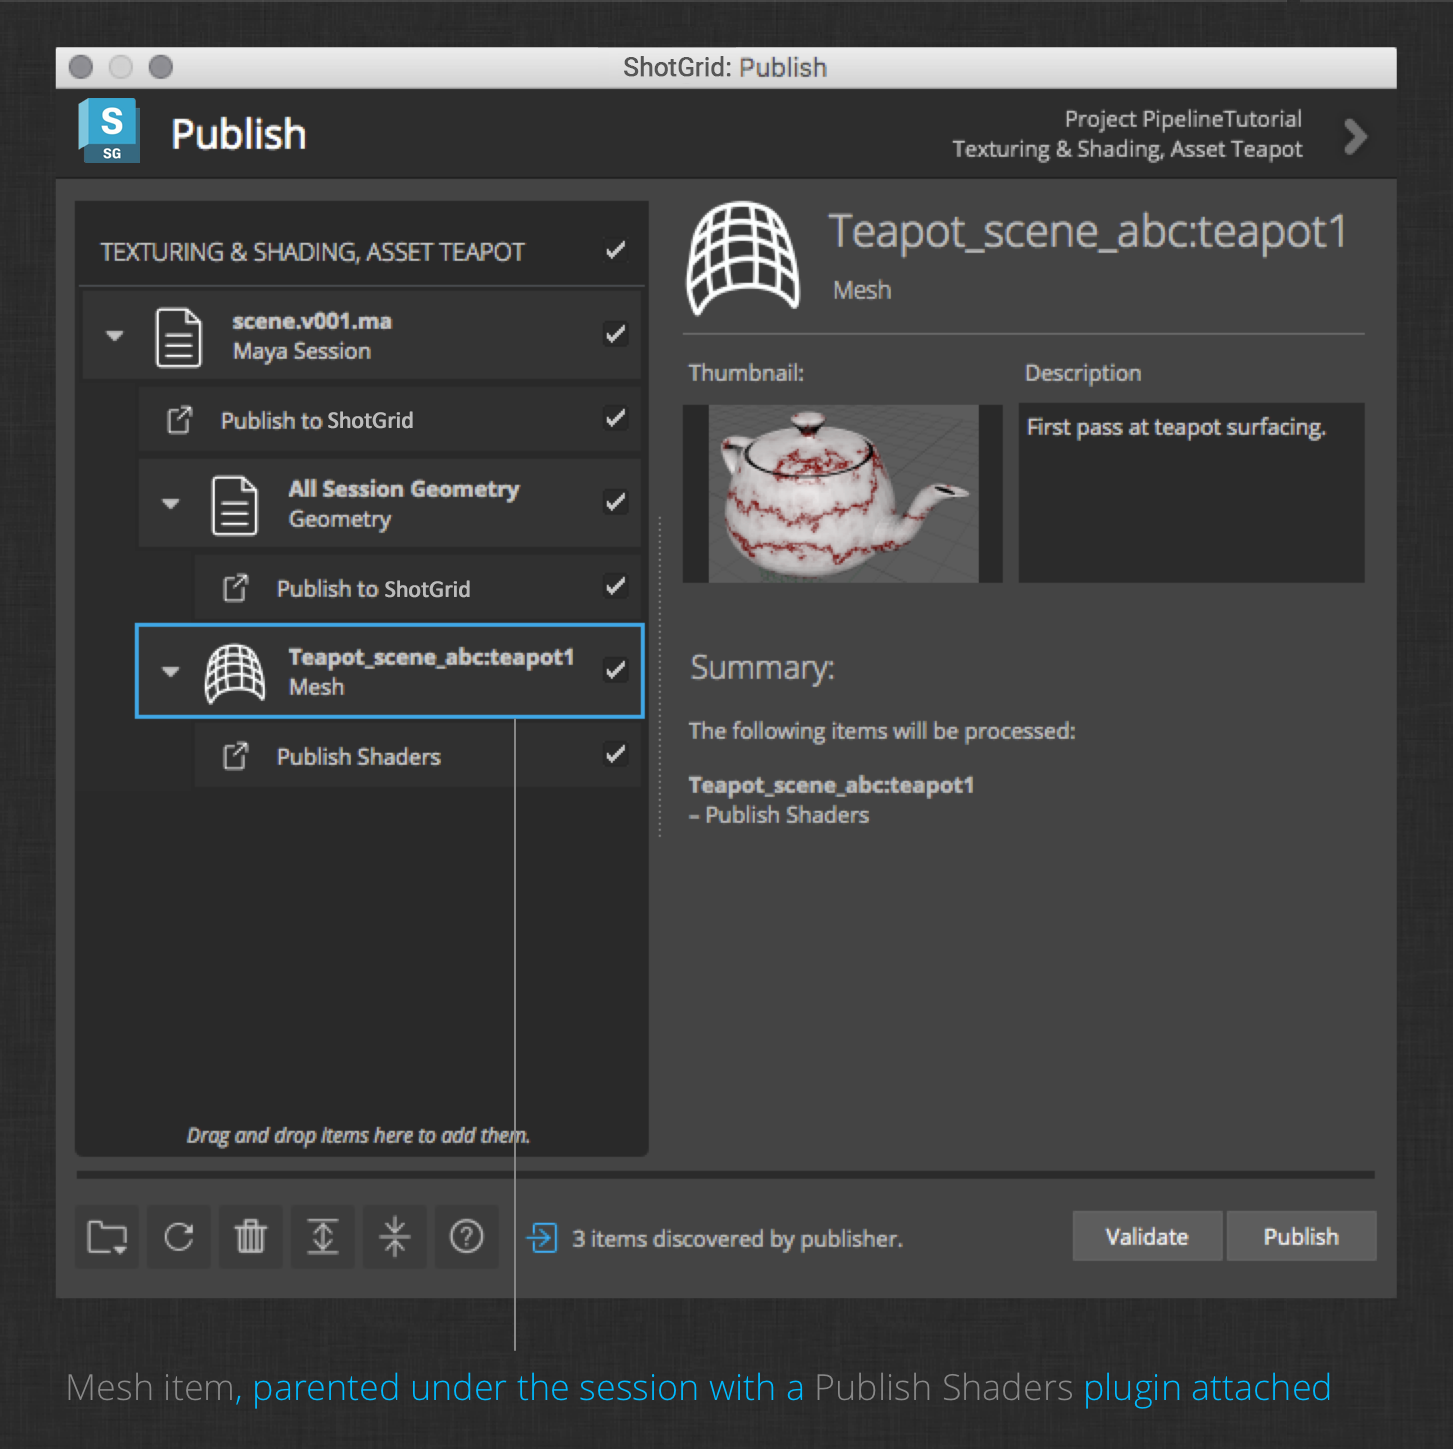
Enter a description of your work and capture a thumbnail of your surfaced Teapot to associate with the published files. Finally, click publish to export the Teapot shaders to disk and register the file as a publish in ShotGrid. When finished, notice that the session publish plugin has automatically saved your work file to the next available version. This is the default behavior within all of the DCCs supported by ShotGrid integrations.
You can now browse to the Teapot asset in ShotGrid to verify that everything worked as expected.
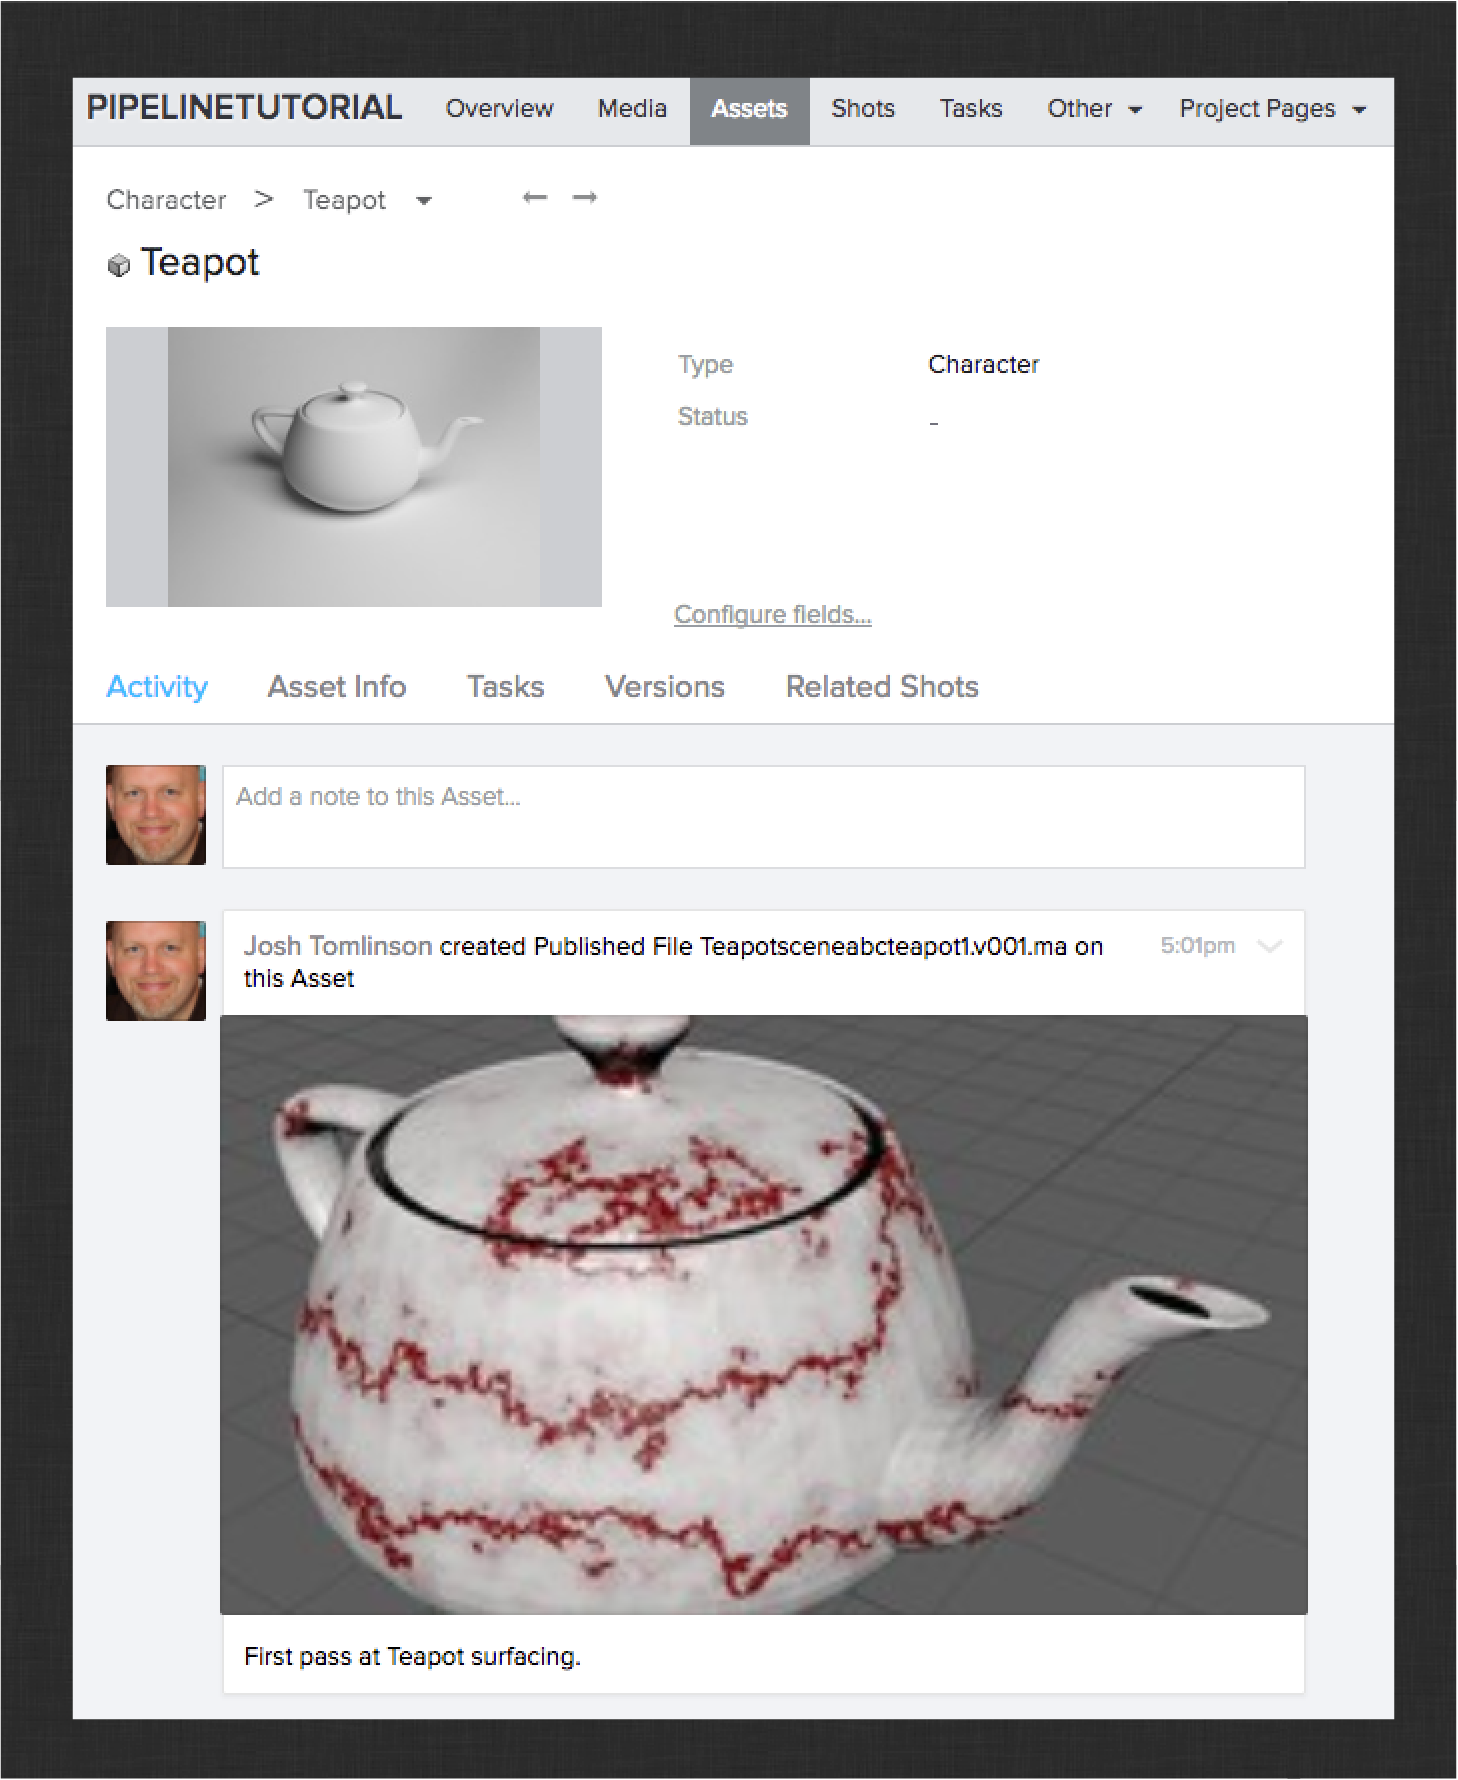
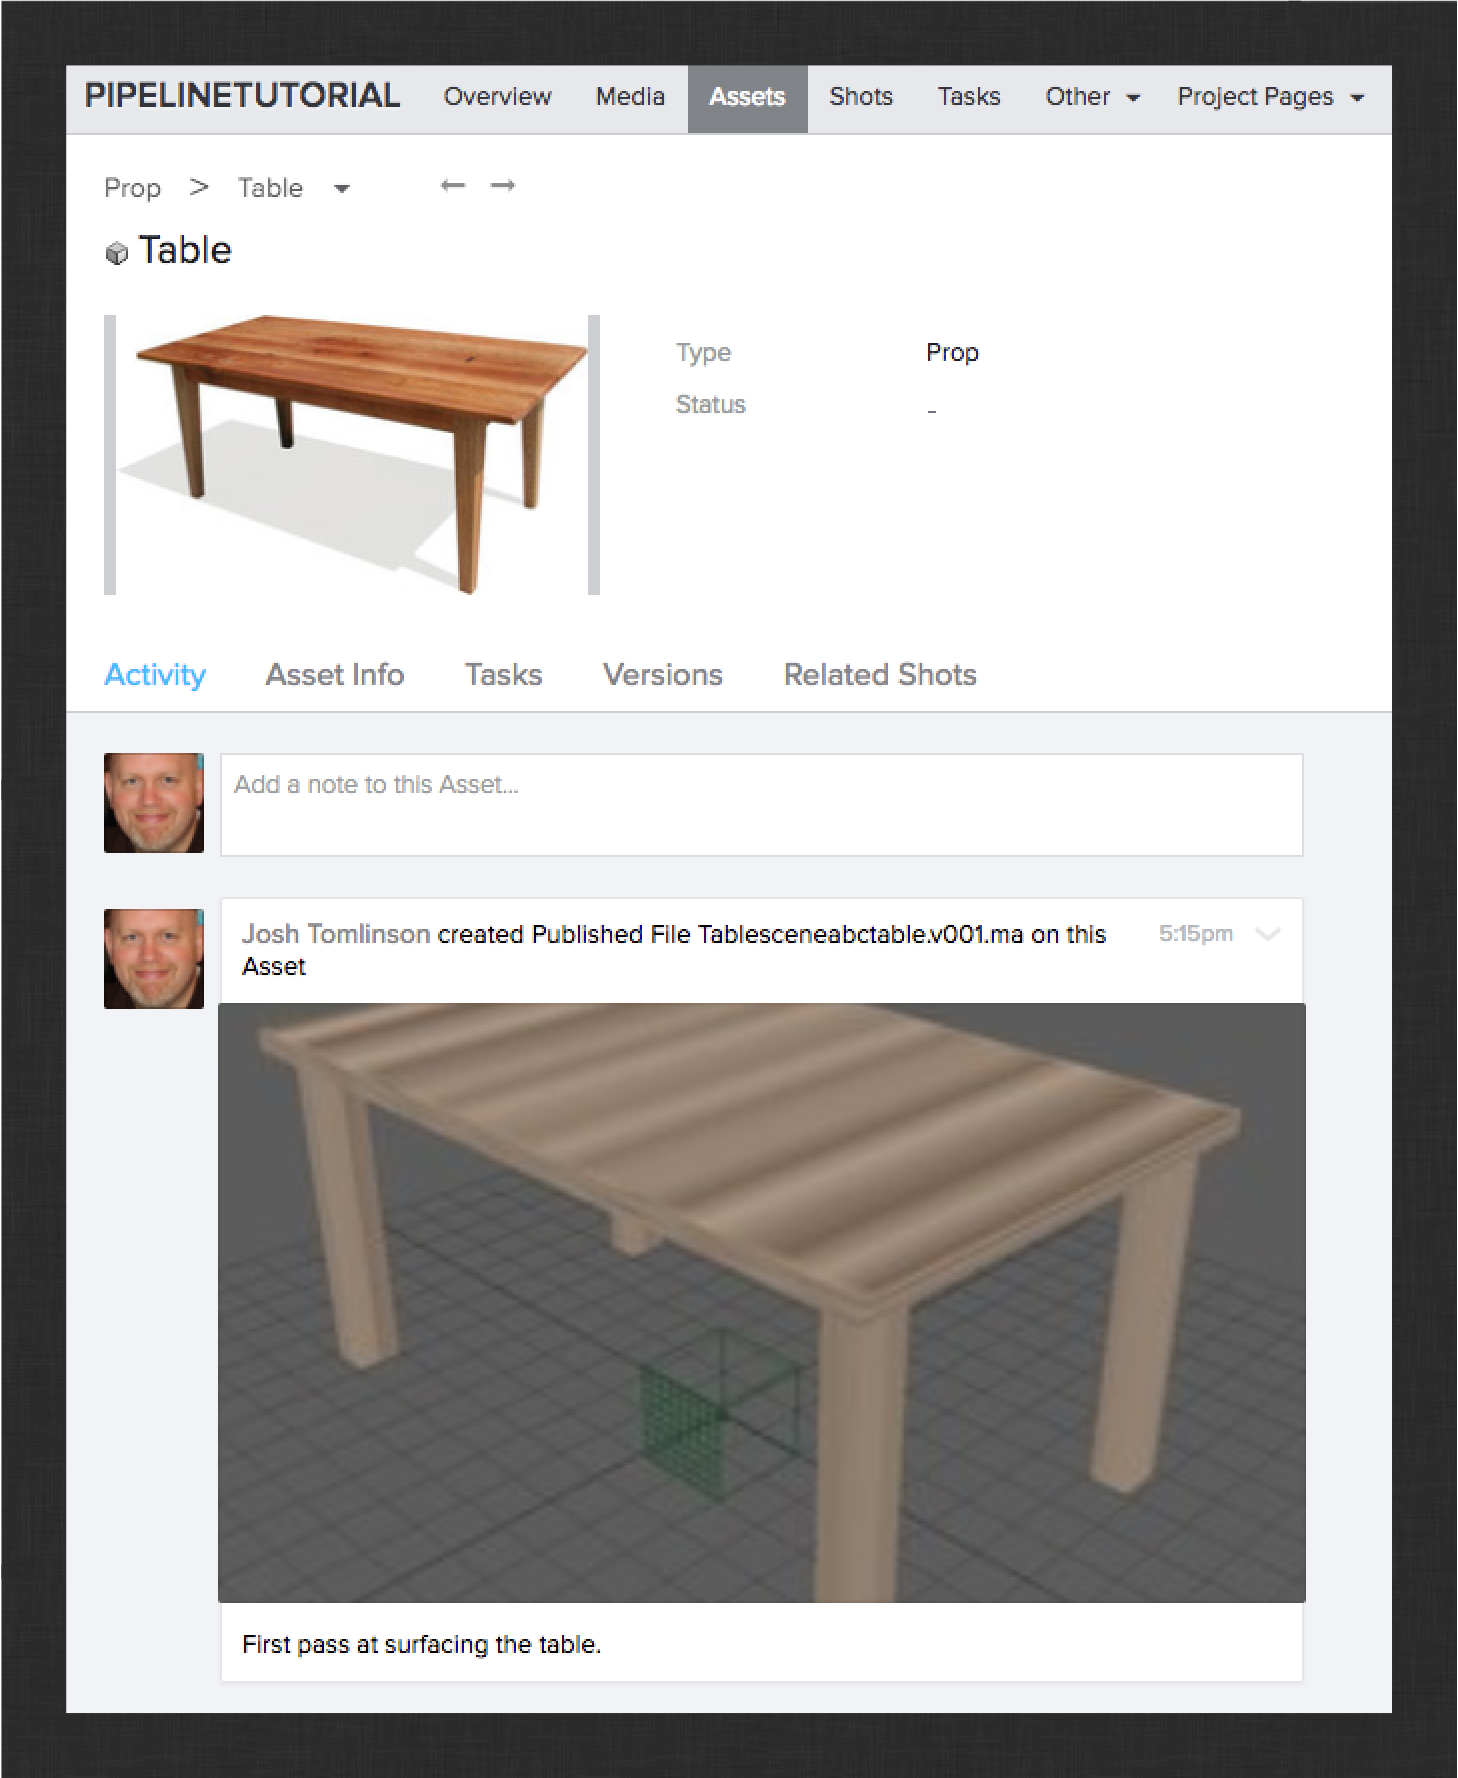
Congratulations! You have successfully customized your pipeline and published shaders for the Teapot. See if you can use what you’ve learned to publish shaders from the Table prop’s surfacing task. The result should look something like this:
Next up, the rigging workflow.
Rigging Workflow
At this point, you should feel pretty comfortable opening (or creating), saving, and publishing workfiles using the Workfile and Publish apps provided by ShotGrid. You’ve also had a chance to use the Loader app to load a publish from upstream. Use what you’ve learned to complete the following tasks:
-
Launch Maya from ShotGrid Desktop
-
Create a new workfile in the Teapot asset’s rigging step
-
Load (reference) Teapot alembic cache publish from the modeling step
-
Rig the teapot’s lid to open and close (keep it simple)
-
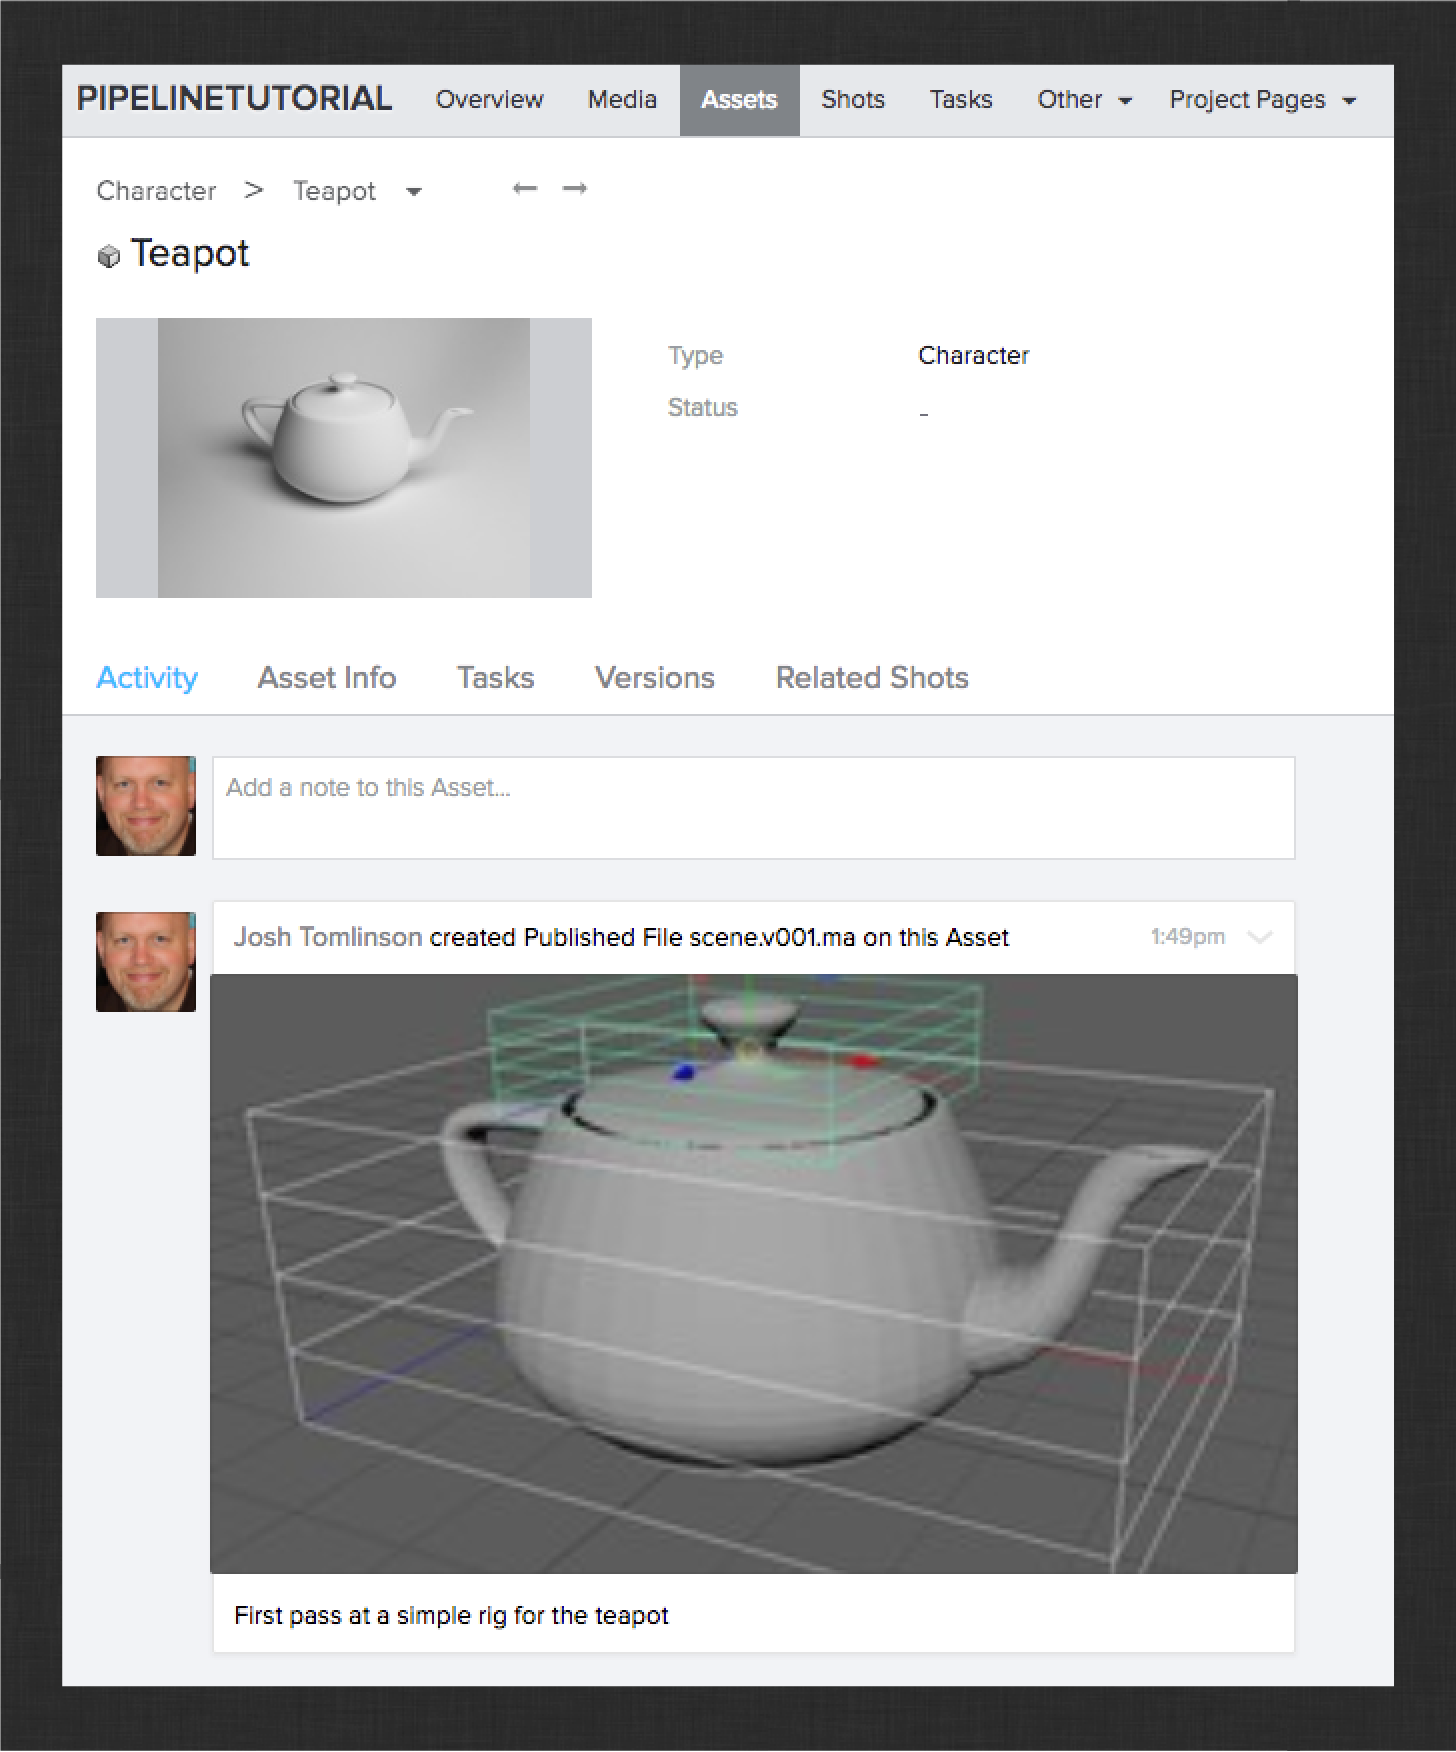
Save and publish the Teapot rig
You should end up with something like this in ShotGrid:
Next, let’s see how artists handle upstream changes in their workflow. Open up the modeling work file and make some changes to the teapot model. Then publish the updated work. The result should be something like this:

Open the work file in the Teapot’s rigging step again (via ShotGrid > File Open…). Now launch the ShotGrid > Scene Breakdown… menu action. This launches the Breakdown app which shows you all of the upstream publishes that you have referenced into your work file. In this case, there is only the upstream Teapot model. You should see something like this:
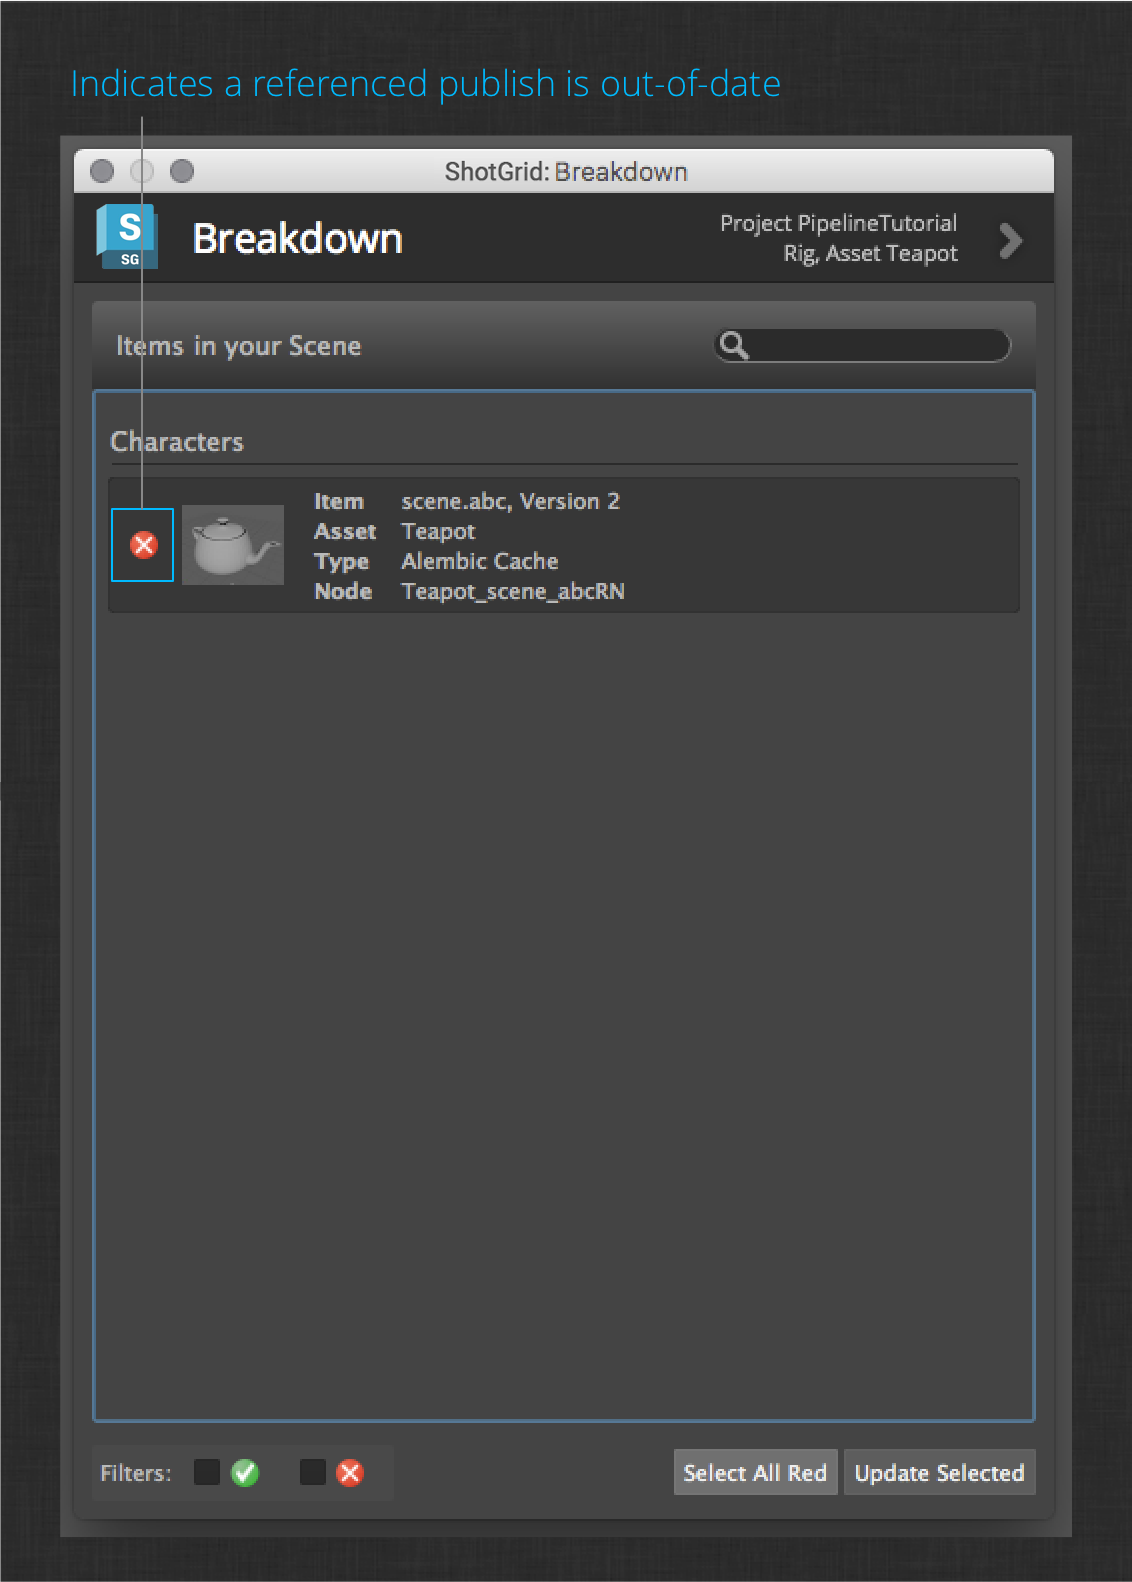
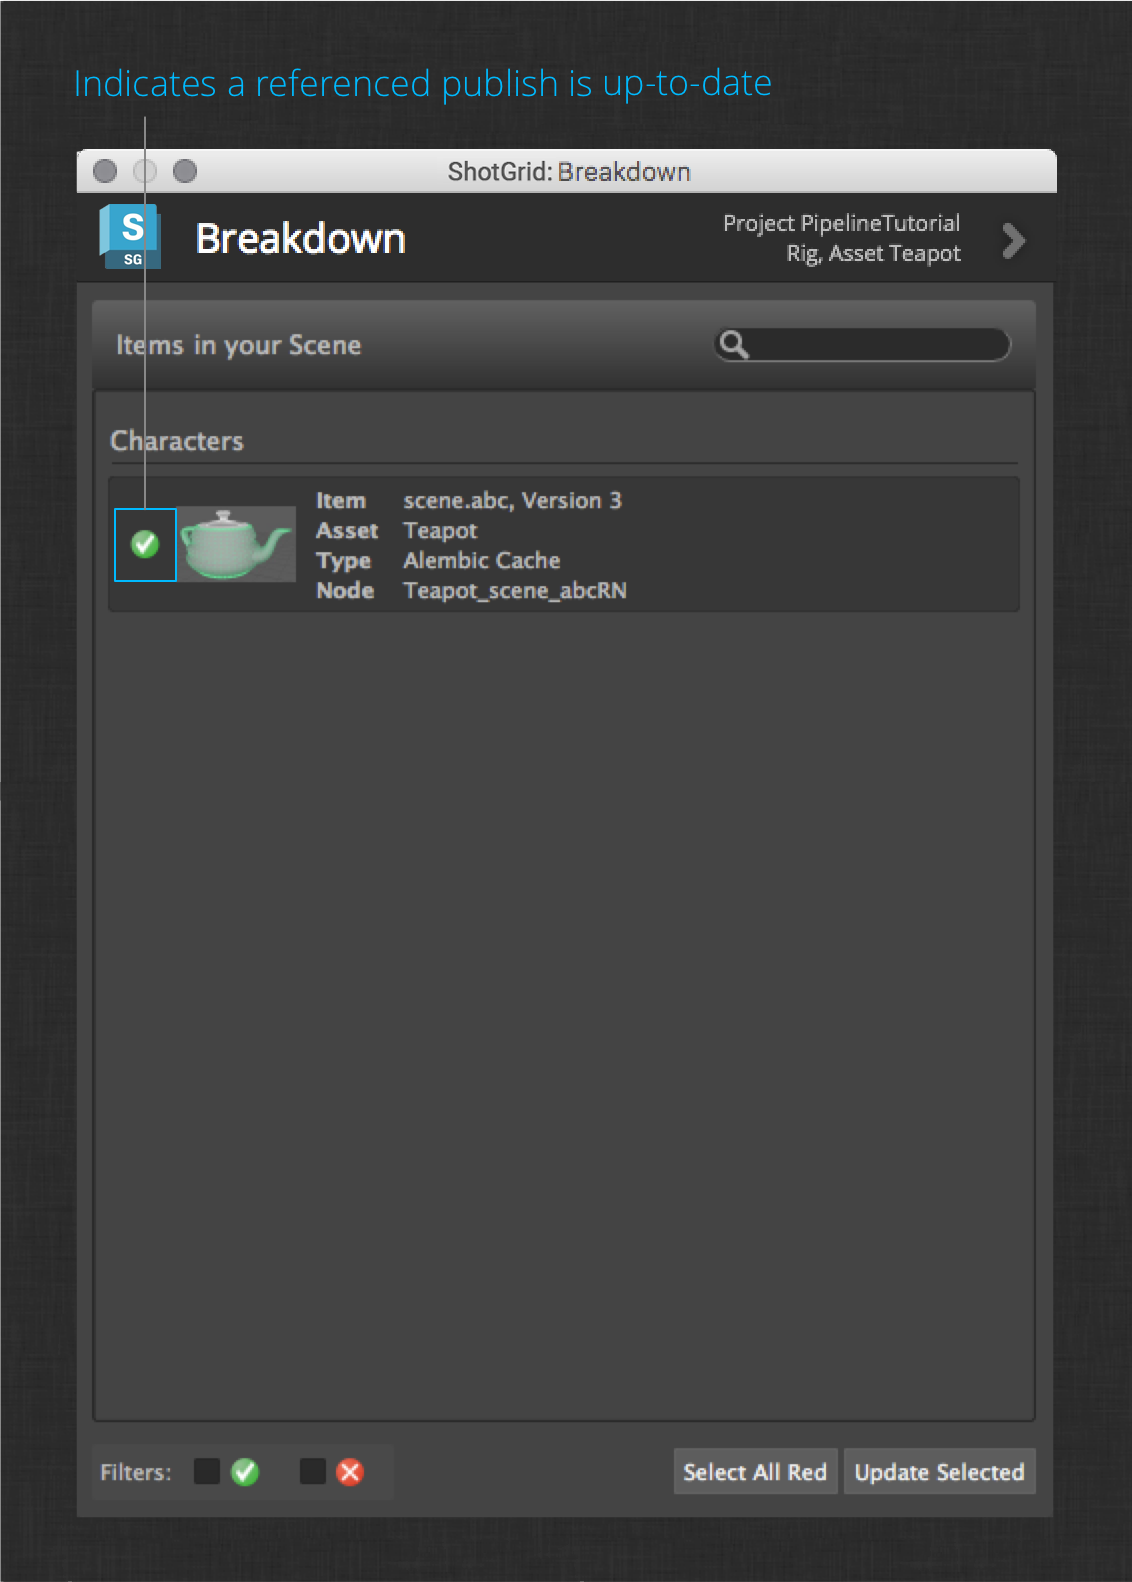
For each reference, the app shows you one of two indicators – a green check to show that the referenced publish is the latest version, or a red “x” to indicate that there is a newer publish available. In this case, we can see that there is a newer publish available.
Now select the referenced Teapot alembic cache item (or click the Select All Red button at the bottom), then click Update Selected.
The app will update the Maya reference to the latest iteration of the Teapot alembic cache. You should now see your new model in the file.
Make any adjustments to your rigging setup that you need to account for the new model and then publish your changes.
In the following sections, you’ll be working in a shot context. Next up, shot layout.
Layout Workflow
In this section, you will begin working in the Shot you created for your project. You will load the assets created in the previous sections and block out the shot. You will then customize the publisher again, this time to publish the shot camera.
Begin by using what you learned in the previous sections to complete the following tasks:
-
Launch Maya from ShotGrid Desktop
-
Create a new workfile in your Shot’s layout step (Hint: use the Shots tab in the Loader)
-
Load (reference) the Teapot publish from the Teapot’s rigging step
-
Load (reference) the Table publish from the Table’s model step
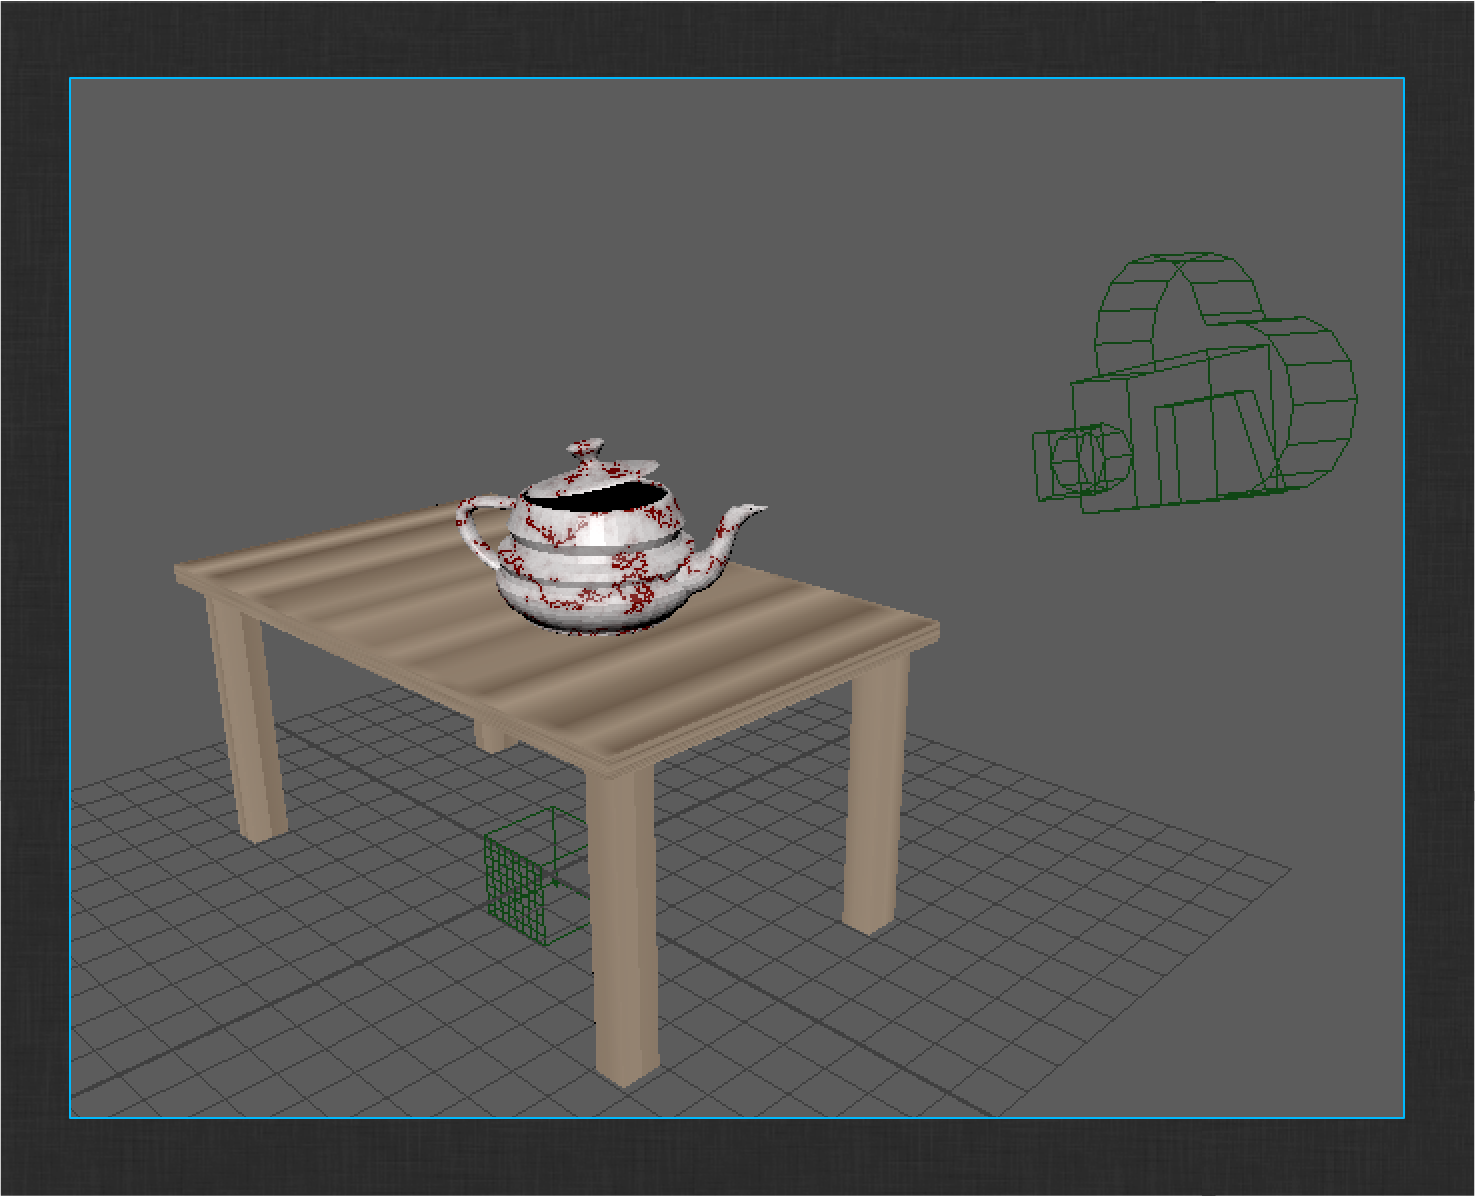
Now block your simple scene with the Teapot on the Table. Add a camera to your scene called camMain and animate a few frames to create your shot’s camera move.
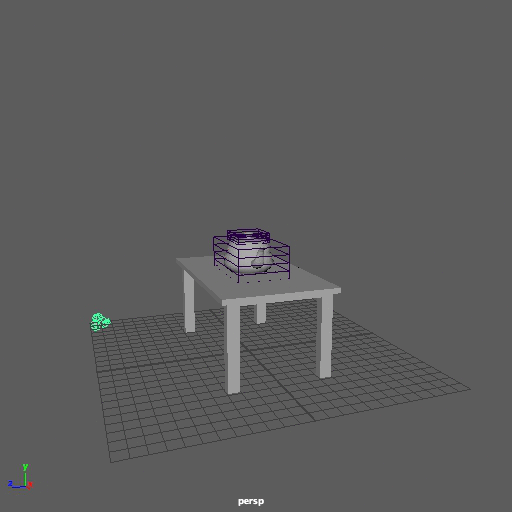
Once you are happy with your shot layout, save the file via the ShotGrid > File Save… menu action. If you were to go ahead and publish at this point, you would only see the entire maya session as an available item to publish.
An easy customization to add, and one that provides a lot of flexibility to a pipeline, is the ability to publish stand-alone cameras to a file format that is easy to import into other packages. This makes it possible to generate the camera once, typically in layout, and then have all other pipeline steps, such as animation, lighting, and compositing, consume it directly.
Collecting cameras
As with shader publishing, the first step is to customize the collector hook. You’ve already taken over the collector hook for maya and configured it for the asset step. Now you need to update the configuration for the shot pipeline steps. To do this, modify the publisher’s configuration file and edit the maya shot step collector setting.
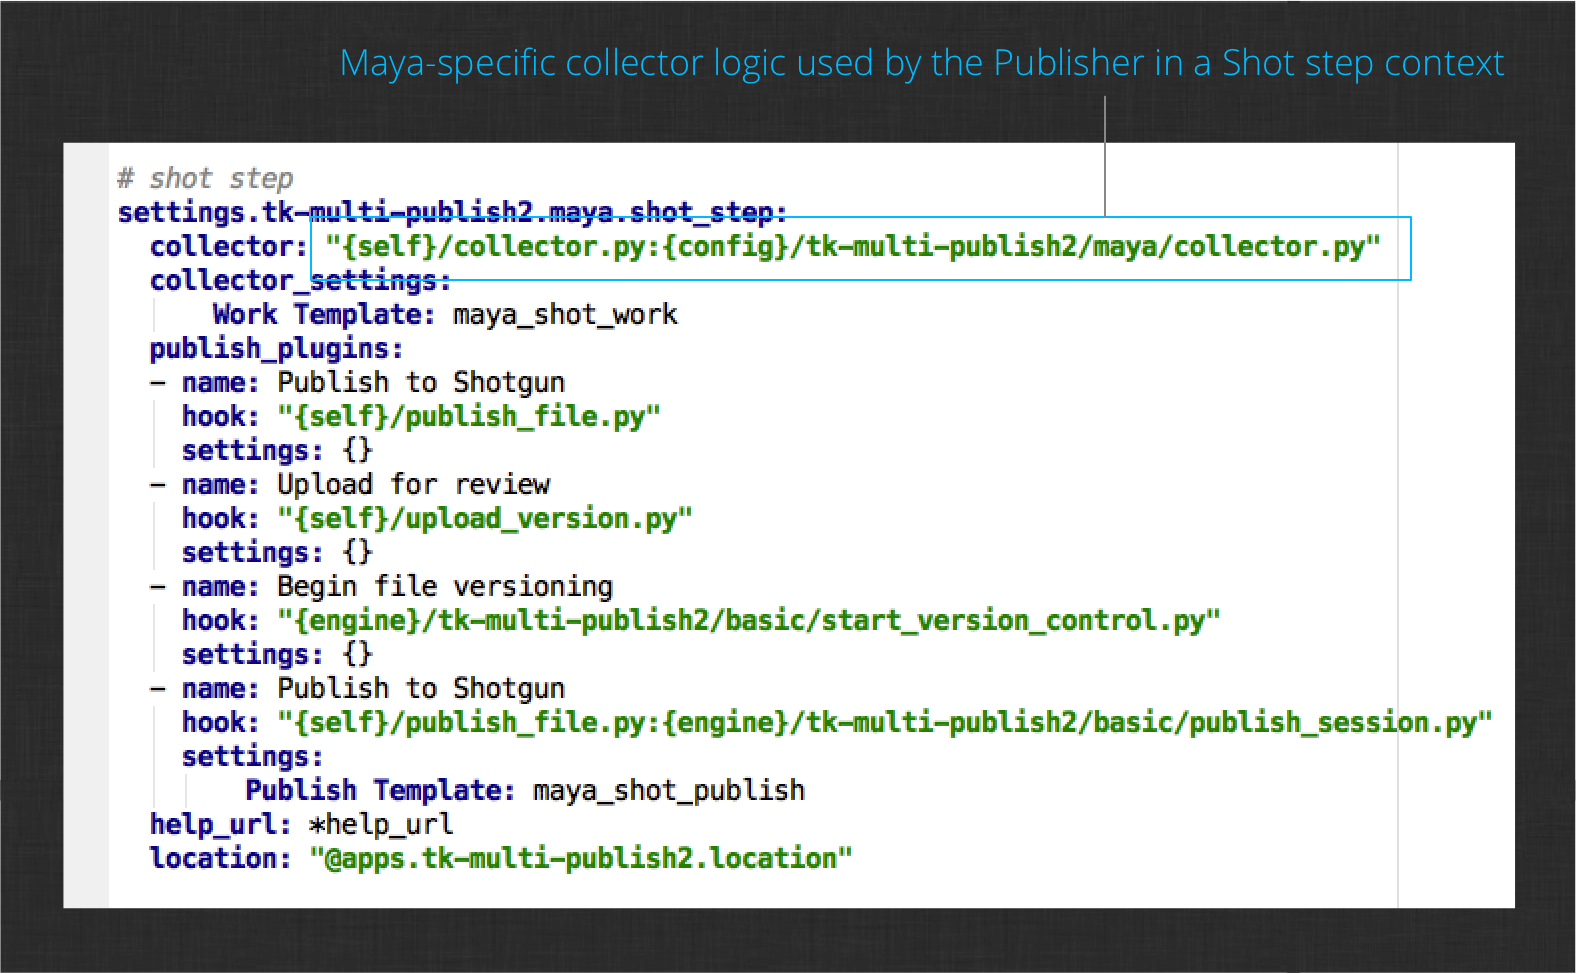
Now, when working in a task within a Shot context, your custom collector logic will run. The next step is to add the custom camera collection logic.
Open your custom collector hook and add the following method call at the bottom of the process_current_session method where you added the call to collect meshes in the surfacing section:
self._collect_cameras(item)
Next, add the method itself to the bottom of the file:
    def _collect_cameras(self, parent_item):
       """
       Creates items for each camera in the session.

       :param parent_item: The maya session parent item
       """

       # build a path for the icon to use for each item. the disk
       # location refers to the path of this hook file. this means that
       # the icon should live one level above the hook in an "icons"
       # folder.
       icon_path = os.path.join(
           self.disk_location,
           os.pardir,
           "icons",
           "camera.png"
       )

       # iterate over each camera and create an item for it
       for camera_shape in cmds.ls(cameras=True):

           # try to determine the camera display name
           try:
               camera_name = cmds.listRelatives(camera_shape, parent=True)[0]
           except Exception:
               # could not determine the name, just use the shape
               camera_name = camera_shape

           # create a new item parented to the supplied session item. We
           # define an item type (maya.session.camera) that will be
           # used by an associated camera publish plugin as it searches for
           # items to act upon. We also give the item a display type and
           # display name. In the future, other publish plugins might attach to
           # these camera items to perform other actions
           cam_item = parent_item.create_item(
               "maya.session.camera",
               "Camera",
               camera_name
           )

           # set the icon for the item
           cam_item.set_icon_from_path(icon_path)

           # store the camera name so that any attached plugin knows which
           # camera this item represents!
           cam_item.properties["camera_name"] = camera_name
           cam_item.properties["camera_shape"] = camera_shape
Once again, the code is commented and should give you an idea of what is being done. You have added logic to collect camera items for all cameras in the current session. As before, if you were to execute the publisher at this point however, you would not see any camera items in the item tree. This is because there are no publish plugins defined to act on them. Next, you’ll write a camera publish plugin that will attach to these items and handle publishing them for use downstream.
Note : You probably saw the call to set an icon for the camera item in the code above. For this to work, you will need to add an icon to your configuration at the specified path:
config/hooks/tk-multi-publish2/icons/camera.png
Custom camera publish plugin
The next step is to connect the newly collected mesh items to a publish plugin that can export the mesh’s shaders to disk and publish them. You will need to create a new publish plugin to do this. Follow this link to the source code for this hook and save it in the hooks/tk-multi-publish2/maya folder and name it publish_camera.py.
Camera publish configuration
Finally, you need to update the Publish app’s configuration for the Shot steps. Edit the settings file to add your new plugin.
env/includes/settings/tk-multi-publish2.yml
Your configuration should look like this now:
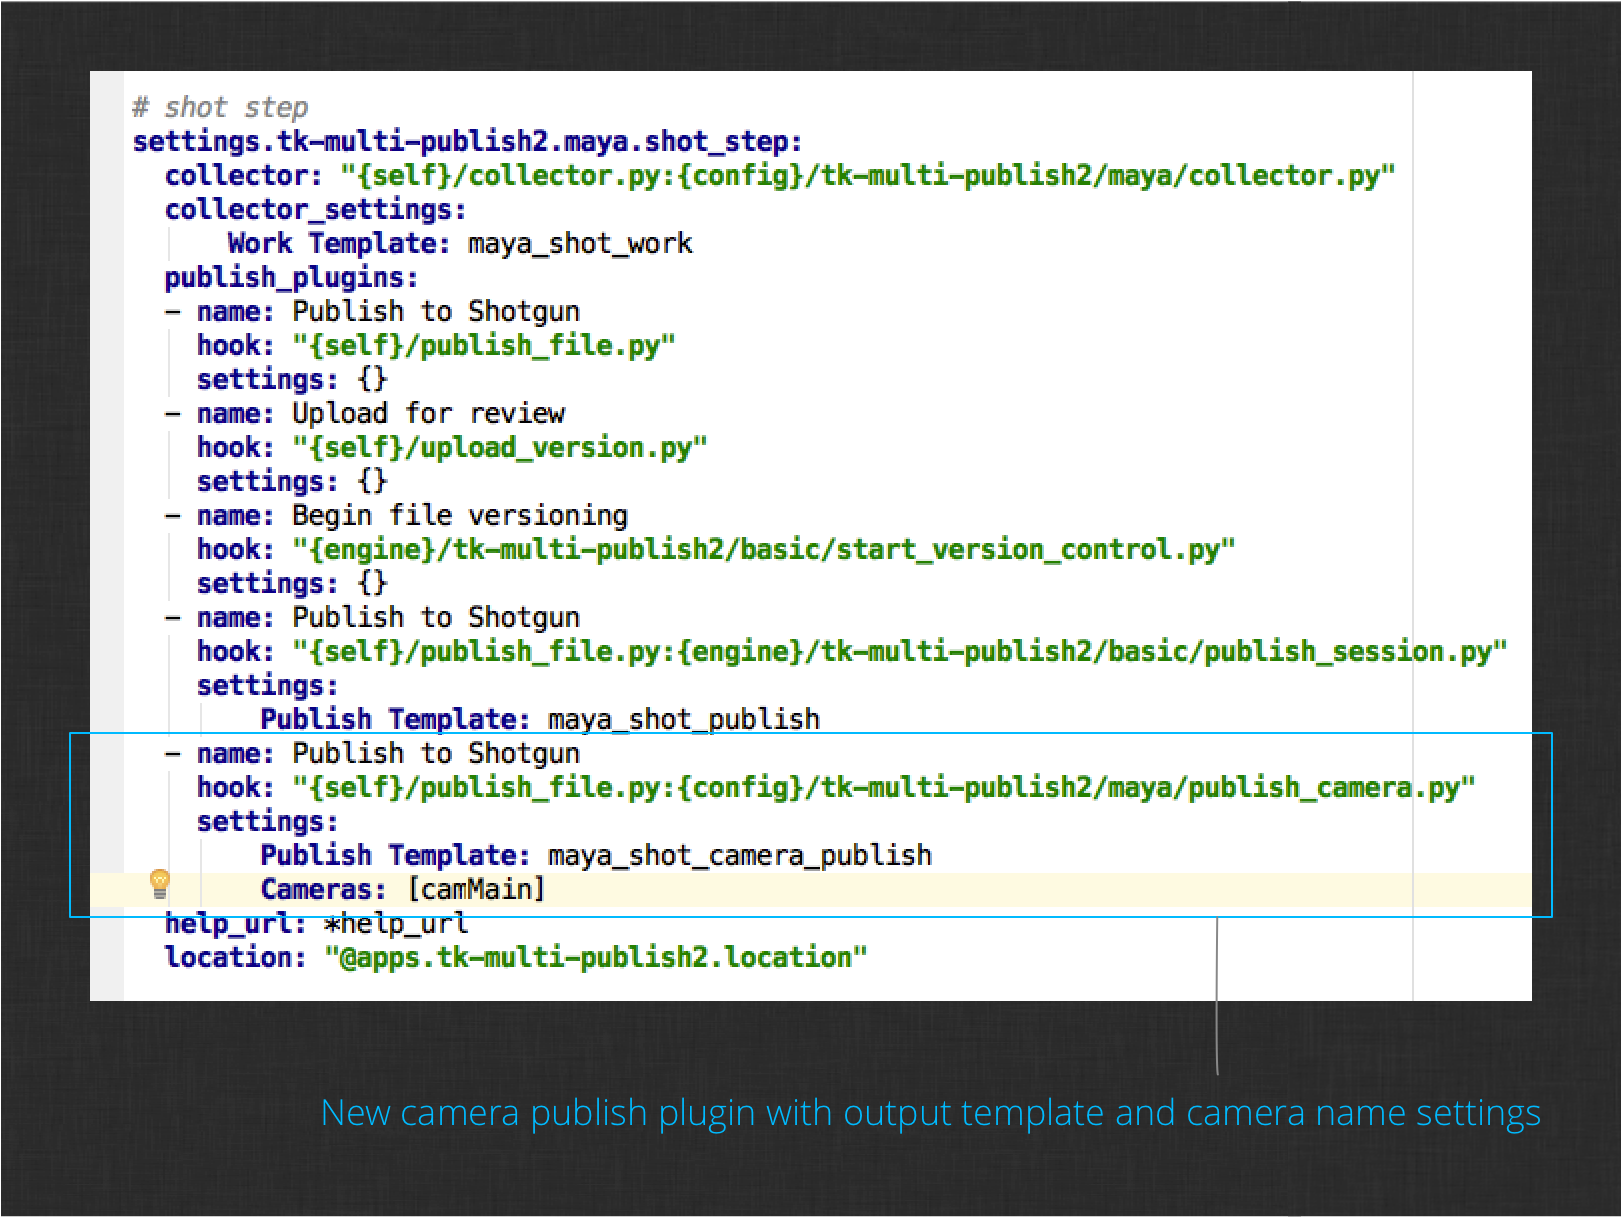
You’ll notice the two settings added to the file as defined by the settings method of the new plugin. As with the shader plugin, there is a Publish Template setting which defines where the camera files will be written. The Cameras setting is a list of camera strings that drive which cameras the plugin should act on. The expectation is that there is some type of camera naming convention and this setting prevents the user from being presented with publish items for cameras that don’t match the convention. In the image above, only the camMain camera will be presented for publishing. The implementation of the plugin you added will also work with wildcard patterns like cam*.
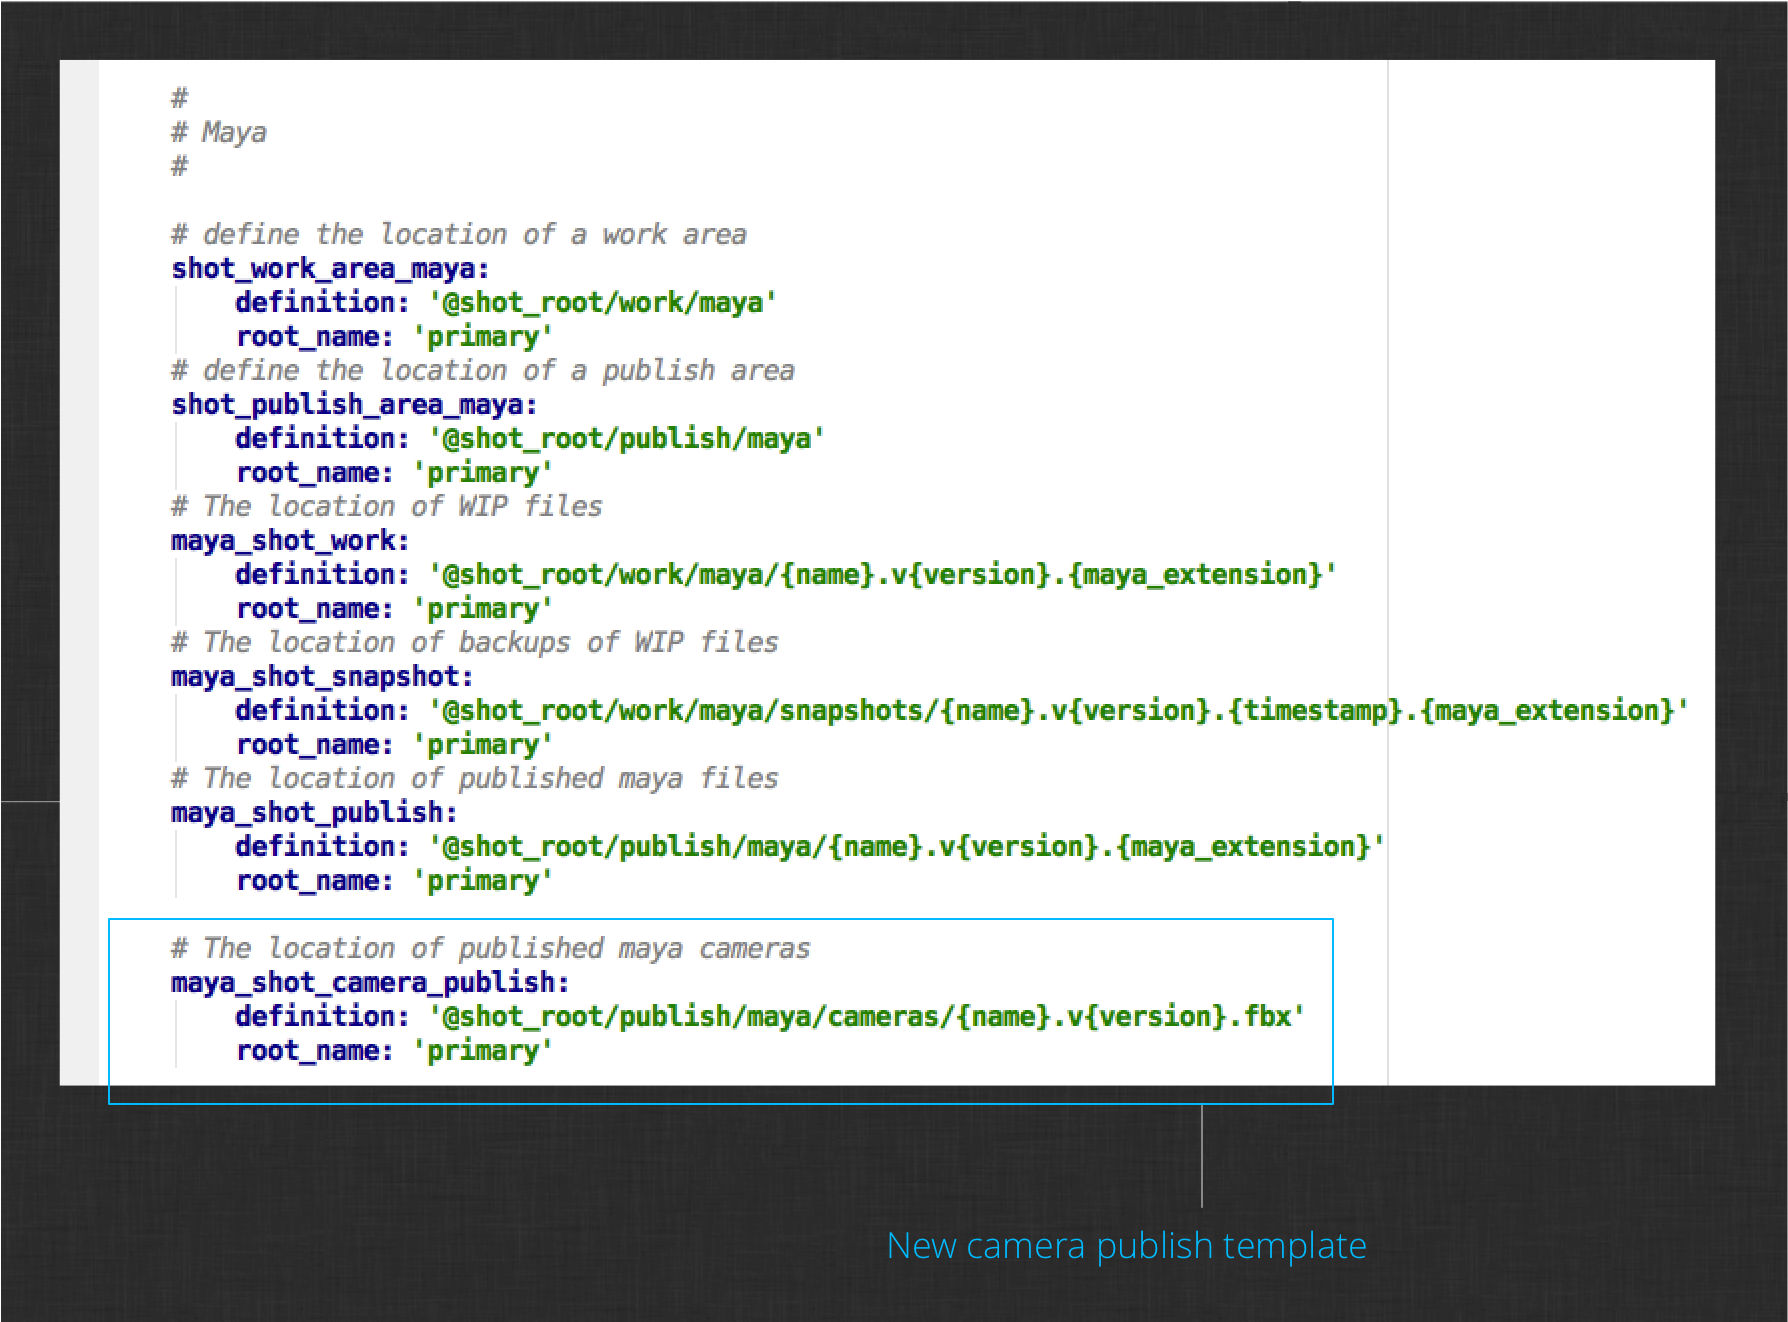
The last step before testing your changes is to add the definition for the new camera publish template. Edit the config/core/templates.yml file and add the template definition to the maya shot template section:
At this point, you should be ready to publish your camera with the new plugin. Use the Work Area Info app to reload the integrations, then launch the publisher.
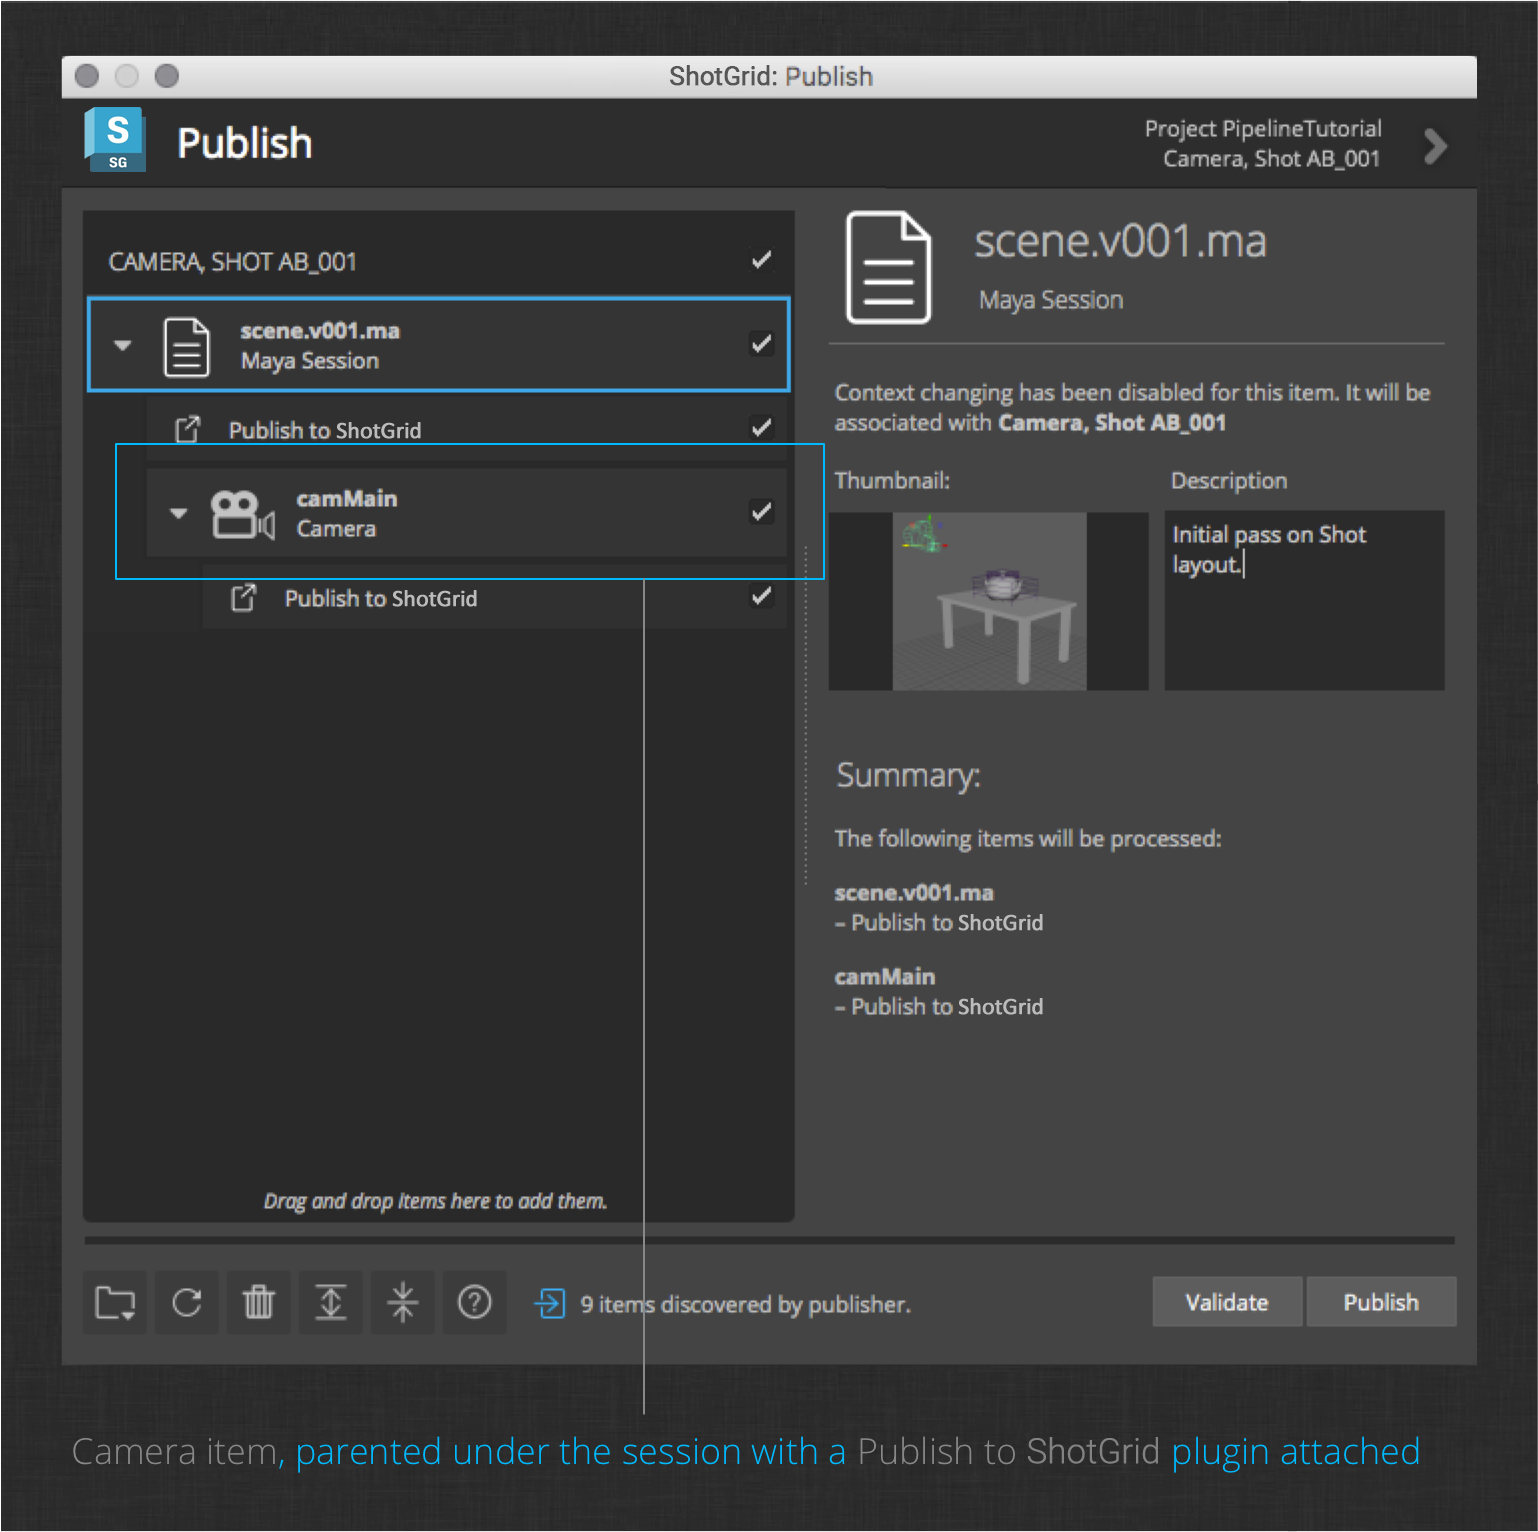
As you can see in the image, the new camera item is collected and the publish plugin is attached. Go ahead and click Publish to write the camera to disk and register it with ShotGrid.
Note : Similarly to Alembic export, the camera publish plugin requires the FBX export plugin to be loaded. If you don’t see the camera publish plugin item, check to ensure that the FBX plugin is loaded, and re-launch the publisher.
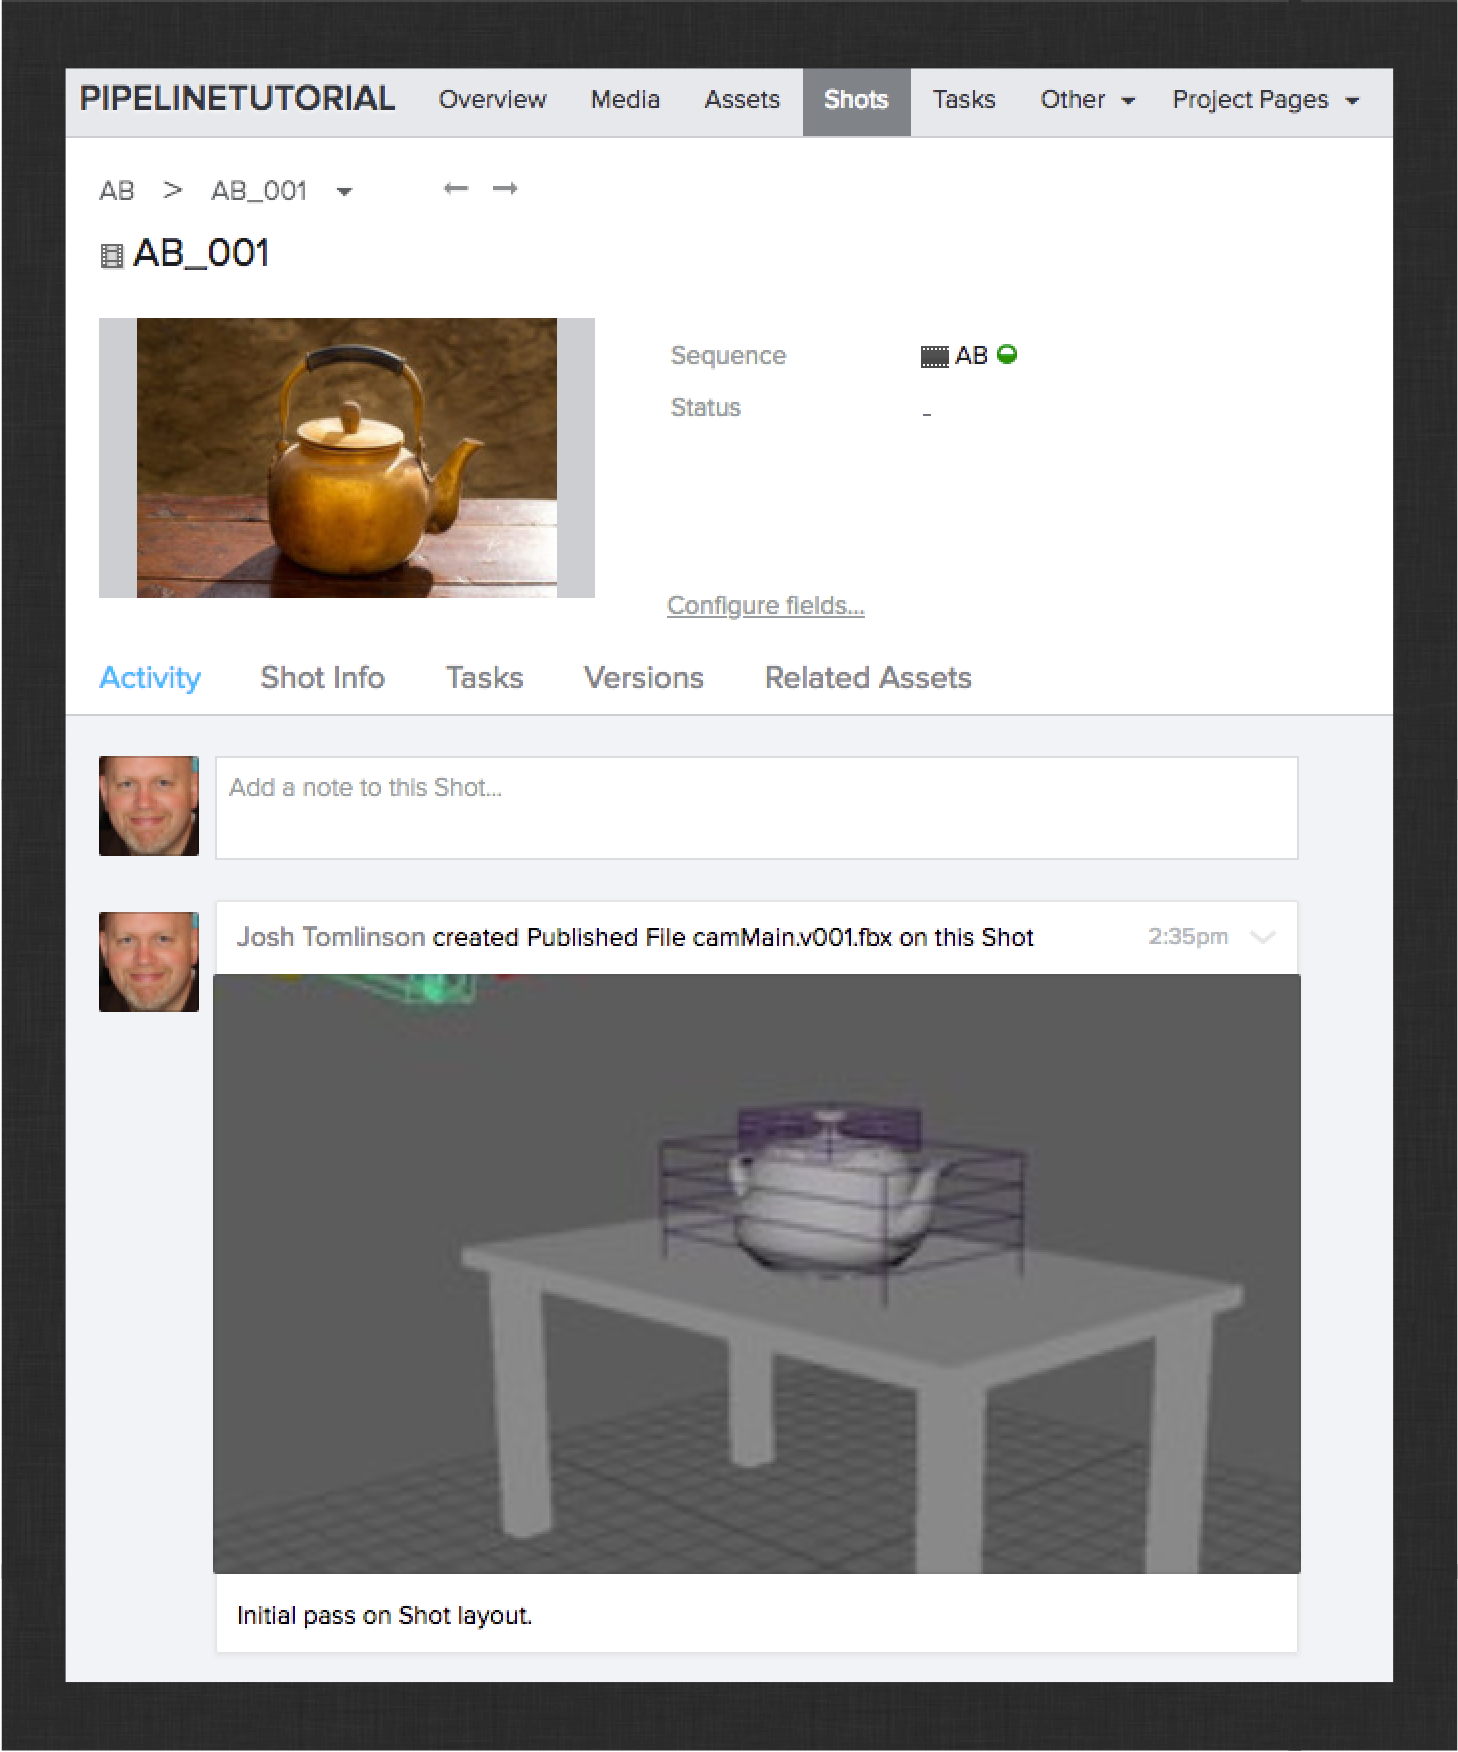
You should see something like this in ShotGrid:
That’s it! Next up, animation.
Animation Workflow
Up to this point, you’ve only customized the Publish app in order to write custom file types/contents to disk and share them with other pipeline steps. In this section, you will customize the Loader app’s configuration to complete the round trip to make it possible to import/reference custom publishes.
Use what you’ve learned in previous sections to complete the following tasks.
-
Launch Maya from ShotGrid Desktop
-
Create a new workfile in your Shot’s animation step
-
Load (reference) the maya session publish from the Shot’s layout step
Note : You’ll notice that the camera was included in the layout session publish file. In a robust pipeline, the camera might be explicitly hidden or excluded from the session publish in order to allow the separate camera publish file to be the one true camera definition. Go ahead and delete or hide the camera included by the reference.
Custom camera Loader action
In order to customize the Loader app to import/reference the camera publishes, you will need to edit the app’s settings file. This is the path to the file in your configuration:
config/env/includes/settings/tk-multi-loader2.yml
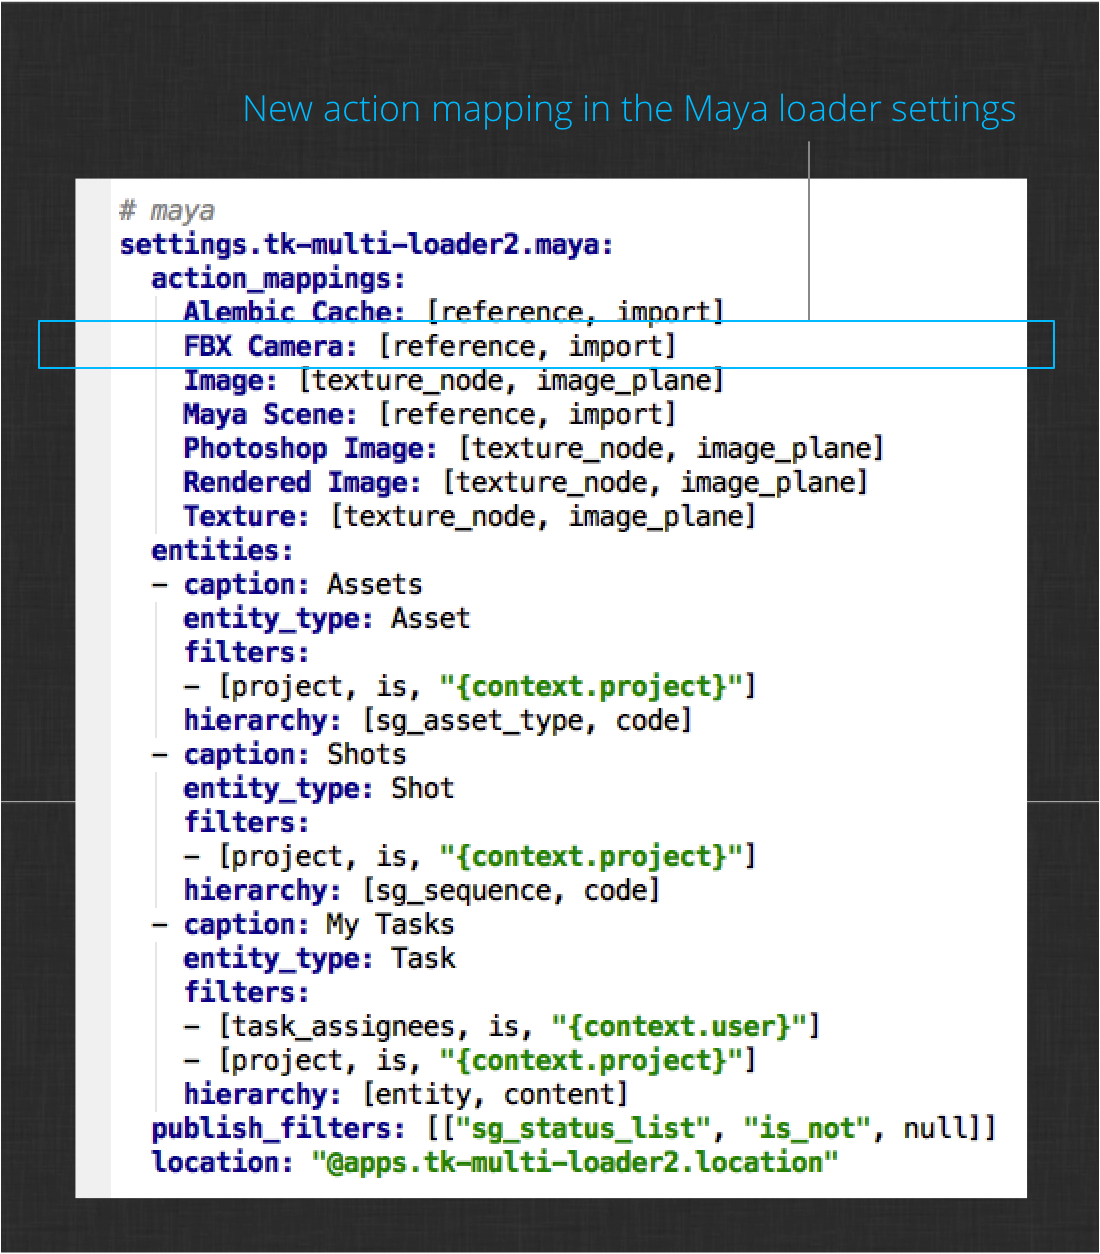
Find the section where the app is configured for maya and add this line to the list of actions in the action_mappings setting:
FBX Camera: [reference, import]
In the custom camera publish plugin, the FBXExport mel command in Maya was used to write the camera to disk, and the publish type used to register the file with ShotGrid was FBX Camera. The line you added to the settings tells the loader to display the reference and import actions for any publishes of type FBX Camera. These actions are defined in the tk-maya-actions.py hook of the Loader app. These actions are implemented in a way to handle any type of file that Maya can reference or import. The .fbx files generated by the custom plugin fall into that category so this is the only change needed to be able to load the published cameras.
Your app settings should now look like this:
Now reload the integrations via the Work Area Info app to pick up the new setting, then browse to the published camera from layout.

Filter by the new publish type, then create a reference to the camera. Close the Loader and you should be able to play back the camera motion you created in the previous section with the newly reference camera.
Next, animate your Teapot model to do something (keep it simple).
When you are happy with your animation, save and publish your work file just like you did in previous sections.
Next up, lighting.
Lighting Workflow
In this section, you will bring together everything you published in the previous sections and render your shot. To do this, you will customize the Loader app to load the published shaders from the Teapot asset’s surfacing step.
First, use what you’ve learned in previous sections to complete the following tasks.
-
Launch Maya from ShotGrid Desktop
-
Create a new workfile in your Shot’s lighting step
-
Load (reference) the maya session publish from the Shot’s animation step
-
Load (reference) the camera publish from the Shot’s layout step
Custom shader Loader action
In order to load the shaders you published in the surfacing step, you will need to take over the tk-maya-actions.py hook mentioned in the previous section. Copy that hook from the install location into your configuration.
This hook is responsible for generating a list of actions that can be performed for a given publish. The Loader app defines a different version of this hook for each DCC supported by the shipped integrations.
The shaders published in the surfacing workflow section are just Maya files, so like the exported cameras, they can be referenced by the Loader without changing the existing logic. The only change required is to add new logic to the actions hook to connect shaders to the appropriate mesh after they are referenced into the file.
Add the following method at the end of the actions hook (outside the class).
    def _hookup_shaders(reference_node):
       """
       Reconnects published shaders to the corresponding mesh.
       :return:
       """

       # find all shader hookup script nodes and extract the mesh object info
       hookup_prefix = "SHADER_HOOKUP_"
       shader_hookups = {}
       for node in cmds.ls(type="script"):
           node_parts = node.split(":")
           node_base = node_parts[-1]
           node_namespace = ":".join(node_parts[:-1])
           if not node_base.startswith(hookup_prefix):
               continue
           obj_pattern = node_base.replace(hookup_prefix, "") + "\d*"
           obj_pattern = "^" + obj_pattern + "$"
           shader = cmds.scriptNode(node, query=True, beforeScript=True)
           shader_hookups[obj_pattern] = node_namespace + ":" + shader

       # if the object name matches an object in the file, connect the shaders
       for node in (cmds.ls(references=True, transforms=True) or []):
           for (obj_pattern, shader) in shader_hookups.iteritems():
               # get rid of namespacing
               node_base = node.split(":")[-1]
               if re.match(obj_pattern, node_base, re.IGNORECASE):
                   # assign the shader to the object
                   cmds.select(node, replace=True)
                   cmds.hyperShade(assign=shader)
Now add the following 2 lines at the end of the _create_reference method to call the shader hookup logic:
    reference_node = cmds.referenceQuery(path, referenceNode=True)
    _hookup_shaders(reference_node)</td>
The code runs whenever a new reference is created, so it should assign the shader when referencing new geometry if the shader already exists in the file. Similarly, it should work when referencing the shader and the geometry already exists.
Note : This hookup logic is very brute force and does not properly handle namespaces and other Maya-related subtleties that should be considered when implementing a production-ready pipeline.
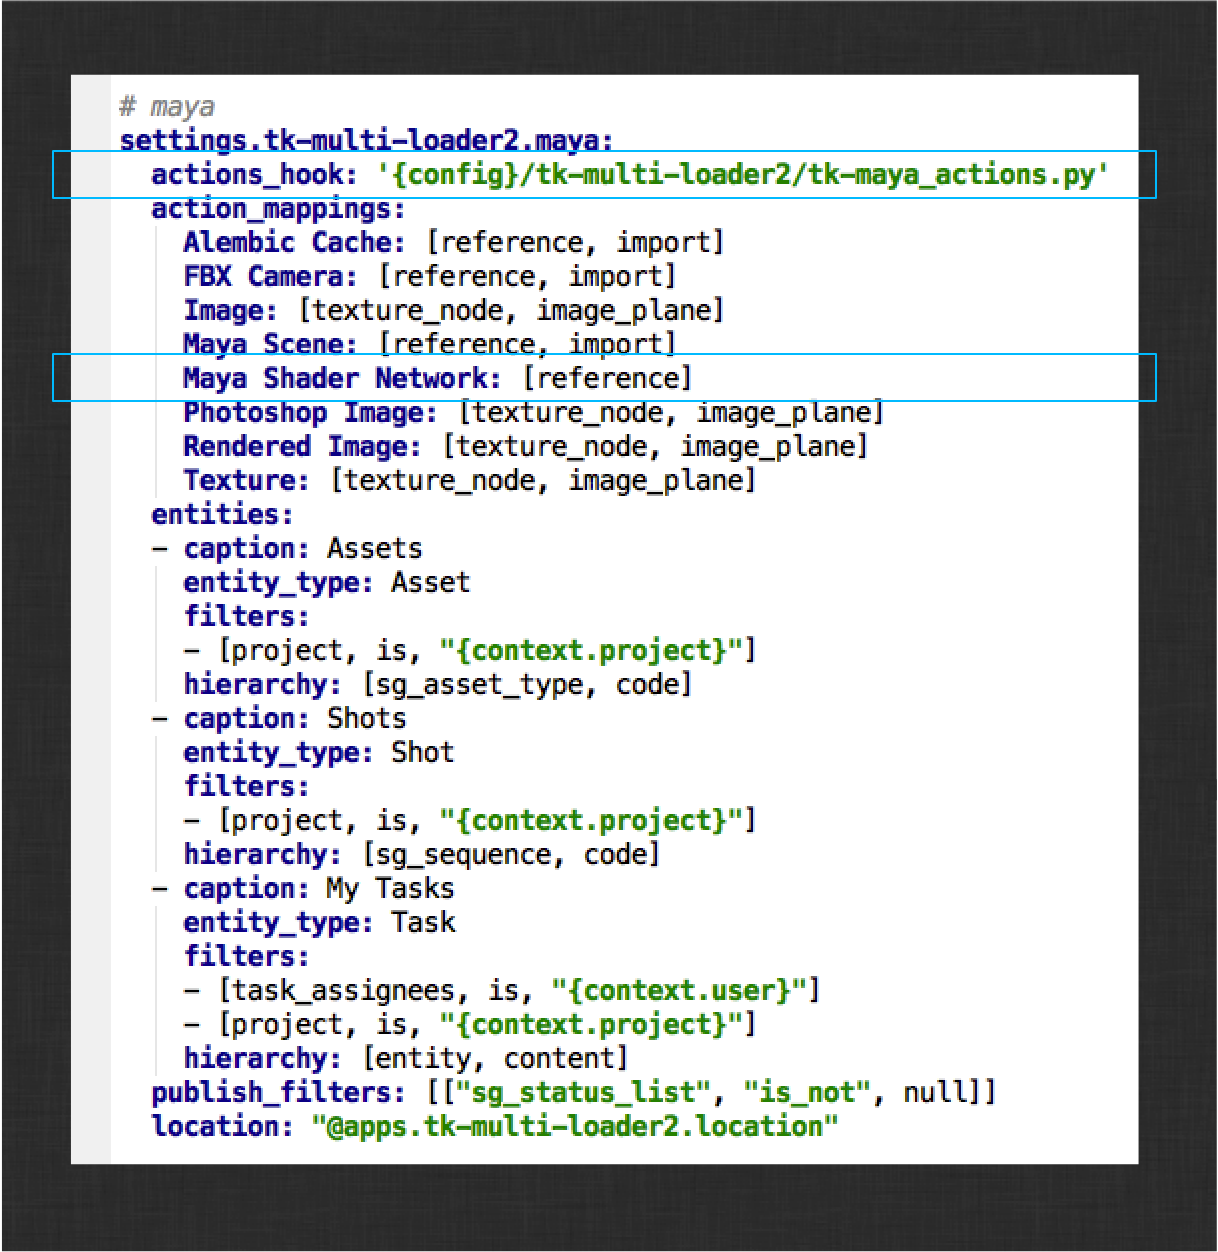
Finally, point your shot’s loader settings to your new hook by editing this file:
config/env/includes/settings/tk-multi-loader2.yml
While, there, also associate the Maya Shader Network publish type with the reference action. Your Loader settings should now look like this:
Now reload the integrations via the Work Area Info app to pick up the new settings, then browse to the published shaders from surfacing.
Create a reference to the Teapot shader network publish.
Now load the Table shader network. If you turn on Hardware Texturing in Maya, your shaders should have been automatically connected to the meshes reference from the animation step.
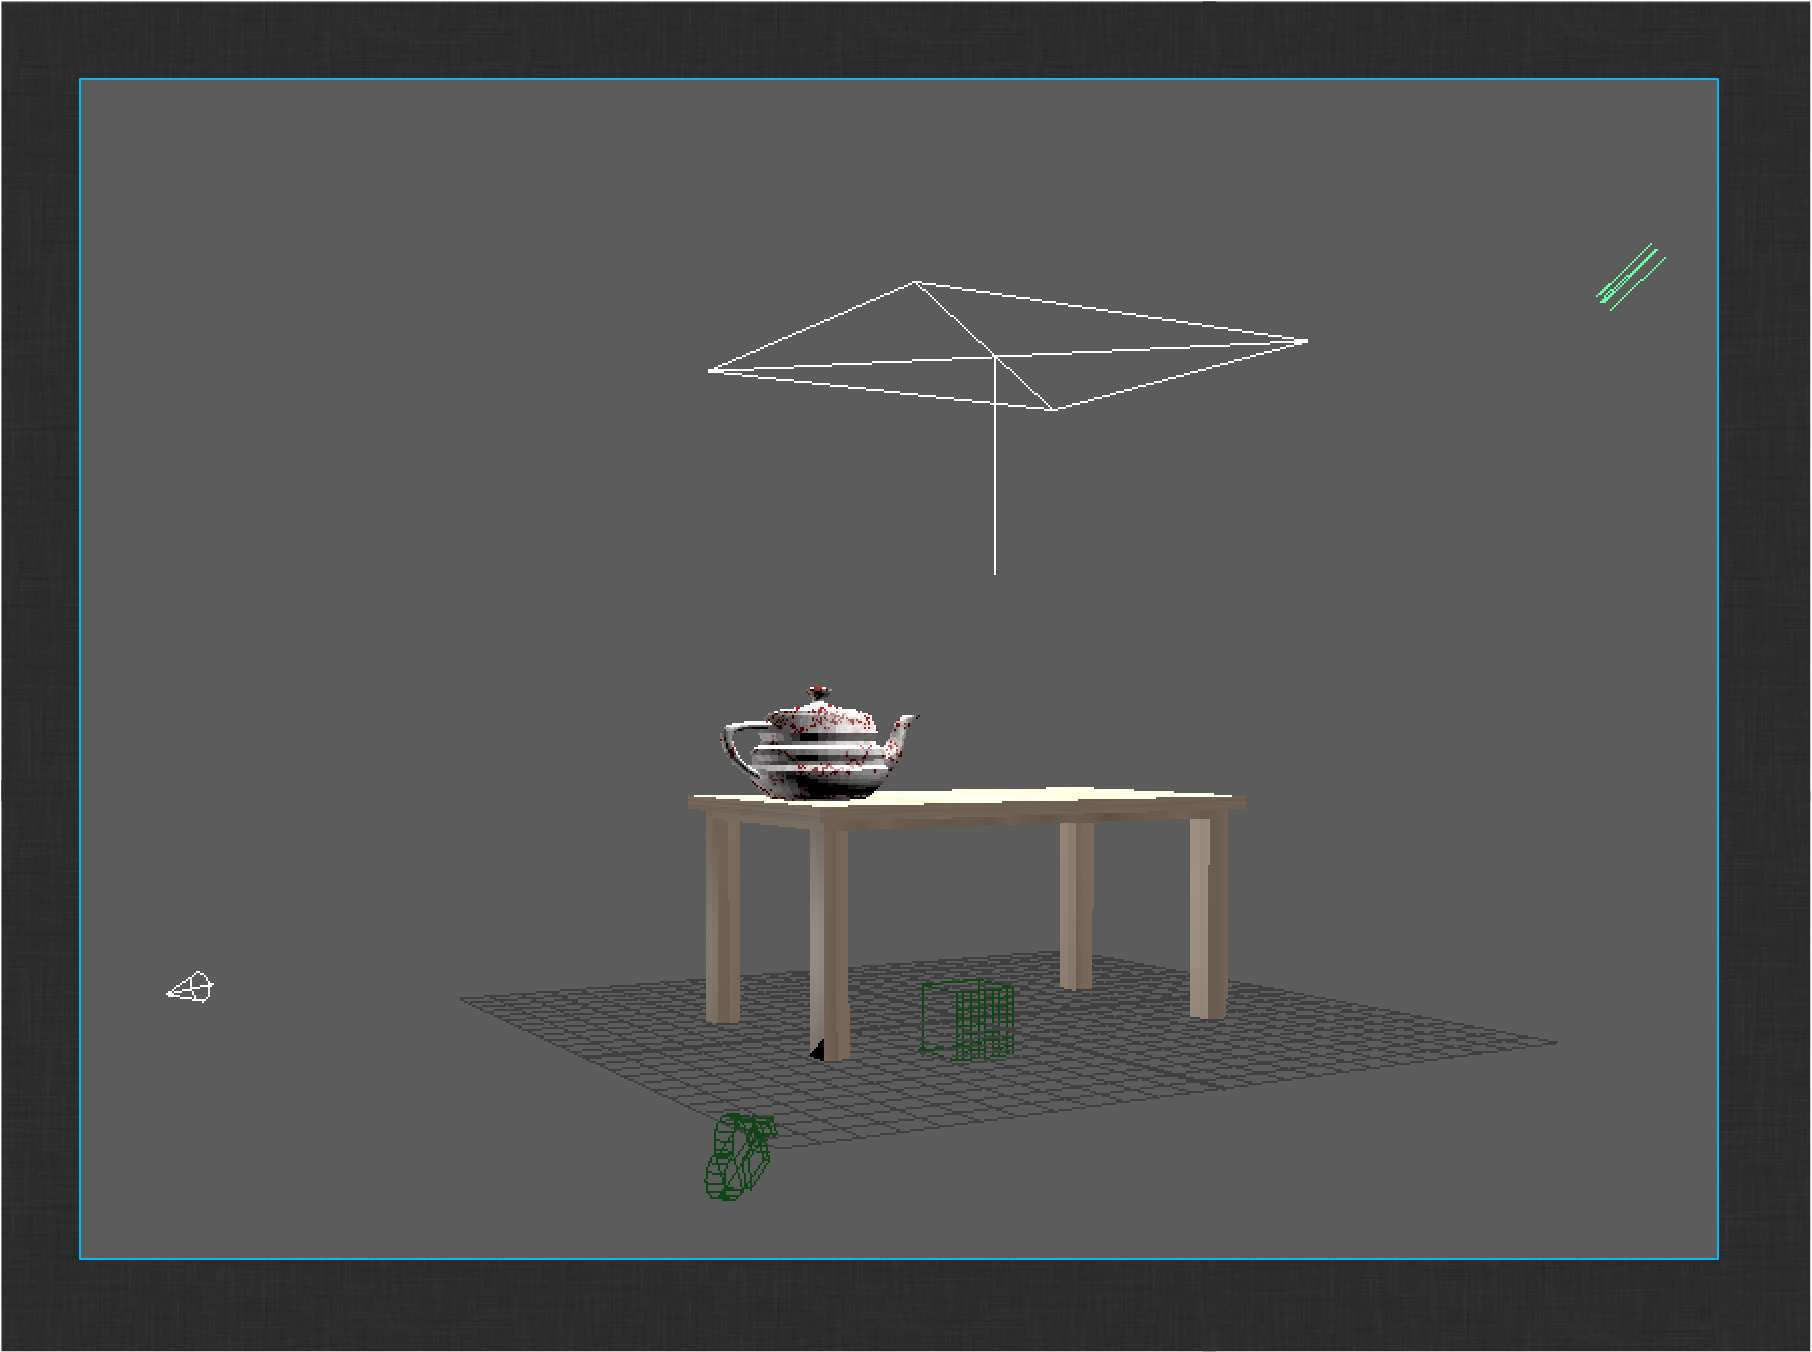
Now add some lights to your scene (keep it simple).
Publishing Maya Renders
Render your shot to disk.
Note : As you can see, there are issues with the surfacing of both the Teapot and the Table asset. For the purposes of this tutorial, assume these were intentional, artistic choices. If you want to address these issues, you can always load the surfacing work files for these assets and adjust the shaders and re-publish them. If you do, remember to update the references in the lighting work file and re-render. If you go through the steps, you may find that the breakdown app does not reconnect your updated shaders after reloading the reference. Based on your experience modifying the loader to hook up shader references, you should be able to update the breakdown app’s scene operations hook to add the required logic. HINT: See the update method in this file.
The shipped ShotGrid integrations will collect image sequences by looking at the render layers defined in the file. Once your render is complete, launch the publisher. You will see the rendered sequence as an item in the tree.
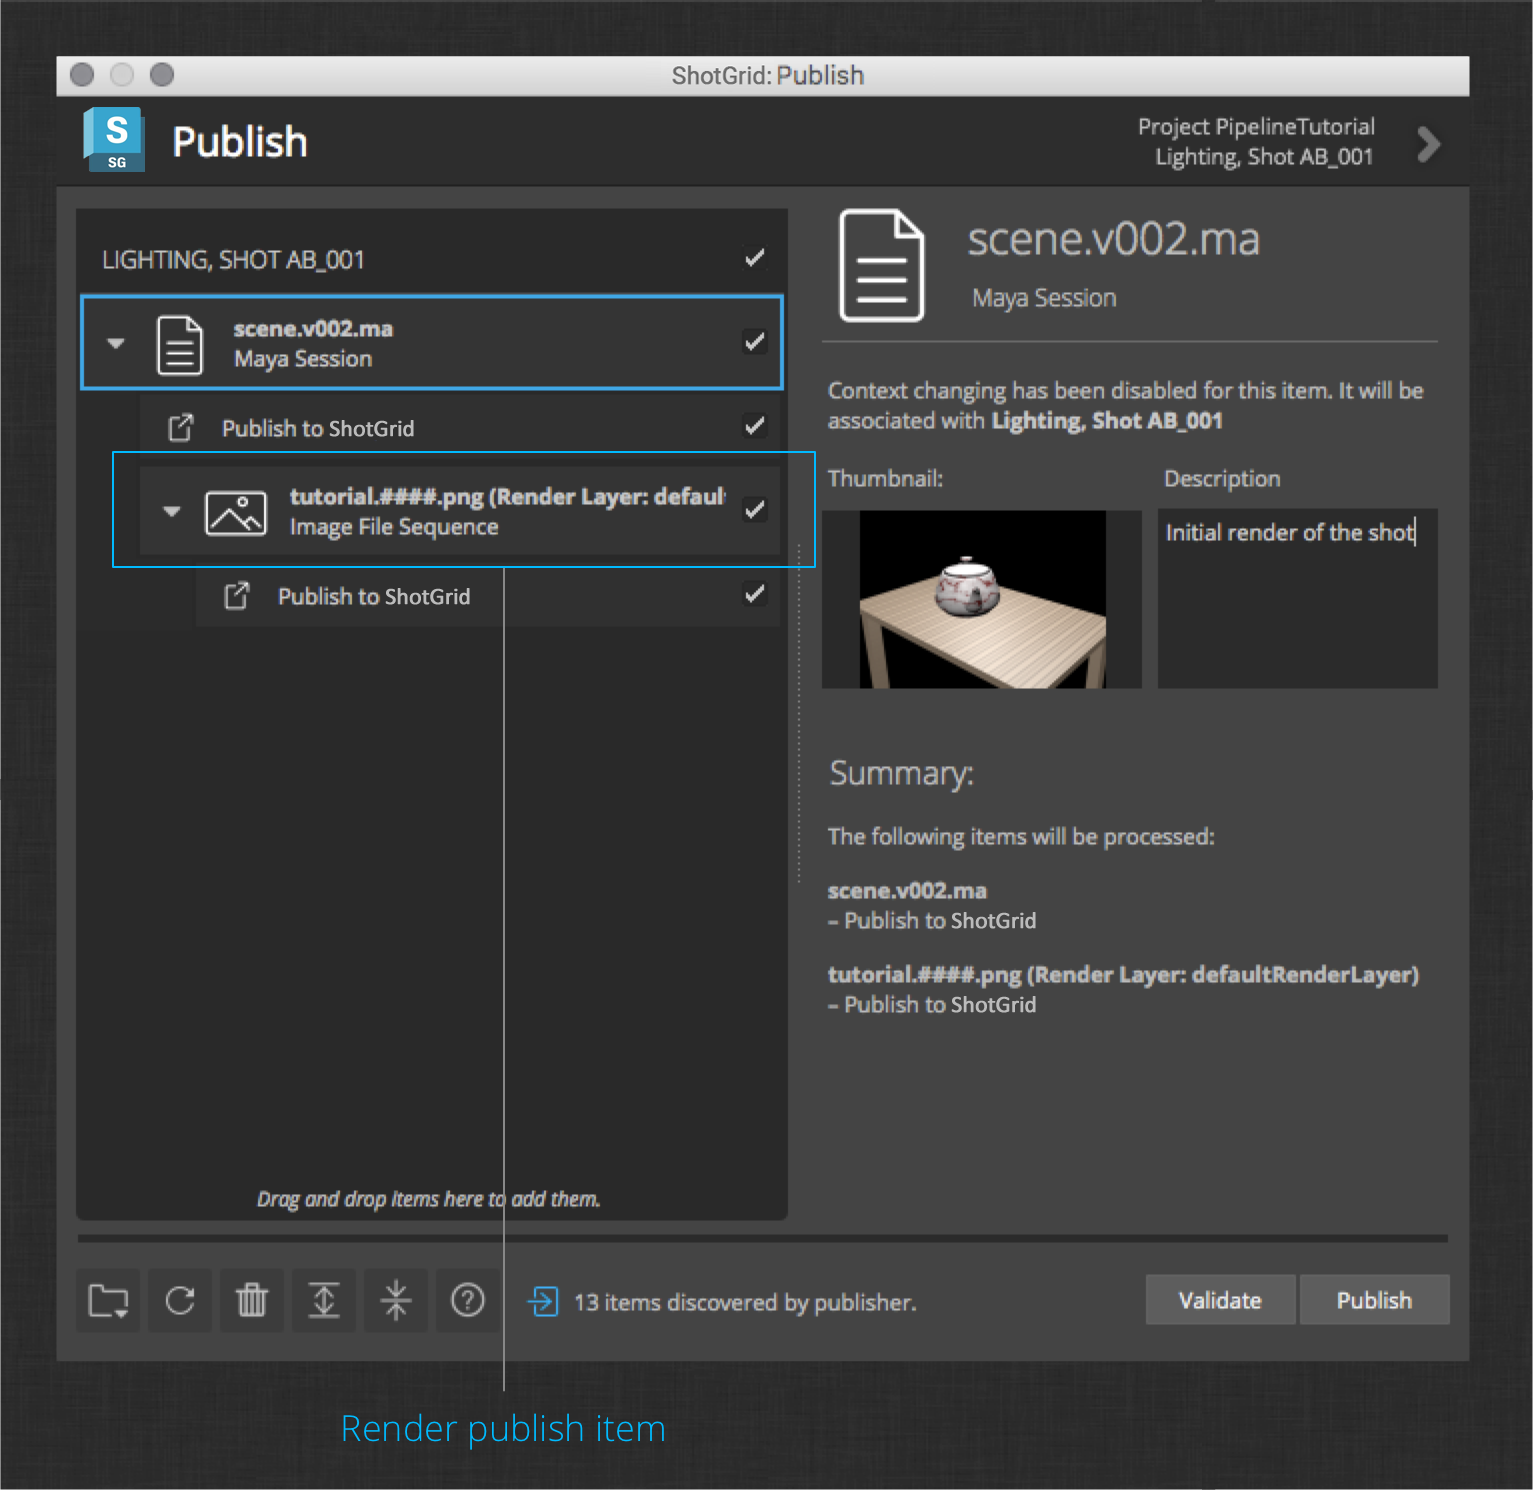
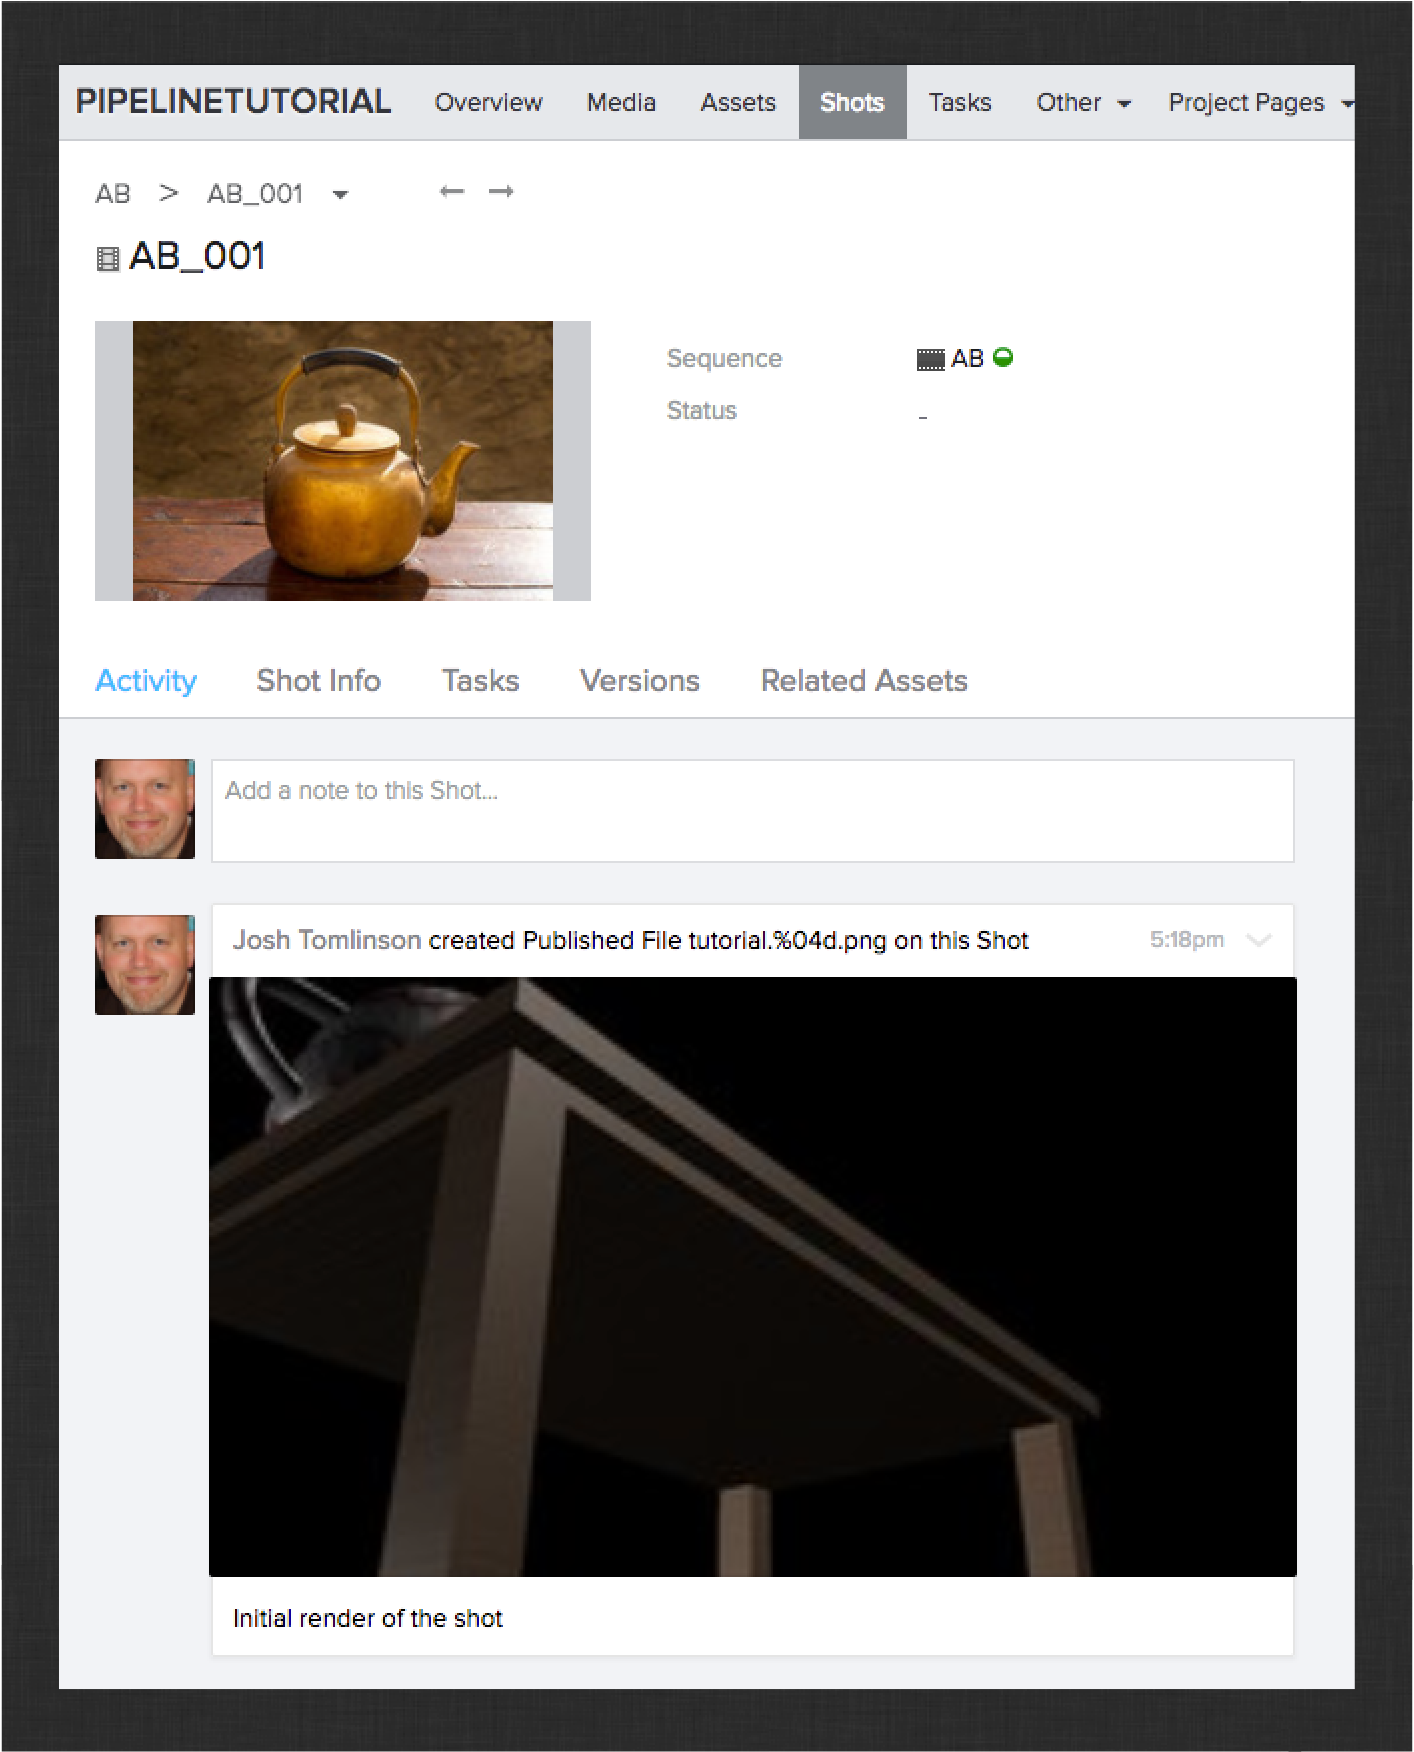
Go ahead and publish the session and the rendered image file sequence. You should see something like this in ShotGrid:
Next up, compositing!
Compositing Workflow
In this final section of the tutorial, you will be introduced to some of the default integrations provided by Nuke. In addition to the app’s you have seen in previous sections, you will learn about the ShotGrid-aware Write node and an app that allows you to quickly send your renders to others for review.
Start by following these steps to prepare your work file.
-
Launch Nuke from ShotGrid Desktop
-
Just like in Maya, use the ShotGrid > File Open… menu action to create a new work file in the Shot’s compositing step.
Load the image sequence you rendered and published in the previous section via the Loader app.
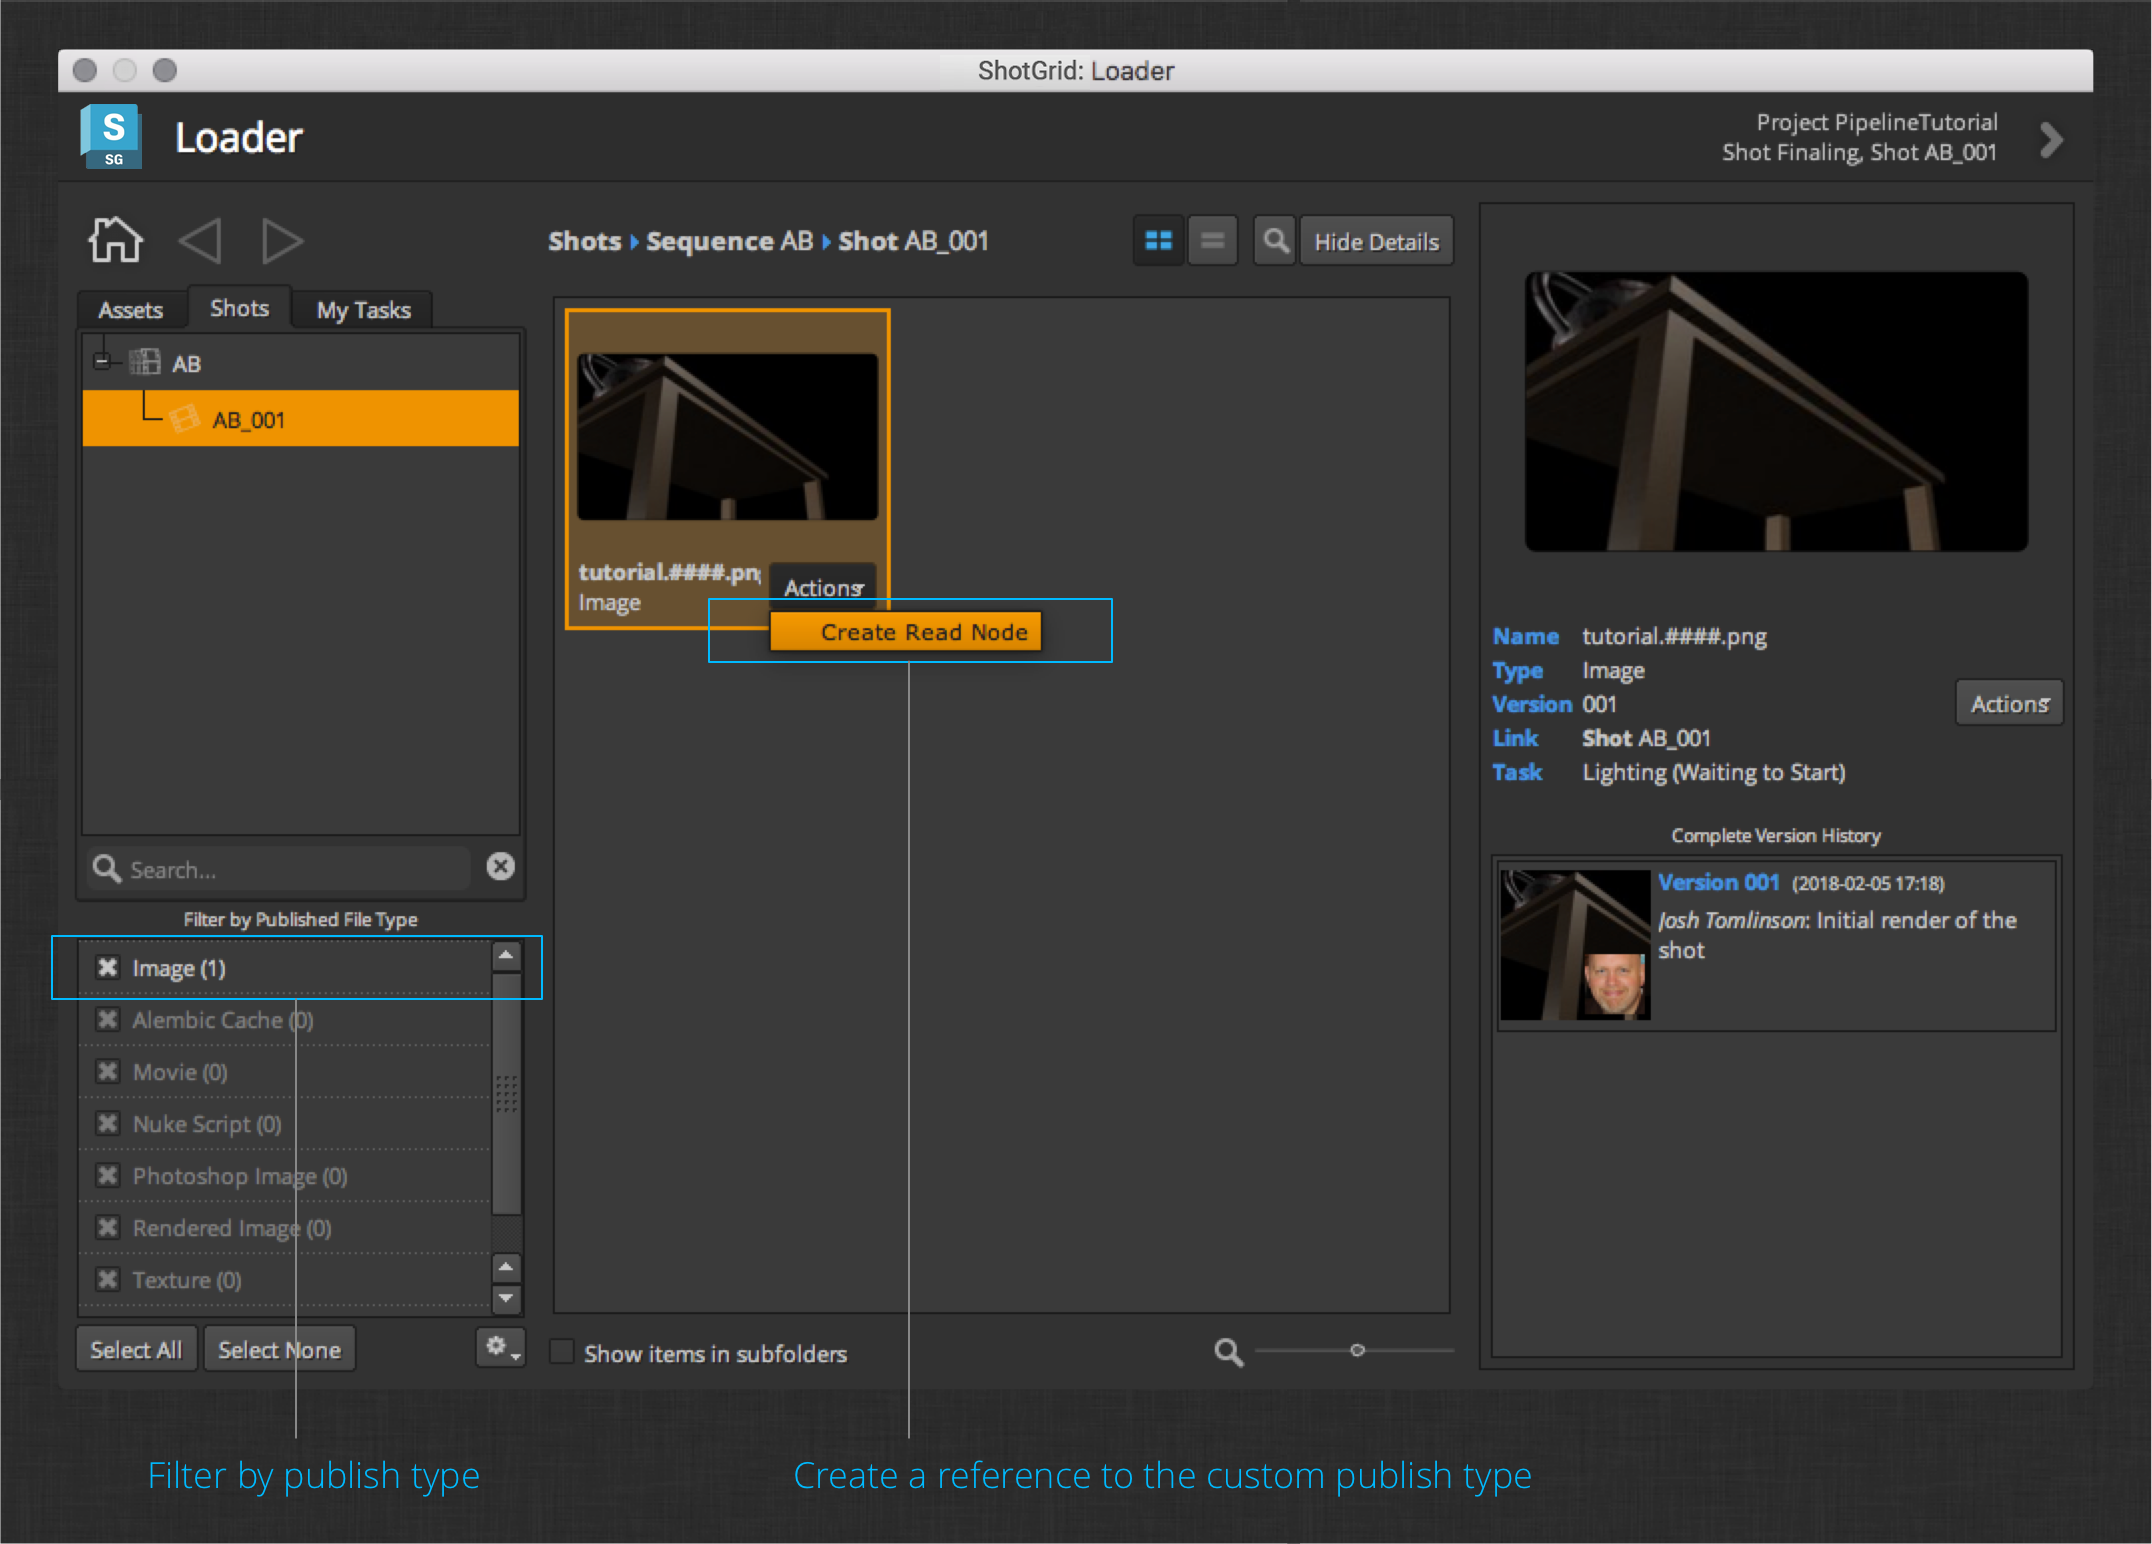
The action defined for the Image and Rendered Image publish types (the type depends on the file extension) is Create Read Node. Click this action to create a new Read node in your nuke session.
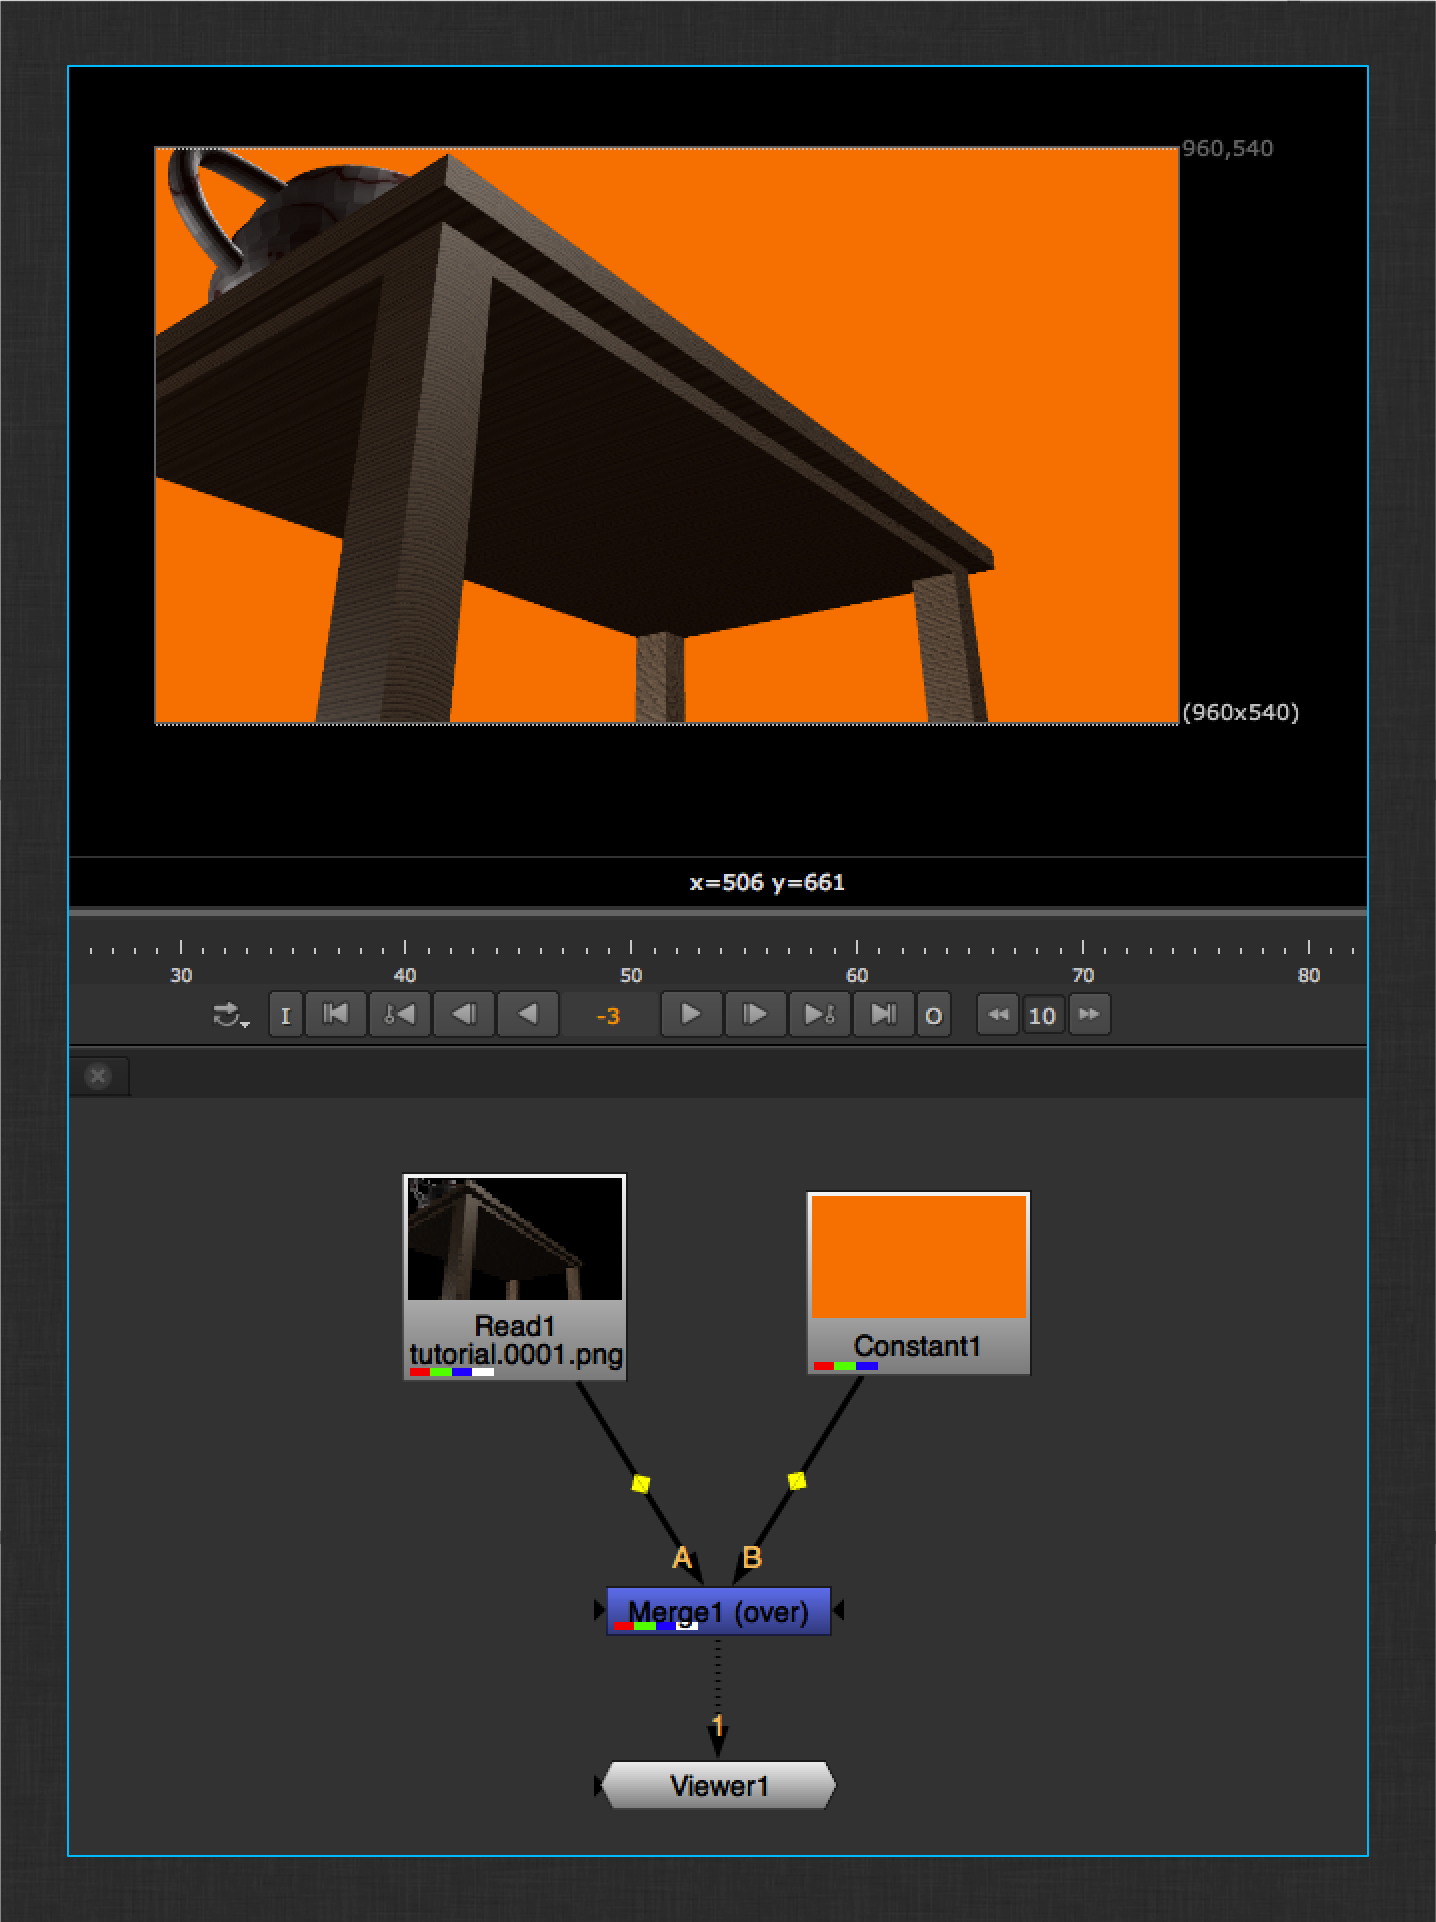
Make sure your Nuke Project Settings output format matches your rendered images. Create a Constant color to use as your background and merge it with your Read node. Attach a viewer to see your composite.
Once you are happy with your comp, use the ShotGrid > File Save… menu action to save your work file.
Next, click the ShotGrid logo in the left hand menu in Nuke. Click on one of the ShotGrid-aware write nodes in that menu:
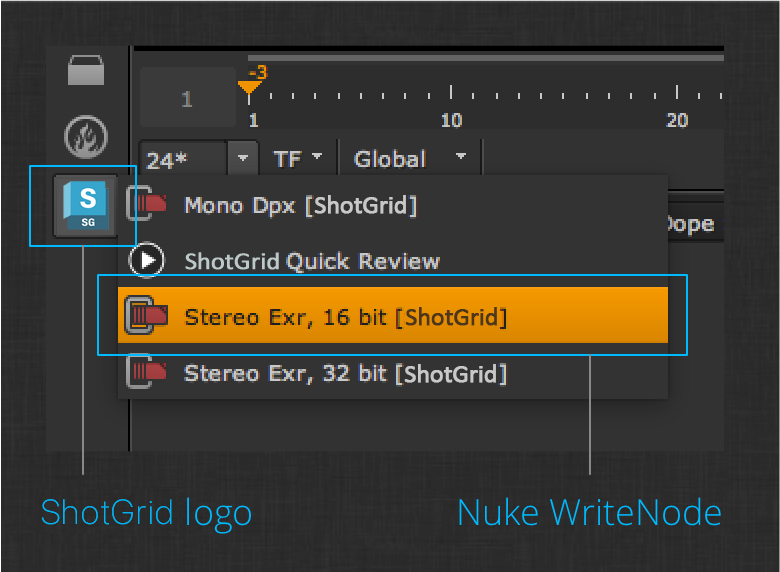
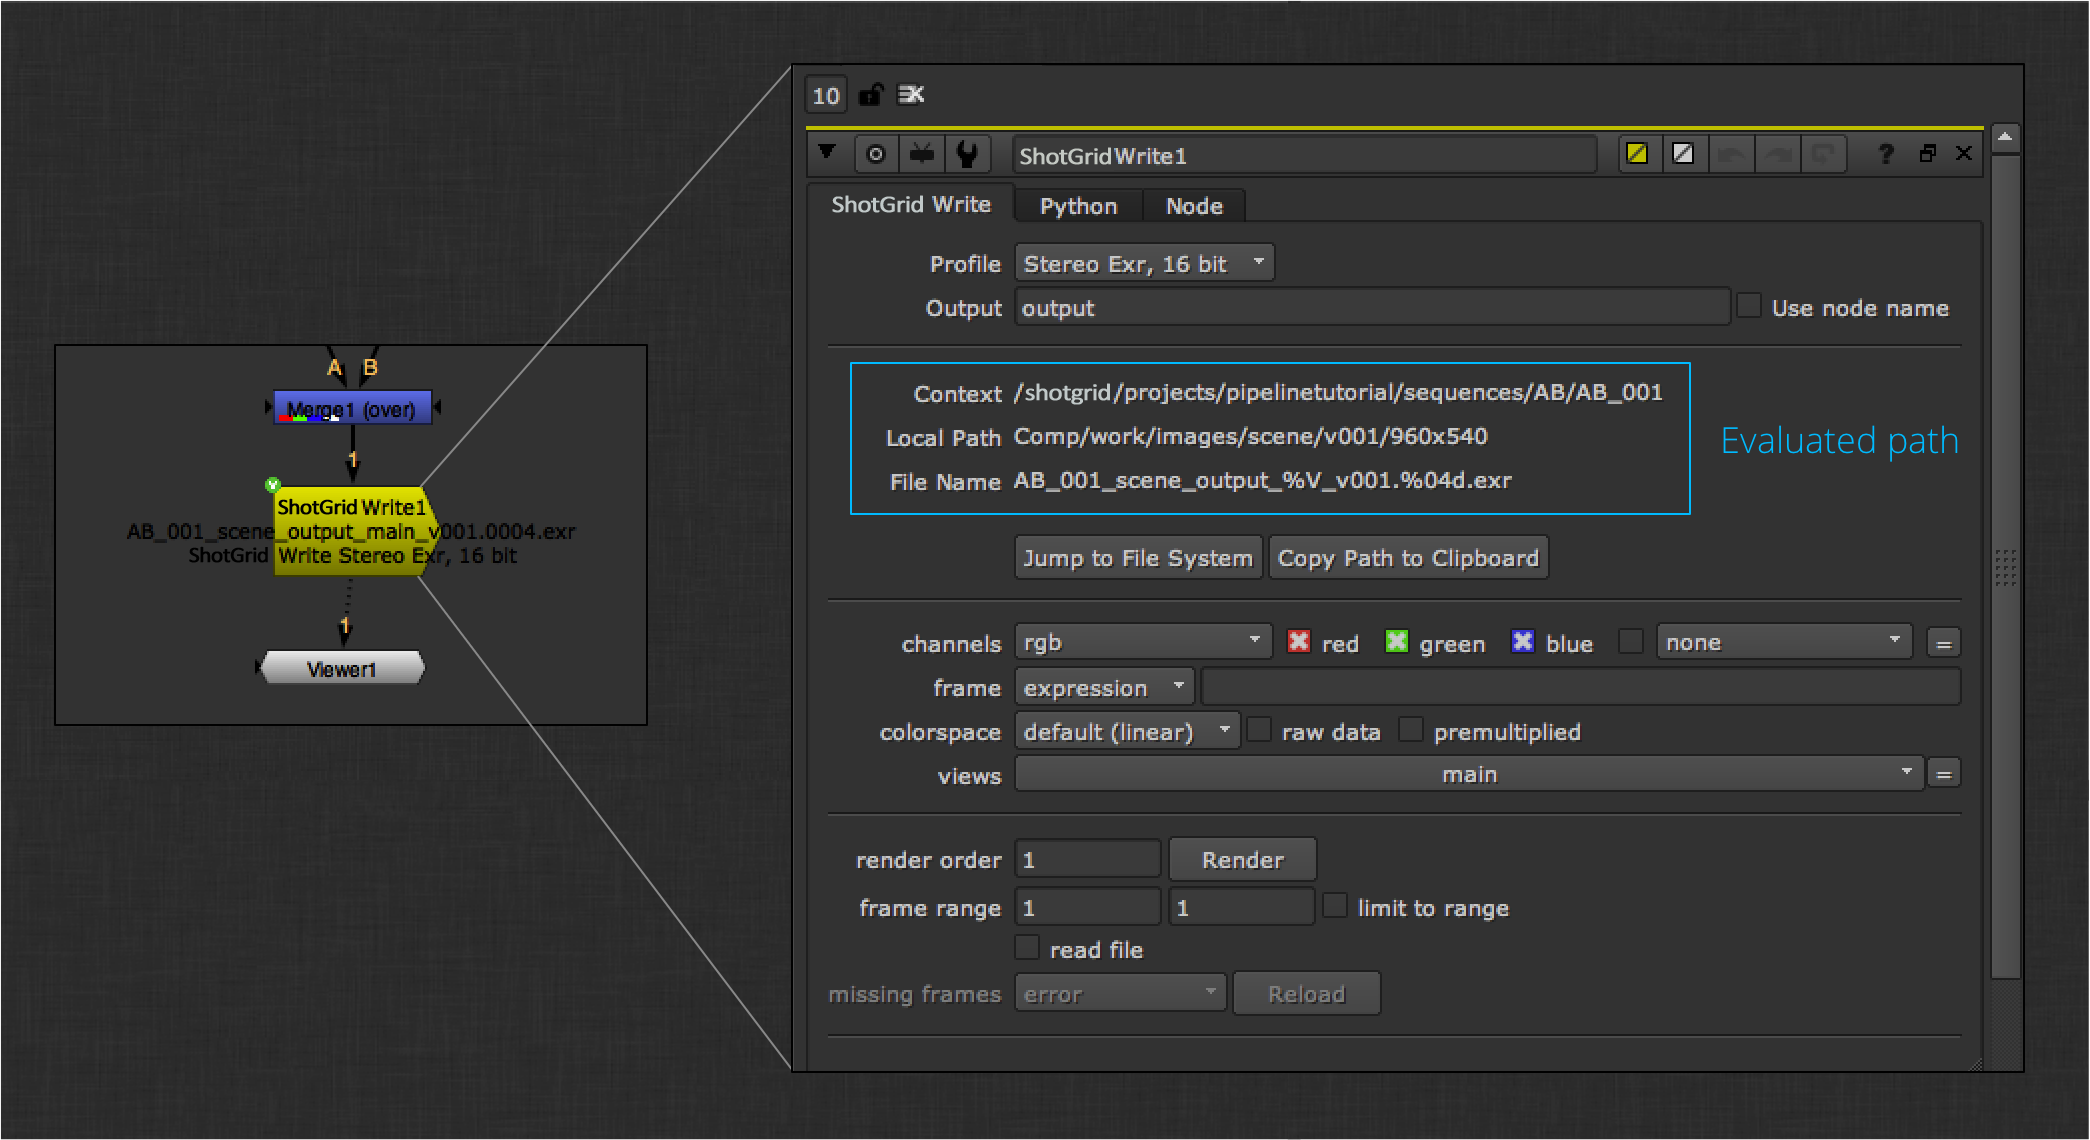
The ShotGrid Write Node app provides a layer on top of the built-in Nuke Write node that automatically evaluates the output path based on your current ShotGrid context.
Render the image frames to disk. You can now publish your nuke session to associate the work file with the rendered images. By default, the publisher will collect the rendered frames and attach a plugin to register the frames with ShotGrid. A second plugin will upload the frames for review by way of an integration that runs in the background called review submission. This app uses nuke to generate a quicktime that will be uploaded and made available for review.

Another useful integration is the Quick Review app. This is an output node that will quickly generate and upload a quicktime to ShotGrid for Review. The app can be found in the left hand menu next to the ShotGrid Write Nodes.
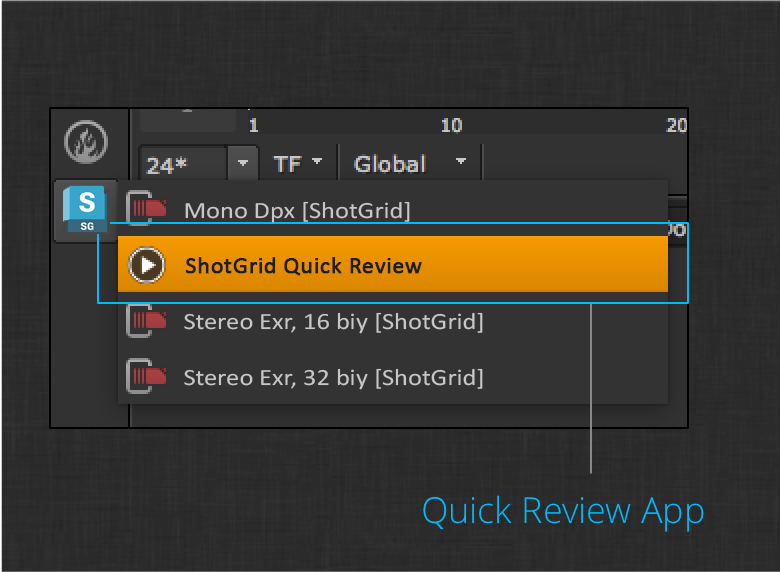
Create a Quick Review node, then click the Upload button to render the input to disk, generate the quicktime, and upload the result to ShotGrid for review. Some standard options are provided before submitting the frames.

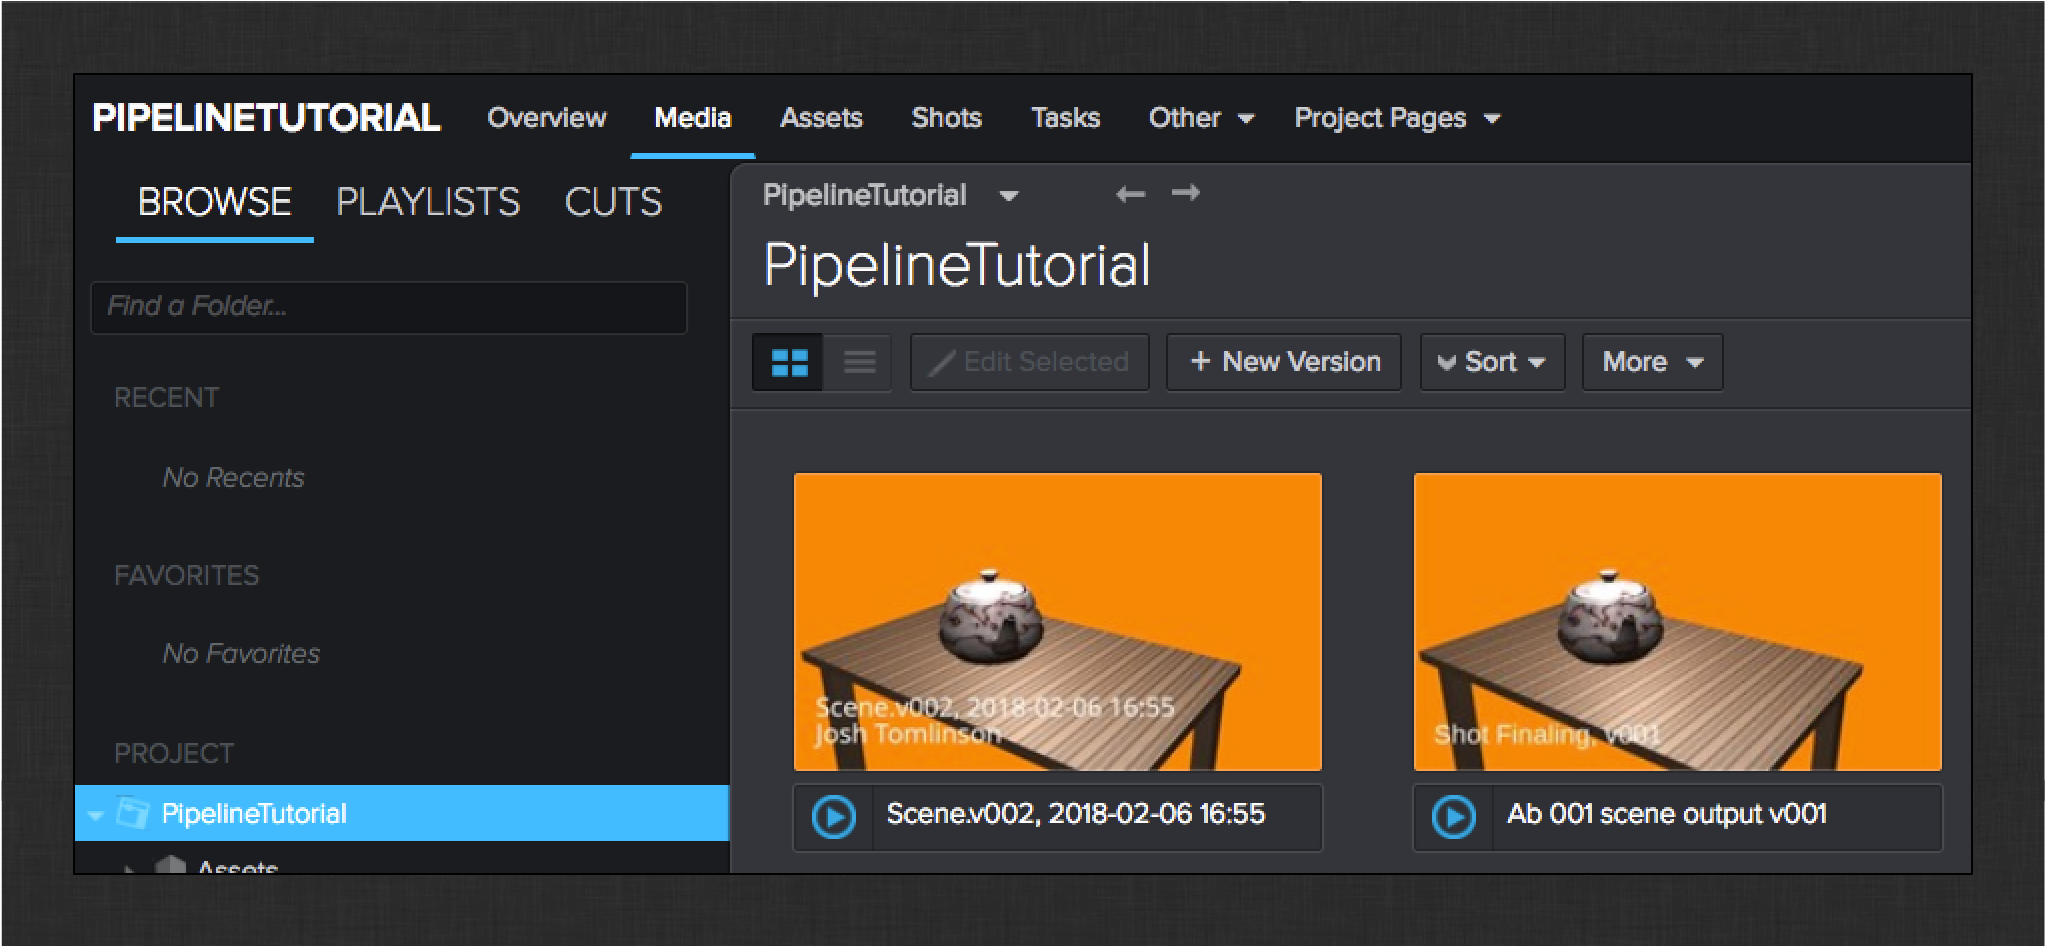
Check the media tab in ShotGrid to see both of the uploaded quicktimes.
For more information on reviewing media in ShotGrid, see the official documentation.
Conclusion
Congratulations, you’re done! Hopefully this tutorial has given you a starting point for building your own custom pipeline using the ShotGrid integrations. You should have an understanding of how to extend the default integrations to meet the specific needs of your studio.
Ask questions and learn how other studios are using Toolkit over at the shotgun-dev Google Group. Be sure to subscribe to stay up to date with the latest posts!
If there are features or workflows that you feel are outside of the default integrations, then you can always write your own apps. Here is an excellent document to help you get started writing your first app.
As always, if you have additional questions about this tutorial or about ShotGrid or the Toolkit platform in general, reach out to the community.