使用自定义浏览器协议启动应用程序
目录
动作菜单项 (AMI) 有一个非常实用的版本,即可在本地计算机上运行应用程序或脚本的版本。要实现这一点,需要在浏览器与要运行的脚本或应用程序之间建立连接。此链接称为自定义浏览器协议。
您可能想要设置一种类型的链接,用户单击它时将启动 [foo] 应用程序。不是将“http”作为前缀,而是需要指定自定义协议,例如“foo”。理想情况下,链接类似如下:
foo://some/info/here
操作系统必须知道如何处理协议。默认情况下,所有当前操作系统都知道“http”应由默认 Web 浏览器处理,“mailto”应由默认邮件客户端处理。有时,安装应用程序时,它们会向操作系统注册并告诉它针对特定协议启动应用程序。
例如,如果您安装 RV,则该应用程序向操作系统注册 rvlink://,并告知它 RV 将处理所有 rvlink:// 协议请求以在 RV 中显示图像或镜头序列。因此,当用户单击以 rvlink:// 开头的链接时(正如您可以在 ShotGrid 中执行的操作),操作系统将知道对该链接启动 RV,而该应用程序将解析链接并知道如何处理它。
有关 RV 如何充当 URL 和“rvlink”协议的协议处理程序的详细信息,请参见 RV 用户手册。
注册协议
在 Windows 上注册协议
在 Windows 上,注册协议处理程序涉及修改 Windows 注册表。下面是您所需的注册表项的常规示例:
HKEY_CLASSES_ROOT
foo
(Default) = "URL:foo Protocol"
URL Protocol = ""
shell
open
command (Default) = "foo_path" "%1"
目标 URL 如下所示:
foo://host/path...
注意 : 有关详细信息,请参见 http://msdn.microsoft.com/en-us/library/aa767914(VS.85).aspx。
Windows QT/QSetting 示例
如果您开发的应用程序是使用 QT(或 PyQT/PySide)框架编写的,可以利用 QSetting 对象来为您管理注册表项的创建。
自动让应用程序设置注册表项的代码如下所示:
// cmdLine points to the foo path.
//Add foo to the Os protocols and set foobar to handle the protocol
QSettings fooKey("HKEY_CLASSES_ROOT\\foo", QSettings::NativeFormat);
mxKey.setValue(".", "URL:foo Protocol");
mxKey.setValue("URL Protocol", "");
QSettings fooOpenKey("HKEY_CLASSES_ROOT\\foo\\shell\\open\\command", QSettings::NativeFormat);
mxOpenKey.setValue(".", cmdLine);
通过 ShotGrid AMI 启动 Python 脚本的 Windows 示例
在本地运行的许多 AMI 可能选择通过 Python 解释器启动简单的 Python 脚本。这样,您可以使用 GUI(PyQT、PySide 或您选择的 GUI 框架)运行简单脚本甚至应用。让我们看一个实际示例来帮您入门。
步骤 1:设置自定义“ShotGrid”协议
使用 Windows 注册表编辑器:
[HKEY_CLASSES_ROOT\ShotGrid]
@="URL:ShotGrid Protocol"
"URL Protocol"=""
[HKEY_CLASSES_ROOT\ShotGrid\shell]
[HKEY_CLASSES_ROOT\ShotGrid\shell\open]
[HKEY_CLASSES_ROOT\ShotGrid\shell\open\command]
@="python""sgTriggerScript.py""%1"
此设置将注册 ShotGrid:// 协议以启动 python 解释器,第一个参数为脚本 sgTriggerScript.py,第二个参数为 %1。请务必了解,%1 将替换为在浏览器中单击的 URL 或调用的 AMI 的 URL。这将成为您的 Python 脚本的第一个参数。
提示 : 您可能需要提供您的 Python 解释器和您的 Python 脚本的完整路径。请进行相应的调整。
步骤 2:在您的 Python 脚本中解析传入 URL
在您的脚本中,您将获取提供的第一个参数 (URL),然后向下解析到其各个组成部分以了解调用 AMI 的上下文。我们在以下代码中提供了一些简单的基架,显示如何执行此操作。
Python 脚本
import sys
import pprint
try:
    from urlparse import parse_qs
except ImportError:
    from urllib.parse import parse_qs

def main(args):
    # Make sure we have only one arg, the URL
    if len(args) != 1:
        sys.exit("This script requires exactly one argument")

    # Make sure the argument have a : symbol
    if args[0].find(":") < 0:
        sys.exit("The argument is a url and requires the symbol ':'")

    # Parse the URL
    protocol, fullPath = args[0].split(":", 1)

    # If there is a querystring, parse it
    if fullPath.find("?") >= 0:
        path, fullArgs = fullPath.split("?", 1)
        action = path.strip("/")
        params = parse_qs(fullArgs)
    else:
        action = fullPath.strip("/")
        params = ""

    # This is where you can do something productive based on the params and the
    # action value in the URL. For now we'll just print out the contents of the
    # parsed URL.
    fh = open('output.txt', 'w')
    fh.write(pprint.pformat((protocol, action, params)))
    fh.close()
if __name__ == '__main__':
    sys.exit(main(sys.argv[1:]))
注意:此脚本与 Python 3 和 Python 2 兼容。
步骤 3:使用您的自定义协议连接 ShotGrid 界面,并最终连接您的脚本
最后,在 ShotGrid 中创建其 URL 值为 shotgrid://processVersion 的 AMI。您可以将此 AMI 指定到您希望的任何实体类型,但此示例使用版本实体。
转到某个版本页面,右键单击一个版本并从菜单中选择您的 AMI。这应使您的浏览器打开 shotgrid:// URL,此 URL 将通过注册的自定义协议重定向到您的脚本。
在您的脚本所在目录中的 output.txt 文件中,您现在应该会看到类似如下的内容:
('processVersion',
 {'cols': ['code',
           'image',
           'entity',
           'sg_status_list',
           'user',
           'description',
           'created_at'],
  'column_display_names': ['Version Name',
                           'Thumbnail',
                           'Link',
                           'Status',
                           'Artist',
                           'Description',
                           'Date Created'],
  'entity_type': ['Version'],
  'ids': ['6933,6934,6935'],
  'page_id': ['4606'],
  'project_id': ['86'],
  'project_name': ['Test'],
  'referrer_path': ['/detail/HumanUser/24'],
  'selected_ids': ['6934'],
  'server_hostname': ['my-site.shotgrid.autodesk.com'],
  'session_uuid': ['9676a296-7e16-11e7-8758-0242ac110004'],
  'sort_column': ['created_at'],
  'sort_direction': ['asc'],
  'user_id': ['24'],
  'user_login': ['shotgrid_admin'],
  'view': ['Default']})
可能的变量
通过变换您的 AMI 中 URL 的 // 部分后面的关键字,可以更改您的脚本中 action 变量的内容,同时保持相同的 shotgrid:// 协议并且仅注册一个自定义协议。然后,根据 action 变量的内容和参数的内容,您的脚本可以获知预期行为应是什么。
通过使用此方法,您可以打开应用程序、通过 FTP 等服务上传内容、归档数据、发送电子邮件或生成 PDF 报告。
在 macOS 上注册协议
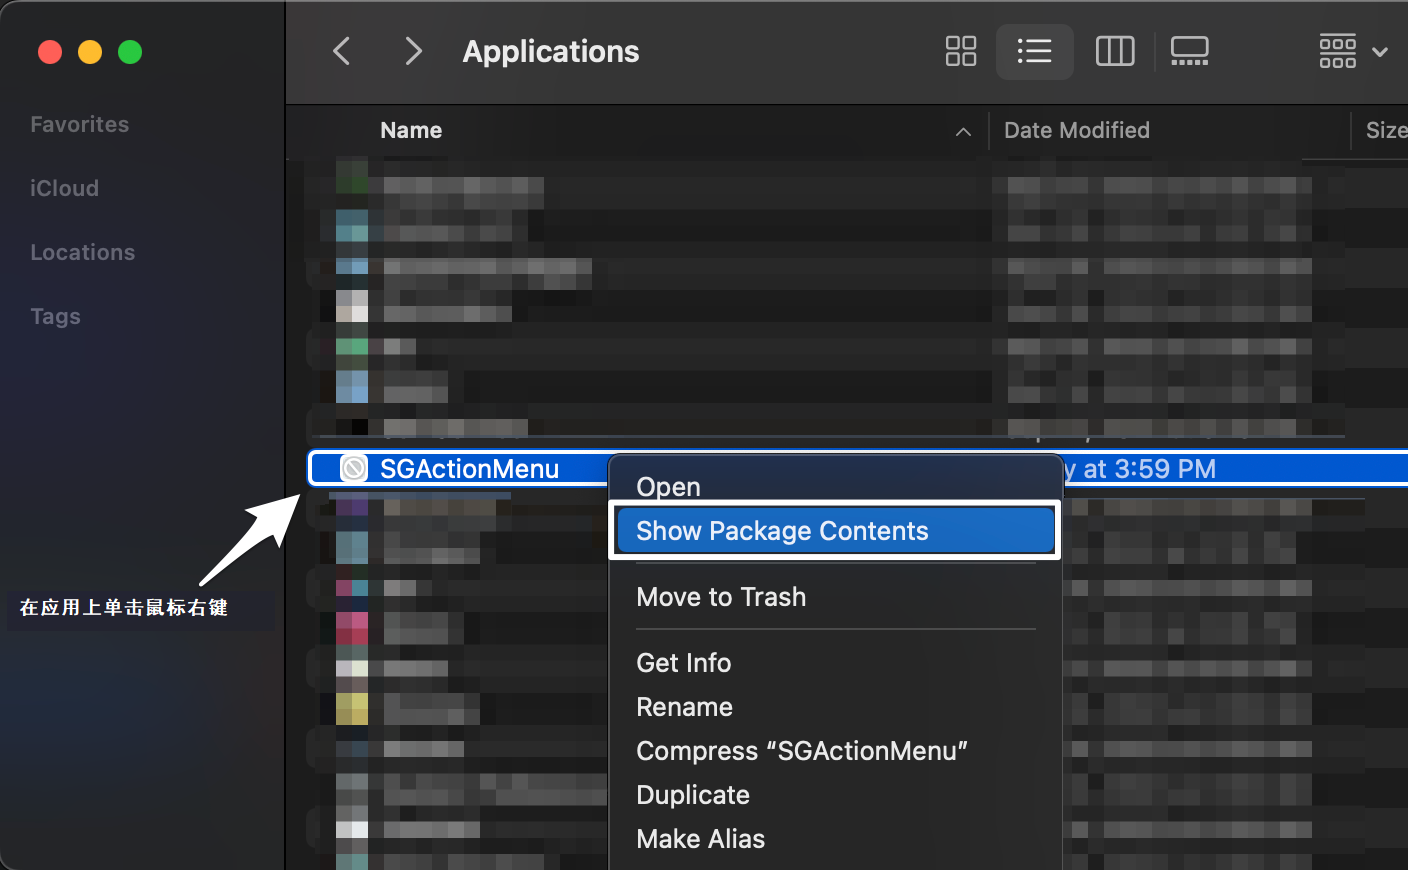
要在 macOS BigSur 和 Monterey 上注册协议,需要创建配置为运行应用程序或脚本的 .app 包。
步骤 1:AppleScript 脚本编辑器
首先,在 AppleScript 脚本编辑器中编写以下脚本:
on open location this_URL
    do shell script "sgTriggerScript.py '" & this_URL & "'"
end open location
调试提示:捕获错误,然后将其显示在弹出窗口中,这样您便可以查看在执行 Python 脚本时是否存在任何问题,避免系统悄然执行错误。以下是可添加到 AppleScript 中以用于试错的示例代码段:
on open location this_URL
	try
		do shell script "/path/to/script.py '" & this_URL & "'"
	on error errStr
		display dialog "error" & errStr
	end try
end open location
注意:为了确保从特定 Shell(如
tcsh)运行 Python,您可以更改 do shell script,如下所示:do shell scripttcsh -c \"sgTriggerScript.py '" & this_URL & "'\"。在脚本编辑器中,将您的简短脚本保存为 应用程序包。
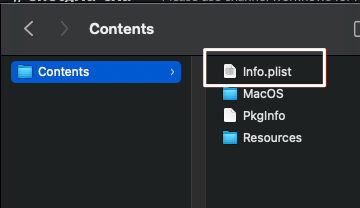
步骤 2:编辑 info.plist 文件
找到保存的应用程序包,并打开内容。
然后打开 info.plist 文件,并将以下内容添加到 plist dict:
<key>CFBundleIdentifier</key>
<string>com.mycompany.AppleScript.ShotGrid</string>
<key>CFBundleURLTypes</key>
<array>
<dict>
<key>CFBundleURLName</key>
<string>ShotGrid</string>
<key>CFBundleURLSchemes</key>
<array>
<string>ShotGrid</string>
</array>
</dict>
</array>
您也可以更改以下三个字符串(可选):
com.mycompany.AppleScript.ShotGrid
ShotGrid
ShotGrid
第三个字符串是协议处理程序;因此 URL 为:
shotgrid://something
如果使用 BigSur,您需要 删除 info.plist 文件中位于 NSAppleEventsUsageDescription 和 NSSystemAdministrationUsageDescription 之间的以下行。如果您使用的版本早于 BigSur,请跳过此步骤,然后继续执行下面的步骤 3。
	<key>NSAppleMusicUsageDescription</key>
	<string>This script needs access to your music to run.</string>
	<key>NSCalendarsUsageDescription</key>
	<string>This script needs access to your calendars to run.</string>
	<key>NSCameraUsageDescription</key>
	<string>This script needs access to your camera to run.</string>
	<key>NSContactsUsageDescription</key>
	<string>This script needs access to your contacts to run.</string>
	<key>NSHomeKitUsageDescription</key>
	<string>This script needs access to your HomeKit Home to run.</string>
	<key>NSMicrophoneUsageDescription</key>
	<string>This script needs access to your microphone to run.</string>
	<key>NSPhotoLibraryUsageDescription</key>
	<string>This script needs access to your photos to run.</string>
	<key>NSRemindersUsageDescription</key>
	<string>This script needs access to your reminders to run.</string>
	<key>NSSiriUsageDescription</key>
	<string>This script needs access to Siri to run.</string>
步骤 3:将 .app 包移动到“应用”(Applications)文件夹
最后,将您的 .app 包移到您的 Mac 上的 Applications 文件夹中。然后双击它,这将向操作系统注册您的协议。
数据流如下:在 ShotGrid 中单击 AMI 后,或单击以 shotgrid:// 开头的 URL 后,.app 包将响应它,并将 URL 传递到您的 Python 脚本。此时,可以使用在 Windows 示例中所用的同一脚本,且所有相同的可能情况均适用。
提示 : 有关 Monterey 疑难解答的其他信息,请访问此社区帖子。
在 Linux 上注册协议
使用以下代码:
gconftool-2 -t string -s /desktop/gnome/url-handlers/foo/command 'foo "%s"'
gconftool-2 -s /desktop/gnome/url-handlers/foo/needs_terminal false -t bool
gconftool-2 -s /desktop/gnome/url-handlers/foo/enabled true -t bool
然后将您本地 GConf 文件中的设置用于以下文件中的全局默认设置:
/etc/gconf/gconf.xml.defaults/%gconf-tree.xml
尽管仅在 GNOME 设置中进行更改,但对 KDE 也有效。Firefox 和 GNU IceCat 在遇到无法识别的前缀(例如 foo://)时会采用 gnome-open,无论运行的窗口管理器是什么。因此,在这种情况下,其他浏览器(例如 KDE 中的 Konqueror)无法运行。
有关如何在 Ubuntu 中为动作菜单项设置协议处理程序的详细信息,请参见 https://askubuntu.com/questions/527166/how-to-set-subl-protocol-handler-with-unity。